
User`s guide

Scanning from TWAIN DocuMate 700
66 User’s Guide
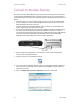
Connect to Another Scanner
You can link with other Xerox desktop scanners to add the functionality of the second scanner
to the DocuMate 700 TWAIN interface. You select the scanner to connect to from the Device
Configuration Properties window. This window also shows the hardware information about your
scanner.
1. Install the driver for the Xerox desktop scanner you want to connect the DocuMate 700
with. For example, if you have a Xerox DocuMate 262i, install the driver for that scanner
before proceeding with these instructions.
For a list of scanners the DocuMate 700 will connect to, please visit the DocuMate 700
product support page at www.xeroxscanners.com.
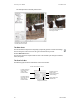
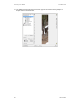
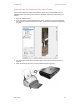
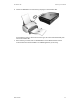
2. At the end of the DocuMate 262i scanner driver installation, you will be prompted to plug
the scanner into the computer and a wall outlet. Follow the instructions on screen for
connecting the power supply to the scanner and to a wall outlet, but use the diagram below
as a guide to connect the USB cable for the DocuMate 262i to the DocuMate 700.
Make sure the DocuMate 700 power is turned on before proceeding.
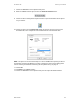
3. Open a TWAIN scanning application. The instructions in this section briefly describe
scanning from the PaperPort software.
4. Click on the scan icon on the PaperPort tool bar.
5. If this is the first time PaperPort has been opened, you will automatically be prompted to
select a scanner. If this prompt does not open, click on the Select… button to open the
select scanner window.
6. Select the TWAIN: Xerox DocuMate 700 Combo scanner then click on OK.