00-SFXM750.
00-SFXM750.
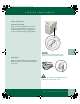
00-SFXM750.book Page iii Friday, August 18, 2000 1:30 PM Table of Contents QUICK REFERENC E GUI D E 1. BASIC INFORMATION Basic Information Printer Components and Parts Printer Components Connections Control Panel Printer Components Paper Thickness Dial Print Heads Printer Components 1-1 1-1 1-2 1-2 1-2 1-3 1-3 1-3 1-4 2.
00-SFXM750.book Page iv Friday, August 18, 2000 1:30 PM Printing Several Envelopes Printing Iron-On Printing Labels Printing Photographs Printing Transparencies 2-6 2-7 2-8 2-9 2-10 3. MAINTENANCE Maintaining Your Printer Changing an Ink Cartridge Cleaning and Aligning the Print Head Cleaning the Print Head Changing the Print Head Printing a Test Print 3-1 3-2 3-5 3-5 3-6 3-6 4.
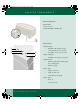
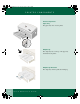
00-SFXM750.book Page 1 Friday, August 18, 2000 1:30 PM BASIC INFORMATION Chapter One 1 Basic Information BASIC INFORMATION 1 To find more complete information about your printer, refer to the Online User Guide. To access the Online User Guide, select Start>Programs>Xerox DocuPrint M750/ M760>User Guide. Printer Components and Parts 1. AC power cord 2. CD, Getting Started Guide, Quick Reference Guide, a Warranty Card (in most countries). 3. M750/M760 color printer 4. Output tray 5. Paper tray 6.
00-SFXM750.book Page 2 Friday, August 18, 2000 1:30 PM PRINTER COMPONENTS Printer Components Connections 1. AC power cord 2. USB cable -OR- 3. Parallel cable 2 3 1 Control Panel 1. Ink status light: 1 2 3 4 5 • Fast blink - Ink cartridge missing, wrong ink cartridge, or out of ink • Slow blink - Cover open or low ink 2. Paper status light: • Fast blink - Out of paper or paper jam 3. Resume button: • Resumes printing after clearing a paper jam or loading paper • Prints a test page 4.
00-SFXM750.book Page 3 Friday, August 18, 2000 1:30 PM PRINTER COMPONENTS Printer Components Paper Thickness Dial The paper thickness dial allows you to choose envelope or paper printing. An envelope icon shows the setting for envelope printing and a paper icon shows the setting for paper printing. 1 Note: Always keep the dial in the paper position, except when printing envelopes. Print Heads This edge of the print head can be easily damaged.
00-SFXM750.book Page 4 Friday, August 18, 2000 1:30 PM PRINTER COMPONENTS Printer Components Paper Tray The paper tray lowers onto the printer. D o c u P r i n t M 7 5 0 o c u P r i n t Output Tray The output tray rests on the top of the paper tray and slides into the printer. M 7 5 0 Output Tray Extension The output tray extension pulls out and flips up. D 1.
00-SFXM750.book Page 5 Friday, August 18, 2000 1:30 PM PRINTER COMPONENTS Bypass Tray The bypass tray feeds one sheet at a time. The bypass tray is used for banner paper, envelopes, and heavy weight media. The bypass tray is located on the back of the printer. To use the bypass tray, flip it down. 1 Rear Access Door 1. The rear access door is located on the back of the printer underneath the bypass tray. The bypass door must be closed before you can open the rear access door.
00-SFXM750.book Page 6 Friday, August 18, 2000 1:30 PM PRINTER COMPONENTS 1.
HOW TO PRINT Chapter Two 233 HOW TO PRINT How to Print This chapter contains the following information: • How to print • Printing banners • Printing cards • Printing envelopes • Printing iron-on • Printing labels • Printing photographs • Printing transparencies 2 Quick Reference Guide 2.
HOW TO PRINT How to Print Tip: The eXpress mode is specially designed to print good quality significantly faster than the normal mode. To take advantage of eXpress mode printing we suggest you set the printer default for print quality to the eXpress mode. This way it will always be available when you print. Simply do the following: For Windows 95/98 1. Select Start>Settings>Printers. 2. Click on DocuPrint M750 or DocuPrint M760. 1 Open the document you want to print and select File: Print.
PRINTING BANNERS Printing Banners For printing banners we recommend you use 20 lb. or 70 gm2 paper. You can feed up to five sheets of banner paper through the bypass tray. After you open your document and select File: Print, click on the Properties button, then the Paper/Output tab, then select Banner in the Paper size listbox. In the paper source list box select bypass tray. 1 Tear off the number of sheets you will need to print your banner (5 maximum).
PRINTING CARDS Printing Cards You can use your printer to print index cards, postcards, and birthday cards. Choose any card size in the Paper size selection menu or use the Custom selection to print on other card sizes not found in the selection menu. 2.4 Quick Reference Guide 1 After you open your document and select File: Print, click on the Properties button, then the Paper/Output tab, then select the desired size in the Paper size listbox.
PRINTING ENVELOPES Printing Envelopes There are two methods you can use for printing envelopes: • For printing a single envelope use the bypass tray on the back of the printer. For printing several envelopes use the regular paper tray. Printing A Single Envelope On the right side of the printer turn the paper thickness dial to envelope. Open your document and select File: Print, click on the Properties button, then Paper/Output tab, then select the envelope size in the Paper size listbox.
PRINTING SEVERAL ENVELOPES Printing Several Envelopes Note: When envelopes are completed: Remember to change the Paper/Output properties back before printing any documents. Turn the paper thickness guide back to paper/normal. Replace the envelopes with paper. M Quick On the right side of the printer turn the paper thickness dial to envelope.
PRINTING IRON-ON Printing Iron-On You can use the Iron-Transfer feature to put an image on to shirts or other cloth material. All you need is iron-on transfer paper, which you can buy at most computer or office supply stores. After you open the document you want to transfer to the shirt, select File: Print. 1 Click on the Properties button, then the Paper/ Output tab, then select Iron-on transfer in the Paper type listbox.
PRINTING LABELS Printing Labels Tip: First print the image on plain paper. Place the print on top of a sheet of labels and hold up to the light. You should be able to check that the print is properly aligned on the labels. If not, make the proper adjustments in your application. o M 2.8 Quick c u P r i n t 7 5 0 Reference Guide You can use your M750/M760 printer to print sheets of labels. Use only US letter or A4-sized labels.
PRINTING PHOTOGRAPHS Printing Photographs Note: If printing multiple copies, remove each sheet promptly and allow it to dry before handling. For best results use Xerox photo gloss paper. After you open your document and select File: Print, click on the Properties button, then the Paper/Output tab, then click on the Paper/ Output tab, and select Photo quality glossy paper in the Paper type listbox. The print quality automatically changes to Best.
PRINTING TRANSPARENCIES Printing Transparencies For best results use a Xerox ink jet transparency or a transparency specifically designed for ink jet printers. Do not use transparencies designed for laser printers. Using these will cause the ink to smear. Note: Make sure you place transparencies roughside down in the tray. Also, remember that transparencies take longer to dry than plain paper. Allow for longer drying time before handling. o M 2.
00-SFXM750.book Page 1 Friday, August 18, 2000 1:30 PM MAINTAINING YOUR PRINTER Chapter Three 3 MAINTENANCE Maintaining Your Printer This chapter contains the following information: • Changing an ink cartridge • Cleaning and aligning the print head • Changing the print head 3 Quick Reference Guide 3.
00-SFXM750.book Page 2 Friday, August 18, 2000 1:30 PM CHANGING AN INK CARTRIDGE Changing an Ink Cartridge You can change an ink cartridge using the Maintenance tab in the Status window: 2 2 3.2 Quick 1 Open the Maintenance tab by selecting: Start >Settings > Printers. Select the DocuPrint M750/M760 icon. 2 Select Printer > Properties. Select the Paper/ Output tab and click on the Status button, then select the Maintenance tab. 3 Click the Change button.
00-SFXM750.book Page 3 Friday, August 18, 2000 1:30 PM CHANGING AN INK CARTRIDGE Remove the new ink cartridge from its package. Slowly remove the protective strip from the cartridge in the direction of the arrow. 5 Caution: Do not touch the uncovered opening in the ink cartridge, as ink will get on your hands. 3 Quick Reference Guide 3.
00-SFXM750.book Page 4 Friday, August 18, 2000 1:30 PM CHANGING AN INK CARTRIDGE 6 Insert the ink cartridge into the correct location on the color print head. The ink cartridges and corresponding locations are color-coded and numbered. 7 Snap the ink cartridge into position. 8 Close the printer cover and select Finish. Caution: Do not force the ink cartridge into the print head. 3 4 3.
00-SFXM750.book Page 5 Friday, August 18, 2000 1:30 PM CLEANING AND ALIGNING THE PRINT HEAD Cleaning and Aligning the Print Head Cleaning the Print Head The clean function is used to restore the print head when the nozzles become dirty or clogged with dried ink. Open the Maintenance tab by selecting: Start >Settings > Printers. Select the DocuPrint M750/M760 icon. 1 Select Printer > Properties. Select the Paper/ Output tab and click on the Status button, then select the Maintenance tab.
00-SFXM750.book Page 6 Friday, August 18, 2000 1:30 PM CHANGING THE PRINT HEAD Changing the Print Head 1 Open the Maintenance tab by selecting: Start >Settings > Printers. Select the DocuPrint M750/M760 icon. 2 Select Printer > Properties. Select the Paper/ Output tab and click on the Status button, then select the Maintenance tab. 3 Select Change… to display the Change window and follow the instructions that display.
00-SFXM750.book Page 1 Friday, August 18, 2000 1:30 PM TROUBLESHOOTING Chapter Four 4 TROUBLESHOOTING Troubleshooting This chapter contains the following information: • Error indicators • Paper feeding problems • Print quality problems • Printer problems 4 Quick Reference Guide 4.
00-SFXM750.book Page 2 Friday, August 18, 2000 1:30 PM ERROR INDICATORS Error Indicators Symptom DiagnosDiaDiagnosis and/or Solutiongnosis and ors All lights blinking • The print carriage isn't centering properly. To clear a carriage position error: 1. Open the printer cover and clear any obstructions. 2. Make sure the color ink cartridges are seated properly by pressing the end of each cartridge to snap it into position. 3. If the error still continues, call the Xerox Customer Support Center. 4.
00-SFXM750.book Page 3 Friday, August 18, 2000 1:30 PM ERROR INDICATORS Error Indicators Symptom DiagnosDiaDiagnosis and/or Solutiongnosis and ors Red ink light is blinking fast • The printer is out of ink. Change the ink cartridge. • There are no ink tank(s) installed. Install an ink cartridge. • There are no print head(s) installed. Install a new print head. • A different ink brand is being used. Get Xerox brand ink cartridges and change the ink cartridges.
00-SFXM750.book Page 4 Friday, August 18, 2000 1:30 PM PAPER FEEDING PROBLEMS Paper Feeding Problems Symptom DiagnosDiaDiagnosis and/or Solutiongnosis and ors Paper sticks together • Make sure there isn't too much paper in the tray. Depending on the thickness of your paper, the paper tray can hold up to 150 sheets of paper. • Make sure you are using the correct type of paper. Remove paper from the feeder and flex or fan the paper. • Humid conditions may cause some paper to stick together.
00-SFXM750.book Page 5 Friday, August 18, 2000 1:30 PM PRINT QUALITY PROBLEMS Print Quality Problems Symptom DiagnosDiaDiagnosis and/or Solutiongnosis and ors Printed document is blank • Print a test print by pressing and holding the Resume button for more than two seconds. If the test print is good check the printer cable or the PC. • If the test print is blank try cleaning the print heads up to 3 times using the Clean function found in the Maintenance tab of the printer driver.
00-SFXM750.book Page 6 Friday, August 18, 2000 1:30 PM PRINT QUALITY PROBLEMS Print Quality Problems Symptom DiagnosDiaDiagnosis and/or Solutiongnosis and ors Envelope printing smudges or streaks • Make sure the Paper Thickness dial on the right side of the printer is in the envelope position.
00-SFXM750.book Page 7 Friday, August 18, 2000 1:30 PM PRINT QUALITY PROBLEMS Print Quality Problems Symptom DiagnosDiaDiagnosis and/or Solutiongnosis and ors Color print quality is poor • Try using a different kind of paper. • Make sure that the Paper Type setting in the Page/Output tab is correct for the type of paper loaded. • Change the Print Quality setting in the Paper/Output tab to Normal or Best.
00-SFXM750.book Page 8 Friday, August 18, 2000 1:30 PM PRINT QUALITY PROBLEMS Print Quality Problems Symptom DiagnosDiaDiagnosis and/or Solutiongnosis and ors When making multiple prints from the bypass tray, prints have fine white lines • Try changing the paper source from bypass to Tray 1. You can still feed paper through the bypass tray. The system automatically feeds from the bypass tray when paper is inserted into the by-pass slot.
00-SFXM750.book Page 9 Friday, August 18, 2000 1:30 PM PRINTER PROBLEMS Printer Problems Symptom DiagnosDiaDiagnosis and/or Solutiongnosis and ors Printer does not print • A paper jam has occurred. If this is the case, the paper light will be blinking. • Print a test print by pressing and holding the Resume button for more than two seconds. If the test print is good, the problem is most likely not with the printer. • The USB or parallel cable is not connected properly.
00-SFXM750.book Page 10 Friday, August 18, 2000 1:30 PM PRINTER PROBLEMS Printer Problems Symptom DiagnosDiaDiagnosis and/or Solutiongnosis and ors Paper feed problems • Out of paper. Add paper. • When the red Resume light is blinking fast, it may indicate a paper jam. Clear the paper jam and press the Resume button on the front of the printer. • Remove all paper from the paper tray, fan the paper and reinstall it in the paper tray. Press and release the Resume button to continue the print job.
00-SFXM750.book Page 11 Friday, August 18, 2000 1:30 PM PRINTER PROBLEMS Printer Problems Symptom DiagnosDiaDiagnosis and/or Solutiongnosis and ors Printed document is blank • Print a test print by pressing and holding the Resume button for more than two seconds. If the test print is good check the printer cable or the PC. • If the test print is blank try cleaning the print heads up to 3 times using the Clean function found in the Maintenance tab of the printer driver.
00-SFXM750.book Page 12 Friday, August 18, 2000 1:30 PM PRINTER PROBLEMS Printer Problems Symptom DiagnosDiaDiagnosis and/or Solutiongnosis and ors Printer prints extra characters, wrong data, or prints incorrect characters • The printer cable may be connected improperly. Check the cable connection. • There may be a problem with the printer driver software. Exit Windows and reboot the computer. Turn printer off and on to purge old data from printer buffer. • The printer cable may be incorrect.
00-SFXM750.book Page 13 Friday, August 18, 2000 1:30 PM PRINTER PROBLEMS Printer Problems 4.13 Symptom DiagnosDiaDiagnosis and/or Solutiongnosis and ors Printer prints very slowly • You may be using Best mode print quality. Change the Print Quality setting in the print driver to Normal or eXpress. • Close all applications not needed to print the job. • If you are using Windows 95/98/NT 4.0, the Spooling Setting may be set incorrectly. Select: Start > Settings > Printers.
00-SFXM750.book Page 14 Friday, August 18, 2000 1:30 PM PRINTER PROBLEMS 4 Quick Reference Guide 4.
00-SFXM750.book Page 1 Friday, August 18, 2000 1:30 PM SERVICE AND SUPPORT Chapter Five 5 Service and Support SERVICE AND SUPPORT If you are unable to solve a problem using this guide or the printer driver Online Guide, do one of the following: • Browse to: http:/WWW.XEROX.COM • In the U.S. and Canada Call the Xerox Customer Support Center at: 1-800-TEAM XRX (1-800-832-6979) If possible, call from a telephone near your PC and the printer. Make sure that both your PC and your printer are turned on.
00-SFXM750.book Page 2 Friday, August 18, 2000 1:30 PM ORDERING SUPPLIES Before calling, have the following information ready: • M750/M760 serial number, which is located on the back of the printer. • Your operating system version (Windows 95/98, NT 4.0, 2000) • Amount of memory in your PC. • Information about the problem, including description of the problem, any error messages and any steps you have taken to solve the problem.
00-SFXM750.book Page 1 Friday, August 18, 2000 1:30 PM INDEX Index QUICK REFERENCE GUIDE A Alignment, Print Head ........................... 3-5 B Banners, Printing ................................... 2-3 Bypass Tray ........................................... 1-5 C Cards, Printing ....................................... 2-4 Changing Ink Cartridge ................................... 3-2 Print Head ....................................... 3-6 Cleaning, Print head ...............................
00-SFXM750.book Page 2 Friday, August 18, 2000 1:30 PM INDEX E Envelopes Printing Several ...............................2-6 Printing Single .................................2-5 Error Indicators, Diagnosis &/or Solution 4-2 I Ink Cartridge Changing .........................................3-2 Re-Order Numbers ..........................5-2 Iron-On, Printing ....................................2-7 L Labels, Printing ......................................2-8 O Online UserGuide, Accessing ................