® Print and Fax Drivers Guide For Windows Release 5.
8 March 2004 Copyright © 2004 by Xerox Corporation. All rights reserved. Printed in the United States of America. XEROX®, The Document Company®, the digital X®, CentreWare®, and the identifying product names and numbers herein are trademarks of XEROX CORPORATION. Other product names and images used in this guide may be trademarks or registered trademarks of their respective companies and are hereby acknowledged.
Table of Contents Chapter 1 CentreWare Print and Fax Drivers for Microsoft Windows . . . . . . . . . . . . . . . . . . . . . . . . . 1-1 What’s Included in this Release? . . . . . . . . . . . . . . . . . . . . . . . . . . . . . 1-2 Print and Fax Driver Overview . . . . . . . . . . . . . . . . . . . . . . . . . . . . . . . 1-3 CentreWare Printer Drivers . . . . . . . . . . . . . . . . . . . . . . . . . . . . . . . . . . 1-4 Types of Printer Drivers . . . . . . . . . . . . . . . . . . . . . . . . . . . . .
Chapter 2 Installing Windows Printer Drivers . . . . . . . . . . . . 2-1 Requirements . . . . . . . . . . . . . . . . . . . . . . . . . . . . . . . . . . . . . . . . . . . . . 2-2 Printer Drivers . . . . . . . . . . . . . . . . . . . . . . . . . . . . . . . . . . . . . . . . . . . . . 2-2 Xerox Windows Driver Installer . . . . . . . . . . . . . . . . . . . . . . . . . . . . . . . 2-2 Network Print Configurations . . . . . . . . . . . . . . . . . . . . . . . . . . . . . . . .
1 CentreWare Print and Fax Drivers for Microsoft Windows CentreWare is software that brings the power of your Xerox systems to your desktop. CentreWare provides you with total access, viewing, and control of any Xerox system from any connected desktop. CentreWare’s interactive drivers make printing and faxing from the desktop simple to perform and easy to understand.
What’s Included in this Release? The CentreWare release of the DocuTech printer drivers supports the following features and hardware: 1-2 Xerox DocuTech 100/120 C/P Xerox DocuTech 100/120 Production Systems (Pro) Graphically enhanced PostScript and PCL printer drivers. You can select paper/output options, image options, layout and watermark options, cover options, inserts, and exception pages all within the printer driver. Xerox Printer Driver Installer.
Print and Fax Driver Overview A print and fax driver makes documents created with specialized software applications (word processing, spreadsheets, graphics) compatible with a specific printer. Each type of printer requires unique commands to print correctly and to enable special features. For these reasons, different types of printers require their own printer drivers to operate correctly. With CentreWare printer drivers, you can print from your workstation to a Xerox system in a network environment.
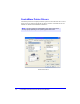
CentreWare Printer Drivers CentreWare printer drivers display the feature options on tabs within the driver. These printer drivers are designed specifically for Xerox products. CentreWare drivers are available for Windows NT/2000/XP workstations. NOTE: The driver graphic is representative. Driver options and mimics will vary slightly depending on the operating system and model. .
Types of Printer Drivers The CentreWare printer drivers are available in PostScript 3, PCL 5e, and PCL 6 (XL) printing formats. NOTE: A PCL 6 driver for Windows NT is not available with this CentreWare release. PostScript PostScript gives you greater ability to scale and manipulate images; it offers more precision with high-end graphics. PostScript also provides you with different types of error-handling and font substitution options.
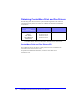
Obtaining CentreWare Print and Fax Drivers The following table shows the Xerox system models supported in this release of CentreWare and the printer drivers that are available for Windows NT/2000/XP environments.
Downloading from the Web Xerox system printer drivers can be downloaded from the Xerox Web site at www.xerox.com. The installation files for all Xerox system models are available from the Web site. To download printer drivers: 1 Access the Xerox Web site and click Support & Drivers at the top of the page. 2 Enter your Xerox product family in the Search text box and click Search. 3 From the list of Drivers and Downloads, find your Xerox system and click Drivers & Downloads.
CentreWare Printer Driver Applications The following applications are included on the CentreWare Print and Fax Drivers CD: Xerox Printer Configuration Utility Xerox Printer Installation Utility Xerox Printer Configuration Utility The Xerox Printer Configuration Utility is for System Administrators who would like to set up standardized configuration files to enable users to install their printer drivers quickly and easily.
Print and Fax Driver Documentation CentreWare Print and Fax Drivers Guide for Windows This guide is intended for administrators who install and configure CentreWare printer drivers and for users who want to know more information about printer drivers and their installation. The CentreWare Print and Fax Drivers Guide is available on the CentreWare Print and Fax Drivers CD in electronic (PDF) format. If selected at the time of installation, the Drivers Guide is placed on the user’s workstation at ...
Telephone Support For additional assistance, you may contact the Xerox Welcome Center by telephone to speak with a Product Support Analyst. Locate your Xerox system serial number on the metal frame behind the front door, and record it in the space below before you make your call. Xerox System Serial Number: The Xerox Welcome Center telephone numbers are listed in the following table.
2 Installing Windows Printer Drivers The CentreWare printer drivers support the special features and functions of Xerox systems, enabling fast, efficient printing from your desktop. Installation instructions for all current Windows environments are provided in this chapter. What’s in this chapter: Requirements . . . . . . . . . . . . . . . . . . . . . . . . . . . . . . . . . . . . . . . . . . . . . . . 2-2 Direct Installation . . . . . . . . . . . . . . . . . . . . . . . . . . . . . . . . . . . . .
Requirements Printer Drivers The minimum hardware requirements for the CentreWare printer drivers vary based on the specific printer driver you are installing. At the most, you will need 14 MB of available hard disk space for any of the CentreWare Windows printer drivers. Internet Explorer 5.01 or higher installed on the workstation for NT, 2000, and XP drivers using Enhanced view.
Network Print Configurations Peer To Peer In a Peer To Peer environment, a printer driver is installed on a workstation that is connected to a printer. The printer driver resides only on the workstation. In this setup, workstation users maintain their own printer defaults and configurations, allowing different printer settings for each user.
Installing Printer Drivers on Windows Networks You have three ways to install a Xerox printer driver and other components in Windows environments. Direct Installation Use the Xerox Printer Installation Utility to install Xerox printer drivers quickly and easily for your network printers.
Direct Installation With the Xerox Printer Installation Utility, you can configure and install printer drivers with a Peer To Peer connection or through a network print server connection. You need administrator rights to run the Xerox Printer Installation Utility. To install drivers onto a network server you must run the Xerox Printer Installation Utility at the network server. You cannot install the drivers remotely.
5 On the Configuration tab, select a language for your printer driver. Figure 2-1: Xerox Printer Installation Utility, Configuration Tab 2-6 6 Select a printer model. 7 Choose one or more drivers. The printer and driver selections appear in the Configuration Information box.
8 Select Install Documentation to place the CentreWare Print and Fax Drivers Guide on your workstation. The document is placed at ...\Program Files\Xerox\. 9 Select a printer from the Information box. Or, select more than one printer of the same model if you want to install a PS and PCL driver for this printer. 10 Click Connection.... The Connection dialog opens. Figure 2-2: Connection Dialog. Peer To Peer Connection is selected. 11 Select Peer to Peer.
Direct Installation Through a Network Printer Server Connection To configure and install printer drivers through a network print server connection: 1 Insert the CentreWare Print and Fax Drivers CD into the CD-ROM drive. The AutoRun program displays the available selections. –or– 2 If the AutoRun is disabled on your workstation, open My Computer and doubleclick the CD-ROM drive. Double-click the Setup.exe file. The AutoRun program displays the available selections. 3 Chose a language and click OK.
7 Select a printer model. 8 Choose one or more drivers. The printer and driver selections appear in the Configuration Information box. 9 Select Install Documentation to place the CentreWare Print and Fax Drivers Guide on your workstation. The document is placed at ...\Program Files\Xerox\. 10 Select a printer in the Information box. NOTE: You may configure only one printer and driver at a time, for example DocuTech 120 C/P PostScript.
12 Select Through Network Printer Server. 13 Enter your network printer path or click Browse to browse to a shared printer. Click OK. The network path to the printer is added to the Connection column of the Configuration Information box and the printer is configured through the network print server. NOTE: After the printer has been configured with a connection type, the printer’s check box in the Configuration Information box is unchecked.
Distributed Installation The Distributed Installation procedures are for system administrators who would like to set up standardized configuration files for users to install their printer drivers.
Copying Files to the Network To configure the installation packet that you send to users to install printer drivers on their PCs, the contents of the CentreWare Print and Fax Drivers CD must be saved to a location on your network. To copy printer drivers: 2-12 1 Insert the CentreWare Print and Fax Drivers CD into the CD-ROM drive. 2 Copy the contents of the CentreWare Print and Fax Drivers CD to a location on your network. 3 Make the CD root directory folder sharable on the network.
Configuring Installation Files The Xerox Printer Configuration Utility provides a simple way to set up a configuration file that you send to users as part of a packet of installation files. With the Xerox Printer Configuration Utility, you can select printer drivers for each supported printer model, set up a network connection for a printer, choose whether to replace drivers, and whether to make this printer the default printer.
Setting Up Connection Types With the Xerox Printer Configuration Utility, you have the option to set up configuration files for multiple printers, which may have different connection types. For example, one printer may have a Peer To Peer connection and another printer may have a connection through a network printer server. The following configuration procedures describe first the procedures for a Peer To Peer connection and then for a Network Printer Server connection.
5 On the Configuration tab, select one or more languages in which to configure a driver. Figure 2-6: Xerox Printer Configuration Utility, Configuration Tab 6 Select a printer model. 7 Choose a driver. The printer model and driver information appear in the Configuration Information box. You may choose other drivers for this printer and also select other printers and drivers at this time to add to the Configuration Information box.
8 9 Select from these options: Silent Installation—Simplifies installation for the user. After the user opens the zip file you send containing the configuration and installation files and clicks the Install.exe file, the printer drivers are automatically installed on the user’s workstation. Install Documentation—Places the CentreWare Print and Fax Drivers Guide on your workstation. The document is placed at ...\Program Files\Xerox\. Select a printer from the Information box.
Peer to Peer a) Select Peer To Peer b) Enter the IP Address of your Xerox system and click OK. The printer is configured with a Peer to Peer connection and the printer’s IP address is added to the Connection column of the Configuration Information box. NOTE: After the printer has been configured with a connection type, the printer's check box in the Configuration Information box is unchecked. You may select another printer to configure.
11 Make your Replace Driver and Default Printer selections. Click the cell to toggle between options. 12 Click Browse to open a Browse for Folder dialog and browse to the location of the printer driver files on the network. 13 Click OK to add the location of the printer driver files to the configuration file. 14 Click Save when you are ready to save the configuration file. A Save As dialog opens.
Distributing Installation Files When you have set up and saved your configuration file(s) to the Packet folder, you are ready to distribute printer driver installation packet to users. You may want to send one of the following notes depending on whether it will be a Silent Installation or User Installation. Silent Installation - Note to User I have attached a zip file that enables you to install printer drivers. 1 Save the file to a temporary folder or to a folder on the desktop. 2 Unzip the file.
Installing Printer Drivers on a PC After you have received the printer driver installation zip file from your system administrator, there are two ways to install printer drivers on your PC: Silent Installation User Installation Silent Installation Your system administrator sends you a zip file containing the installation files to automatically install your printer drivers. To install printer drivers automatically: 1 Save the file to a temporary folder or to a folder on the desktop.
Managing Configuration Files for Multiple User Groups To manage configuration files for different groups of users that use separate printers, you can create separate configuration files for each group. To manage configuration files for multiple user groups: 1 Follow the procedures to set up a configuration file for users. See Configuring Installation Files on page 2-13. 2 Save the file for a group of users to a specific folder for that group.
Supported Driver Languages You may configure the printer driver in several languages at the same time. Choose the Select Drivers Language button on the Configuration tab. A list of supported languages opens. Make your language selections. When you save your settings on the Configuration tab, you will have a configuration file, XeroxPrintersToInstall[Language].xml, for each chosen language. For example, XeroxPrintersToInstallFRA.
Point and Print Installations This procedure assumes that a Xerox system on a network server has been installed with the appropriate CentreWare printer driver prior to performing Point and Print. If you would like to standardize the device settings and document settings for the NT/ 2000/XP printer drivers, see Preconfiguring Default Driver Settings on page 2-24 before installation.
Installing Printer Drivers on Other Networks The Xerox Installer supports Windows networks. To install drivers on other networks use Microsoft’s Add Printer Wizard. Configuring Printer Drivers To use the Xerox system printer drivers most effectively, you will need to configure the drivers to reflect options available on your Xerox system.
To modify the driver default settings: 1 At a workstation, insert the CentreWare Print and Fax Drivers CD into the CD-ROM drive. The AutoRun program displays the available selections. –or– If the AutoRun is disabled on your workstation, open My Computer and doubleclick the CD-ROM drive. Double-click the Setup.exe file. The AutoRun program displays the available selections. 2 Chose a language and click OK. 3 Select Browse CD and browse to the printer driver files for your Xerox system.
10 Expand the Override/Restore Defaults option on the Device Settings tab. 11 Select Save Current Settings as Default. A Save button appears. 12 Click Save. The configuration and device settings are saved as the default settings. 13 If you want to modify the default document settings, continue with the following steps. Otherwise, close the Properties dialog and continue with step 14. a) Do one of the following: For 2000/XP drivers, select the General tab and click Printing Preferences.
Configuring Installable Options at the Workstation You may want to configure installable options at a user workstation. NOTE: You may need Administrator rights on the workstation to perform these steps. To configure the Installable Options at the workstation: 1 At the desktop, click Start > Settings > Printers or Start > Printers and Faxes. 2 Right-click the appropriate printer icon and select Properties. 3 Select the Configuration (System Configuration) tab.
4 Click Installable Options and select the options that are available on your Xerox system. Figure 2-9: Installable Options Dialog 2-28 5 Click OK to save the settings and OK to close the Properties dialog. 6 Click OK to close the printer driver.
Locating Installation Files on the CD The installation .inf files for Windows Postscript (PS) and PCL printer drivers are located in the Drivers folder of the CentreWare Print and Fax Drivers CD. If you want to browse to, or access these files, locate the Drivers folder and open the Windows folder, as well as the folder for your particular Xerox system model, for example, DT120.
Uninstalling Windows Printer Drivers NOTE: Before you uninstall CentreWare Windows printer drivers, ensure that the Xerox system you are deleting is not the default printer. If so, select another printer as the default. For Windows NT To uninstall the Windows NT printer drivers: 1 At the desktop, click Start > Settings > Printers. 2 Right-click on the icon for the Xerox system you want to delete and select Delete. 3 A confirmation message appears. Click Yes to delete the printer driver.
3 Getting the Most From Your Printer Driver With the CentreWare printer drivers, you have an invaluable tool to save you time and increase your productivity. These drivers offer you over thirty-five feature options, depending on the type of driver and the installable finisher options, for you to choose how your document will look and print. The Help system is the primary source for information about using the printer drivers.
Driver Structure The driver arranges the features on six tabs: Paper/Output, Special Pages, Image Options, Layout/Watermark, Advanced, and Job Notes. Figure 3-1: Printer Driver Interface The features on the tabs are organized for your convenience with the most frequently used features available to you when you open the driver. Small icons are placed next to the features so that you can quickly find the features you want.
Tabs Features vary on the driver tabs depending on the driver type and installable options. General Tabs These driver tabs are accessed through your application’s print dialog. Driver setting changes on these tabs apply to the open document and application, and are temporary. The Paper/Output tab has the most frequently used features. For example, you can choose to print on two sides of the paper, select specific media on which to print, or hold your print job.
Default Tabs These driver tabs are accessed through the Printers folder and may be available only with administrative rights. From the desktop select Start > Settings > Printers and Faxes. Right-click on your printer icon and select Properties. The Device Settings tab on the Properties dialog contains features that relate to font settings and PostScript settings.
Driver Help System The Help system is the primary source for information about using the printer drivers. Each driver tab has a Help button for easy access to the Help system. Through this Help button you can call up information on any feature on that tab or any other tab. Among the useful items in the Help system is a menu of How To... procedures for each feature, for example, How To Print Booklets.
3-6 Getting the Most From Your Printer Driver
4 Problem Solving Application, device, and network errors can occur in a variety of printing situations. In many cases, simply restarting the application, the workstation, or the printer will resolve the problem. This chapter includes tips for troubleshooting a problem. What’s in this chapter: Troubleshooting a Problem . . . . . . . . . . . . . . . . . . . . . . . . . . . . . . . . . . . .
Troubleshooting a Problem When a problem persists, document the error messages and gather information to define the problem. The following problem-solving procedures are recommended: Accurately define the problem. When, where, and how does the problem occur? Reproduce the problem. Can the problem be reproduced consistently or is it an intermittent problem? Ask other users if they have encountered the problem, and keep a log to track problem occurrences.
Index A Adobe Acrobat Reader 1-9 Applications 1-8 C CentreWare print and fax drivers Applications 1-8 Configuring Installable Options Manually 2-24 Configuring Installation Files 2-13 Configuring printer drivers 2-24 Copying Files to the Network 2-12 D Direct Installation Client/Server Connection 2-8 Peer to Peer Connection 2-5 Distributed Installation Configuration File 2-14 Configuring Installation Files 2-13 Copying Files to the Network 2-12 Distributing Installation Files 2-19 Installing Printer Driver
L Supported Driver Languages Abbrevations 2-22 Languages Supported 2-22 T Locating Installation Files on the CD 2-29 Tabs M Printer Drivers 3-3 Managing Configuration Files for Multiple Troubleshooting a problem 4-2 User Groups 2-21 U P PCL 1-5 Point and Print 2-23 PostScript 1-5 PPD Files DocuTech 1-7 Preconfigured File 2-13 Print and fax drivers Applications 1-8 Overview 1-3 Printer Drivers Configuration 2-24 Installing 2-4 Requirements 2-2 Tabs 3-3 Problem Solving 4-1 Uninstalling Windows printer driver