Fax Sharing User’s Guide February 2000
WinFax PRO Fax Sharing User’s Guide Copyright Notice © Symantec Corporation 2000 All rights reserved. The use and copying of this product is subject to a license agreement. Any other use is prohibited. No part of this publication may be reproduced, transmitted, transcribed, stored in a retrieval system or translated into any language in any form by any means without the prior written consent of Symantec Corporation.
C O N T E N T S About this Guide .................................................................................... 6 Using the Online Help ...................................................................................................... 6 Getting Help in a Dialog .................................................................................................. 7 Documentation Feedback .................................................................................................
Contents iv
WinFax PRO Fax Sharing If you do not have a modem installed on your computer, you can still use WinFax™ PRO to send and receive faxes. To do so, you must be attached to a network, and there must be at least one computer with a fax capable modem or similar communications device and WinFax installed. This modem sharing feature in WinFax is called Fax Sharing. If you are sending and receiving messages using a modem on another computer, your computer is a Fax Sharing Client station.
WinFax PRO Fax Sharing About this Guide While this guide contains instructions for the most basic Fax Sharing tasks, the online help covers all features. Additional information on using the Fax Sharing Host (that is, WinFax with a local modem or device) is provided in the WinFax PRO User’s Guide, available in Adobe Acrobat format on your WinFax installation CD.
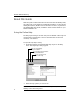
About this Guide Getting Help in a Dialog Help button in upper right corner of most WinFax dialogs and windows Many WinFax dialogs and windows contain a help button (in the upper right corner) that you can use to display information about on-screen components, such as commands and individual fields in dialogs. To view the pop-up help for an on-screen component: In a dialog, click the What’s This? button in the upper right corner, then click any screen element. A pop-up appears over the element.
WinFax PRO Fax Sharing To forward your feedback, use any of the following methods: Q Fax – Fax your comments to 1-416-441-0333 to the attention of the Technical Publications Department. Q Postal letter – Send a letter to: Symantec Corporation Technical Publications Department 895 Don Mills Road, 500-2 Park Centre Toronto, Ontario M3C 1W3 (Canada) Introducing WinFax PRO Fax Sharing WinFax turns your computer into a full-featured fax messaging communications center.
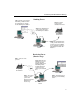
Introducing WinFax PRO Fax Sharing Sending Faxes Step 1: Prepare your fax using Fax Sharing Client, then click the Send button to send it to the Fax Sharing Host’s Outbox. Step 4: Your fax is received on the destination fax device. Step 2: Fax Sharing Client sends your fax files to the Fax Sharing Host’s Outbox. Destination Client Host with modem or device Step 3: The Fax Sharing Host sends your fax when the host modem or device is available.
WinFax PRO Fax Sharing System Requirements The Fax Sharing feature enables Fax Sharing Client stations to transfer faxes across the network to and from the Fax Sharing Host station. To use the Fax Sharing feature, you need at least one Fax Sharing Host station and one Fax Sharing Client station on your network. Multiple Client stations can connect to a single Host station at any one time (maximum 15 under Windows 95/98, maximum 25 under Windows NT/2000).
Installing WinFax for Fax Sharing (Administrators Only) Icon Program WinFax PRO Message Manager – Use WinFax PRO Message Manager to maintain a list of all WinFax messages, and to create detailed reports about fax events. Starting and Exiting WinFax Programs The Message Manager is the main interface for sending faxes, for organizing and storing messages, and for configuring your WinFax system. Program Setup is the program you use to set up Fax Sharing and modify your WinFax preferences.
WinFax PRO Fax Sharing Setting Up a Fax Sharing Host Station Your Fax Sharing network must have at least one Fax Sharing Host station. If you have a modem or communications device attached to your WinFax station, you can share your modem or device with other WinFax users on your network when you enable the Fax Sharing Host feature. To set up your WinFax station as a Fax Sharing Host, install WinFax to work with your modem or device and then enable the Fax Sharing Host feature.
Installing WinFax for Fax Sharing (Administrators Only) Enabling the Fax Sharing Host Feature To allow Fax Sharing Clients to receive voice messages and send and receive faxes using the host computer, you must first enable the Fax Sharing Host feature and then enable automatic reception. To enable the Fax Sharing Host feature: 1 If your Host computer is running under Windows 95/98, proceed to Step 2.
WinFax PRO Fax Sharing 4 Click the General tab. 5 Enable Use This WinFax PRO Station As A Fax Sharing Host. 6 If you want to protect the Fax Sharing Host station with a password, enable Use Password then type a password in the Password field. 7 In the Host Computer Information section, type the appropriate information.
Installing WinFax for Fax Sharing (Administrators Only) Start Here Copy files to network (see page 16) WinFax CD Silent response file (see page 17) Copy the silent response file (SETUP.ISS) to the shared network directory. Copy the installation files to a shared network directory. Script files (see page 18) Shared network directory Copy the script file (WFSCRIPT.SPT) to the shared network directory.
WinFax PRO Fax Sharing 4 Create an installation script file (WFSCRIPT.SPT) containing the appropriate installation options. See “Creating an Installation Script” on page 18. 5 Copy both the InstallShield silent response file (SETUP.ISS) and the installation script (WFSCRIPT.SPT) to the Disk1 subdirectory of the network directory containing the WinFax installation files. 6 Instruct users to install WinFax using the silent response file and installation script.
Installing WinFax for Fax Sharing (Administrators Only) Creating an InstallShield Silent Response File WinFax uses the InstallShield program. To perform a scripted install, InstallShield requires you to create a silent response file (SETUP.ISS). You can create a silent response file by running the Setup program with the “-r” command line parameter. This parameter instructs the Setup program to record all of your selections in a silent response file (SETUP.
WinFax PRO Fax Sharing (that is the drive and directory specification) after the equals sign in the “szDir=” line and proceed to step 10. Note: You must edit the silent response file (SETUP.ISS) before you can run a scripted installation. 10 Save the file and exit Notepad. 11 Copy the file to the Disk1 subdirectory of the network directory containing the WinFax installation files.
Installing WinFax for Fax Sharing (Administrators Only) Note: The sample script file also contains information for other modems and communications devices. Do not delete those entries. 4 Save the updated file. 5 Copy the file to the Disk1 subdirectory of the network directory containing the WinFax installation files.
WinFax PRO Fax Sharing 4 Click the Windows Start button, and then click Run. The Run dialog appears. 5 In the Open field, type ... \SETUP.EXE -s … where “network path” is the location of the WinFax installation files on the network. 6 Click OK. The Setup program installs WinFax. 7 After the install is complete, restart the computer. 8 Start Message Manager (see page 11). 9 On the Receive menu, click Automatic Receive.
Installing WinFax for Fax Sharing (Administrators Only) Result Code Meaning -10 Data type is invalid. -11 Unknown error during setup. -12 Dialogs are out of order. -51 Cannot create the specified folder. -52 Cannot access the specified folder. -53 Invalid option selected.
WinFax PRO Fax Sharing … where “drive and path” is the CD ROM drive containing the WinFax installation CD or the location of the WinFax installation files on the network. 4 Click OK. The Setup program starts. 5 Follow the instructions on the screen. Click Next to proceed. 6 When the Modems And Communications Devices panel appears, click the WinFax PRO Fax Sharing device and click Next. Note: You can also set up Fax Sharing after you install WinFax.
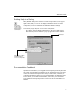
Working With Faxes 2 In the list, double click Modems And Communications Devices. The Modems And Communications Devices Properties dialog appears. 3 In the devices list, click the WinFax PRO Fax Sharing device. 4 Click Properties. The WinFax Fax Sharing Client Properties dialog appears. 5 Make any changes as desired, clicking Next to proceed. Working With Faxes This section describes how to send and receive faxes with WinFax.
WinFax PRO Fax Sharing How Faxes Are Sent After you prepare your fax and click Send, WinFax begins processing your fax. The steps involved in processing a fax may vary, depending on where the fax was created and assembled. Faxes created on the Fax Sharing Host – WinFax delivers the fax to the modem or device, displays the Status dialog, dials the recipient’s fax number, and instructs the modem or device to send your fax.
Working With Faxes Current fax transmission activity Rate of transmission Current page Collapse details display area Cancel the transmission If the faxing traffic on your computer is heavy, you can disable the Status dialog so it does not appear each time a fax is sent or received. Start Program Setup (see page 11), double click Call Status And Controller, click the General tab, and then disable Display Status Dialog.
WinFax PRO Fax Sharing Scheduled or pending – Message is scheduled, or WinFax is waiting to retry the send. Sometimes faxes are not sent successfully due to communication problems such as busy or no-answer signals. In those situations, WinFax stores the faxes in the Outbox until either they are successfully delivered or the available number of retries is exceeded. Note: If the number of retries is exceeded, WinFax places the fax in the Send Log and marks it as an “unsuccessful” event.
Working With Faxes To download received faxes from the Fax Sharing Host (Fax Sharing Client): 1 Do one of the following, depending on when you want to receive faxes: Q Receive faxes automatically – On the Receive menu in Message Manager, enable Automatic Receive. Whenever there are new faxes at the Fax Sharing Host, the WinFax Receive dialog appears on your screen and displays a list of all unread faxes in the Fax Sharing Host’s Receive Log.
WinFax PRO Fax Sharing 5 Click Receive Now. The Fax Sharing Host marks those faxes as read and transfers them across the network into your Message Manager Receive Log. Note to Fax Sharing Clients: To display the WinFax Receive dialog each time you start WinFax, enable Check For New Events On Startup in the Fax Sharing Properties dialog. Start Program Setup (see page 11), double click Modems And Communications Devices, click WinFax PRO Fax Sharing in the list, and then click Properties).
Troubleshooting groups, FAQs, the automated Symantec Support Genie, and the Symantec FTP site, connect to http://service.symantec.com. For more information, look up “support” in the online help index. Q Online forums – Provide question-and-answer support on CompuServe and America Online (AOL). Symantec Technical Support representatives monitor these forums. For more information, look up “support” in the online help index.
WinFax PRO Fax Sharing 30