W eb Tr M ai e ni n t ng o r Installation and Setup Guide Version 2.
Copyright © 1999-2000 Xerox Corporation. All Rights Reserved. Publication number: 613P08611 W eb Tr M ai e ni nt n g or Copyright protection claimed includes all forms of matters of copyrightable materials and information now allowed by statutory or judicial law or hereinafter granted, including without limitation, material generated from the software programs which are displayed on the screen such as styles, templates, icons, screen displays, looks, etc.
Contents Chapter 1 i Installing the FlowPort Server ................................. 1–1 FlowPort CD-ROM Contents................................................ 1–2 FlowPort System Requirements............................................ 1–3 Windows NT or Windows 2000 Server.......................... 1–4 Network Environment .................................................. 1–5 FlowPort Client Requirements.............................................. 1–6 Optional Components ............................
iManage ....................................................................... 1–35 To Set the iManage Environment Path........................ 1–35 Documentum ................................................................ 1–36 PaperWare forms and Documentum ........................... 1–37 Creating User Accounts..................................................... 1–38 Getting More Information ................................................. 1–39 Customer Support .......................................
Installing the FlowPort Server 1 re tpahC The purpose of this document is to provide an experienced System Administrator with the FlowPort system requirements and instructions for installing FlowPort and its suite of server-based applications. This chapter includes the following sections: FlowPort CD-ROM Contents .............................................. 1–2 FlowPort System Requirements .......................................... 1–3 FlowPort Client Requirements .......................................
FlowPort CD-ROM Contents FlowPort CD-ROM Contents The Flowport CD-ROM contains the following software and documentation: • FlowPort server software • FlowPort documentation — FlowPort Installation and Setup Guide (PDF) — FlowPort User Guide (PDF) — FlowPort Administrator Guide (PDF) • JRE 1.2.2 (Java Runtime Environment) • TextBridge Optical Character Recognition software • Adobe Acrobat Reader 4.05 Note: Textbridge OCR software is not available on the FlowPort Trial CD.
FlowPort System Requirements FlowPort System Requirements Before installing the FlowPort software, complete the installation checklist below to determine that your Xerox Document Centre ST or Internet Fax machine and Windows (NT or 2000) server meet these requirements: Xerox Document Centre ST or Internet Fax machine Scan To File option installed TCP/IP-enabled Domain Naming System (DNS) host name or static IP address assigned: Domain Naming System (DNS) host name or static IP address assign
FlowPort System Requirements Windows NT or Windows 2000 Server Microsoft Windows NT 4.
FlowPort System Requirements Use the nslookup command in Windows as follows: A Open a DOS window B At the DOS prompt, enter: nslookup DNS-hostname If the hostname that you entered is registered, you will receive a response with a Name (DNS name) plus an IP Address. This means that you can use the fully qualified hostname to access the FlowPort server in a Web browser. If the hostname is not registered, you will get a message that the server cannot find it.
FlowPort Client Requirements FlowPort Client Requirements The FlowPort server is accessed through a Web browser. It can be accessed on any platform that supports the following: Microsoft Internet Explorer 4.0, version 4.72 or later or Netscape Navigator, version 4.5.1 or later Viewer that supports multi-page TIFF email attachments, such as Imaging for Windows or Pagis 2.06 Viewer Note: A free Pagis 2.06 Viewer can be downloaded from the Scansoft web site at: http://www.scansoft.com/products.
Optional Components Optional Components Microsoft Office If you plan to print Microsoft Office documents, you need to install Microsoft Office on the FlowPort system. FlowPort supports Office 97 or greater. FlowPort Document Token and Document Catalog forms can be used to print Microsoft Word, Excel, and PowerPoint documents. Note: Installing Microsoft Office before installing FlowPort is recommended.
Performance Considerations Performance Considerations FlowPort server performance can be affected by software running on the same host system. This section provides information that maximizes FlowPort server performance. Server Ports Web Browser 1–8 You can install FlowPort and repository software on the same system; however, this will increase contention for the CPU. FlowPort operates its own Web server and therefore requires a dedicated HTTP port such as port 80 (recommended).
Installing FlowPort Installing FlowPort Before you start, make sure you have Administrator privileges for the server on which you are installing FlowPort. If you currently have FlowPort Release 1.0.x installed, backup your FlowPort directory (which includes the user data files and system files) before upgrading to the new version of FlowPort. To backup your existing FlowPort files, perform the following: 1 Stop the FlowPort service.
Installing FlowPort To install FlowPort: 1 Insert the FlowPort CD into the CD-ROM drive. 2 If the FlowPort installation program does not run automatically: A Double-click to open My Computer. B Click the CD-ROM drive. C Click setup.exe. The FlowPort Installation welcome screen displays.
Installing FlowPort 3 In the FlowPort Installation welcome screen, click Install FlowPort. The FlowPort Installation application screen displays. 4 In the FlowPort Installation application screen, install the following applications: A JRE 1.2.2 (Java Runtime Environment). Follow the onscreen instructions to complete the JRE installation. B TextBridge Optical Character Recognition software. Follow the onscreen instructions (for typical install) to complete the TextBridge installation.
Installing FlowPort 5 At the completion of the Acrobat Reader installation, click Next to proceed to the FlowPort Configuration test screen. Running the configuration tester is recommended. Note: If you are upgrading the FlowPort server, ensure that the server is stopped before running the Configuration Tester. Refer to the “Uninstalling FlowPort” section to stop the FlowPort server. 6 In the FlowPort Configuration test screen, click Run Configuration Tester.
Installing FlowPort The FlowPort Configuration Utility Welcome page displays.
Installing FlowPort 7 1–14 Click Next to continue with the test. The Test Preparation page displays.
Installing FlowPort 8 Click Next to continue with the test. The Port Conflicts Test page displays. The FPConfig Test checks for port conflicts on Ports 21, 25, and 80. Note: If port 80 is being used by the server, enter an alternate port number for the FlowPort HTTP port. 9 Enter the HTTP port number or click Next to accept the default. The Host and Domain screen displays.
Installing FlowPort adoc.xerox.com 10 1–16 Enter the hostname and domain.
Installing FlowPort 11 Click Next to continue to the SMTP server test screen. 12 Enter fully qualified name for the SMTP server.
Installing FlowPort 13 1–18 Click Next to proceed to the FPConfig Test Summary screen.
Installing FlowPort 14 Click Test to start the port configuration test. At the completion of the configuration tests, a status screen displays. Note: If a failure flag appears indicating a port conflict, click the Help button for information to resolve the port conflict. 15 Click Finish to install FlowPort. The FlowPort Run Configuration Test screen re-displays.
Installing FlowPort 16 1–20 Click Next to proceed to the Install FlowPort Server screen.
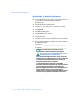
Installing FlowPort 17 In the Install FlowPort Server screen, click Install FlowPort Server. Follow the onscreen instructions to complete the FlowPort installation. Caution: Quit all Windows applications before continuing with the FlowPort installation. Failure to quit applications can delete the data files. If you are upgrading or re-installing FlowPort, you are asked whether to pack and unpack your user data files so that they can be used with the new version.
Installing FlowPort 18 In the FlowPort Setup screen, follow the onscreen instructions to verify the HTTP port number or accept the default. Note: When specifying the port number for the HTTP server, be sure the port number is not in use. The HTTP server is part of the FlowPort server; you do not need a separate Web server to run FlowPort. 19 1–22 Click Next to proceed to the License Key Information screen.
Installing FlowPort 20 The License Key Information screen provides FlowPort License Key information. 21 Click Yes to proceed to the Enter License Key screen.
Installing FlowPort 22 If available, enter the 16-character license key. If you click Next without entering the license key, FlowPort will install and operate as a trial version and expire after 60 days. Note: To obtain a license key, contact your local Xerox FlowPort representative or go to the Xerox web site at http://www.xerox.com/flowport for additional information.
Configuring FlowPort Configuring FlowPort To configure the FlowPort server once it is installed: 1 Open a Web browser, either on the same machine or on a client workstation (refer to the Performance Considerations section to set the browser priority). 2 In the Address (or Location) box, enter the server’s name. For example, for a server named “astro,” and assuming that the FlowPort server is running on port 80, you would enter: http://astro The FlowPort Welcome page displays.
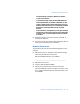
Configuring FlowPort 4 In the password box, type 22222 (the default for FlowPort administrator password). Note: Refer to the Administrator online help or Administrator Guide to change the administrator account information. 5 Click Login. The Language Pack Installation screen displays. Note: This screen displays only if this is an initial FlowPort installation. 6 1–26 Select and install your language options. Continue to the System Configuration page.
Configuring FlowPort 7 On the System Configuration page, enter the information required for your site. Note: For more information about an option, click on the option’s hyperlink to open a Help window. Click the option’s hyperlink to open a Help window. 8 Click the Apply button. 9 Click the Continue button. The Install Application Suite page lists all the available applications and services. All applications and services are checked (default) to be installed.
Configuring FlowPort 10 Click the Install Applications and Services Now button. Note: Refer to the Administrator online help or Administrator Guide to configure applications, services, or both.
Configuring FlowPort 11 On the Loading Applications and Services page, click the Continue button. Note: Depending on the size of the application and service files, this process can take several minutes. 12 On the Administrator Email Confirmation page, click the Continue button to send a confirmation of the installation to the FlowPort administrator. 13 Click Continue. 14 Click the logout link.
Xerox Document Centre Setup Xerox Document Centre Setup If you have a Xerox Document Centre, go to the Xerox web site at http://www.xerox.com/flowport to download the setup documentation for your Document Centre. Note: If you do not have a Xerox Document Centre, continue to the Internet Fax Machine Setup.
Internet Fax Machine Setup (Optional) Internet Fax Machine Setup (Optional) FlowPort is an SMTP (Simple Mail Transfer Protocol) direct mail system but can be configured to work with the POP3 (Post Office Protocol) polling mail system. To use an Internet Fax machine as an input and output device for FlowPort, you must make configuration settings if using either an SMTP server or a POP3 polling server.
Internet Fax Machine Setup (Optional) Note: If incoming faxes are sent to an address other than FlowPort@FlowPortserver-hostname.domain, you must enter this address in the Internet Fax Receive Service configuration page in order for outgoing Internet faxes to show this address.
Repository Setup Repository Setup During installation, the FlowPort server is configured to support multiple repositories (refer to Optional Components). This section provides additional configuration instructions for the following repositories. • Domino • Domino.Doc • iManage • Documentum Note: FlowPort, functioning as a client to a repository, may use a client license token allocated for clients of the repository.
Repository Setup 2 From the Lotus Notes directory, copy the NCSO.jar to the FlowPort directory C:\Xerox\FlowPort\ImportJars. Note: Lotus Notes directory— C:\Lotus\Notes\data\domino\java\NSCO.jar. If you installed Lotus Notes to a different directory, replace C:\Lotus\Notes with your Lotus directory name. Domino.Doc This repository allows users to store documents in a Lotus Domino.Doc repository on the network. Domino.Doc supports both writing and reading by FlowPort.
Repository Setup 9 10 iManage For Type of installation, select API Install. Follow the onscreen instructions to complete the installation. This repository allows users to store FlowPort documents in an iManage repository on the network. iManage supports both writing and reading by FlowPort. Users can store documents and also access (retrieve) stored documents from an iManage repository via Document Tokens and Document Catalogs.
Repository Setup 3 From the System Variables list, select the variable Path. 4 Add C:\Program Files\iManage to the end of the Path value. Note: If you installed iManage to a different directory, replace C:\Program Files\iManage with your iManage directory name. Documentum This repository allows users to store documents in a Documentum repository on the network. Documentum supports both writing and reading by FlowPort.
Repository Setup 4 When prompted for the Doc Broker configuration, enter the machine hostname (DNS) for the server running the Documentum Doc Broker. 5 Follow the onscreen instructions to complete the installation. PaperWare forms and Documentum To create avFlowPort PaperWare form, Documentum requires an Object ID. To allow your FlowPort users to identify the Documentum Object ID, you need to install the FlowPort resource file, flowport.vrf, to the Documentum server or to each FlowPort user’s system.
Creating User Accounts Creating User Accounts To enable a user to access the FlowPort server through a Web browser, you must create a FlowPort user account. To create a user account: 1 In your Web browser’s Address (or Location) box, enter the server’s name. For example, for a server named “astro,” and assuming that the FlowPort server is running on port 80, you would type: http://astro The FlowPort Welcome page displays. 2 In the username box, type admin. 3 In the password box, type 22222.
Getting More Information 10 On the User Profile page, select the appropriate application option for the user. A If the user is to receive Internet Faxes, select Internet Fax Mailbox to specify the Internet Fax options. B If the user will be tracking FlowPort usage, select Network Accounting to set DocuCentre accounting. For more information, click the help link. 11 Click OK. FlowPort sends an email message to the new user that explains how to get started using FlowPort and provides your email address.
Uninstalling FlowPort Uninstalling FlowPort Note: Before uninstalling, decide whether you want to transport and use your database with any new version of FlowPort that you install. If you intend to transport your database, it is recommended that you do not perform the uninstall steps, but install over the previous version of FlowPort. When the installation program prompts for the option to pack and transport your old database, select Yes.
Uninstalling FlowPort 8 On the FlowPort Windows NT workstation, click the Start button, select Settings, and click Printers. 9 Select and delete the FlowPort TIFF printer. 10 Reboot the system.
Uninstalling FlowPort 1–42 ❖ Xerox FlowPort Installation and Setup Guide
Troubleshooting A x i dneppA This appendix provides information for troubleshooting problems you may encounter when installing and configuring FlowPort. This appendix includes the following: System Requirements......................................................... A–2 Installing FlowPort ............................................................. A–4 Configuring FlowPort .........................................................
System Requirements System Requirements The following section provides system requirements that may affect properly installing and configuring FlowPort. System Requirement About the NT Server Resolution To view server information, such as hostname or network setup, perform the following: 1. Open a DOS command window. 2. Enter ipconfig/all. If you know the IP address, you can find the server’s name by enter the IP address from the ipconfig/all window.
System Requirements System Requirement Resolution Static IP Addressing You should not use Dynamic Host Configuration Protocol (DHCP) to assign an IP address to your NT server. DHCP may reassign a machine’s IP address after rebooting. This invalidates any PaperWare forms created on FlowPort. Therefore, a static IP address is required in order to run FlowPort. Checking Ports In the DOS command window, enter NETSTAT -a | more to check which ports are in use by the server.
Installing FlowPort Installing FlowPort The following section describes solutions to some common problems you may encounter when installing FlowPort. FlowPort Installation Resolution FlowPort Installation Order Installing FlowPort on a new system should be done in the following order: 1. Document Centre 2. DocuShare 3. FlowPort FlowPort Fails to Run If the FlowPort Welcome/Login page in your browser does not display, the FlowPort server is not running.
Installing FlowPort FlowPort Installation FlowPort Fails to Run: HTTP Port Conflict Resolution The FlowPort server is not able to start—the log file indicates that it is unable to start the HTTP server on port 80. The most common reason is that Microsoft Internet Information Server (IIS) is already running on port 80 (or FlowPort is installed on the same server as DocuShare). Perform the following to check the server status: 1. Go to C:\Xerox\FlowPort\Logs\AdminN.log. 2.
Installing FlowPort FlowPort Installation FlowPort Fails to Run: NSA Server Fails Resolution The FlowPort server is not able to start—the log file displays a message that the NSA server has failed. FlowPort includes an FTP server which runs by default on port 21. It cannot run on a machine where another FTP server is running as port conflicts may result. Perform the following to check the server status: 1. Go to C:\Xerox\FlowPort\Logs\AdminN.log. 2.
Configuring FlowPort Configuring FlowPort The following section describes solutions to some common problems you may encounter when configuring FlowPort. FlowPort Configuration Mail Host Errors Resolution If you receive an error when specifying the name of your mail server, then you need to use the fully qualified hostname of the server. The fully qualified hostname includes the main server name, as well as the hostname. For example: mailserver-1.goodcompany.
Configuring FlowPort FlowPort Configuration Microsoft Office Document Printing Resolution If there is a problem printing Microsoft documents, it is possible that on Windows NT 4.0 servers, long directory paths (those that contain spaces and directory names longer than 8 characters) may conflict with other directories on the same or a different drive.
Configuring FlowPort FlowPort Configuration Proxy Host for FlowPort Resolution It is not necessary to specify a Proxy Host (on the System page of the administrator’s web interface) unless you expect FlowPort users to access DocuShare collections located outside your company intranet. If all DocuShare collections are within your company firewall, do not specify a Proxy Host.
Configuring FlowPort A–10 ❖ Xerox FlowPort Installation and Setup Guide