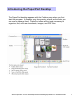
Scan to PC Desktop Professional Workgroup Edition v8 Orientation Guide Maximizing Your Productivity with Scanning and Your Xerox WorkCentre Pro Multifunction Device Training Topics: •Scanning to the Desktop •Creating PDF Files •Scanning to the Desktop - Settings •Creating Secure PDF Files •Introducing the PaperPort Desktop •Creating Text Searchable PDF Files •Splitting Desktop and Viewing Page Thumbnails •PDF Editing •Working with Documents from Any Folder •Managing Documents at the Desktop •Wo
Advanced Topics*: •Advanced OCR •Create Audio Documents from Paper and Digital Documents •OCR Batch Processing •Paper to Digital Forms Conversion •PDF Batch Conversion *Advanced Topics will not be covered in Nuance’ s web-based Scan to PC Desktop End User Training Sessions unless specifically requested.
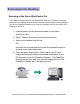
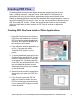
Scanning to the Desktop Scanning at the Xerox WorkCentre Pro The PaperPort Image Retriever tool included with Scan to PC Desktop completely automates the scanning process so that each new scanned image is there waiting for you on your PaperPort desktop by the time you physically return to your office from scanning at the MFP. 1. Load the paper into the document feeder on the Xerox WorkCentre Pro. 2. Select “ Network Scanning”from the control screen. 3.
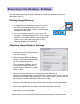
Scanning to the Desktop - Settings You can adjust the Image Retriever Settings to control how scanned images are delivered to your PC. Starting Image Retriever 1. If Image Retriever is already running on your PC, you will see the Image Retriever icon in your Systray in the lower right corner of your Windows Desktop near the clock. 2. If it is not running on your PC, go to Start > All Programs > ScanSoft PaperPort Pro 10.0 > Image Retriever.
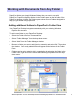
Introducing the PaperPort Desktop The PaperPort desktop appears with the Folders pane when you first start the program. It displays your documents, as well as the tools you can use to manage them. PaperPort offers all the tools necessary to organize, find, and use documents, images, and PDF files.
Working with Documents from Any Folder PaperPort folders are simply Windows folders that you want to use with PaperPort. PaperPort displays folders in the Folders pane on the left side of the PaperPort desktop. Initially, the Folders pane shows a set of folders designed to help you get started using PaperPort. Adding additional folders to PaperPort’ s Folder View Your PaperPort Desktop integrates seamlessly with your existing Windows Explorer file structure.
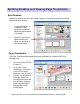
Splitting Desktop and Viewing Page Thumbnails Split Desktop Splitting the desktop into two parts makes it easier to copy and move items and pages between different folders. 1. To split the desktop, go to Desktop > Split Desktop. A horizontal splitter will appear which is moveable. 2. Place the cursor on the splitter and drag the splitter up and down to the desired location. Page Thumbnails The Page Thumbnails pane displays the page thumbnails of a selected PDF file in Desktop View. 1.
Working with ePaper on the Desktop ePaper is represented on the PaperPort desktop as PDF files. The PaperPort desktop displays all files as visual thumbnails (MS Office, PDF, TIFF, and JPEG). Annotating scanned images and PDF files 1. To annotate a scanned image or a PDF file, double click on its thumbnail on the PaperPort Desktop to launch the file in Page View. 2.
Combining Documents on the Desktop You can combine, or stack, individual PDFs or documents of different file types into multipage PDFs. Stacking and Unstacking PDF files 1. PDF file thumbnails can be copied, stacked and unstacked just as you would with physical paper documents. 2. To stack, or combine, two PDF images one on top of the other to create a new document, you can either: • Select one PDF and then drag that image with the mouse on top of the other PDF file.
Creating PDF Files Combining paper documents and digital documents typically requires several steps…printing, scanning…and lots of time. With PaperPort Professional 10, documents from all of your MS Office applications can be printed directly to the PaperPort Desktop and then automatically combined with scanned images to create a new unified digital PDF documents. Also, you can convert batches of documents into PDF files using PDF Create!.
Creating Secure PDF Files In PaperPort Professional 10, you can adjust the security level of your PDF files. There are two types of passwords in the program. The open password restricts document accessibility: you can only open it by supplying the password when prompted. The permissions password allows users to define how the document may be used. If it is not specified, further use of the file is possible without any restrictions. PDF Security from the PaperPort Desktop 1.
Creating Text Searchable PDF Files Text searchable PDF is the file format of choice for digital archiving applications. With PaperPort Professional 10 and OmniPage Pro 15 installed on your PC, converting paper to a fully text searchable PDF file is an automatic process directly from your PaperPort desktop or directly from the network. Creating Text Searchable PDF from the PaperPort Desktop 1. Select the file you want to convert with a click of the mouse on PaperPort desktop. 2.
Managing Documents at the Desktop With PaperPort Professional 10, you can organize and index all of your scanned image files and text based documents. Using PaperPort's All-in-One Search tool, finding the file that you need is as simple as knowing a word or phrase from the file for which you are searching. 1. Select the scanned image file you want to add to your PaperPort document management system. 2. Right click on the mouse and select “ Add to Allin-One Search”from the drop-down menu list. 3.
Linking to Additional Applications Your PaperPort Desktop makes it easy for you to integrate scanned images into other applications on your workstation or the network. 1. Simply select the scanned image that you want to work with and, using the mouse, drag and drop that scanned image on to the desired application icon on the Send To Bar. 2. The desired application will automatically launch with the scanned image integrated into that application’ s workflow.
Repurposing Documents - OCR Differences between Basic Text Capture and Document Conversion to MS Word: • In both Basic Text Capture and Document Conversion, the text and paragraphs in the document will be retained. • When using Basic Text Capture, all of the document’ s formatting and layout will be lost. The formatting and layout will be retained in Document Conversion. • All embedded images will be removed when using Basic Text Capture. Embedded images will be retained with Document Conversion.
Introducing the OmniPage Desktop OmniPage Toolbox Menu Bar Standard Toolbar Original Image View Text Editor View Xerox Corporation –Scan to PC Desktop Professional Workgroup Edition v8 –Orientation Guide 16
Repurposing Documents - OCR Document Conversion to MS Word 1. Select the image file you want to convert from the PaperPort desktop with a single mouse click. 2. Click on the OmniPage Pro 15 icon on the PaperPort Send To Bar. OmniPage Pro will automatically launch and load your image file into the application. 3. Select the 1-2-3 button from the OmniPage Toolbox. 4. Select Finish Processing Existing Pages. 5. OmniPage will now perform OCR on your image file and convert the scanned image into editable text.
Advanced Topics* *Advanced Topics will not be covered in Nuance’ s web-based Scan to PC Desktop End User Training Sessions unless specifically requested.
Repurposing Documents –Advanced OCR Manual Zoning for Complex Documents OmniPage has additional options that allow improved recognition for complex documents. 1. Select the image file you want to convert from the PaperPort desktop with a single mouse click. 2. Click on the OmniPage Pro 15 icon on the PaperPort Send To Bar. OmniPage Pro will automatically launch and load your image file into the application. 3. Click on the 2-Automatic button in the OmniPage Toolbox.
Repurposing Documents –Advanced OCR Create Audio Documents from Paper and Digital Documents OmniPage features RealSpeakTM Text-To-Speech for converting documents into audio files. 1. Select the image file you want to convert from the PaperPort desktop with a single mouse click. 2. Click on the OmniPage Pro 15 icon on the PaperPort Send To Bar. OmniPage Pro will automatically launch and load your image file into the application. 3. Click on the 2-Automatic button in the OmniPage Toolbox.
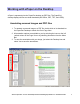
Repurposing Documents –Advanced OCR OCR Batch Processing OmniPage Pro 15 includes a full batch manager for automated processing of files. One of the most common processes is detailed below. Batch Conversion to Text Searchable PDF Using the Xerox WorkCentre Pro and OmniPage Pro 15, you can scan multiple documents into a network folder and then schedule OmniPage to convert all these scanned images to fully text searchable PDF files automatically at a pre-determined point in time. 1.
Repurposing Documents –Advanced OCR (con’ t) 7. Click the Browse button, then click Advanced. Browse to the folder where the files are located. Click the Add Folders button, then OK. 8. In the “ Create New Document” section, check “ For Each Image File” . Click Next. 9. Select “ Recognize Images”. Click Next. 10. Set the appropriate languages and dictionaries for the documents to be processed. Click Next. 11. In this step, the save location is selected.
PDF Batch Conversion Batch conversion to PDF 1. Open the PDF Create! Assistant by going to Start > All Programs > ScanSoft PDF Create! 2.0 > PDF Create! Assistant. 2. Drag and drop documents and images into the PDF Create! Assistant window. 3. From the drop-down menu, select to “ Create One PDF per file”or to “ Combine into one PDF document” . 4. Click on the “ PDF Create”button and you will be prompted to select where you want your PDF files saved. Paper to Digital Forms Conversion 1.