Travel Scanner 100 User Guide
Design © 2008 Xerox Corporation. All rights reserved. Xerox®, and the sphere of connectivity design are trademarks of XEROX CORPORATION in the United States and/or other countries. Content © 2008 Visioneer, Inc. All rights reserved. The Visioneer brand name and logo are registered trademarks of Visioneer, Inc. Reproduction, adaptation, or translation without prior written permission is prohibited, except as allowed under the copyright laws.
Contents Contents Welcome The Xerox Travel Scanner 100 . . . . . . . . . . . . . . . . . . . . . . . . . . . . . . . . . . . . . . . . . . . . . . . . . . . . What’s in the Box . . . . . . . . . . . . . . . . . . . . . . . . . . . . . . . . . . . . . . . . . . . . . . . . . . . . . . . . . . . . . . . . What You Need . . . . . . . . . . . . . . . . . . . . . . . . . . . . . . . . . . . . . . . . . . . . . . . . . . . . . . . . . . . . . . . . . . Documentation . . . . . . . . . . . . . . . . . . . . . . .
Contents Scanning from the TWAIN Interface . . . . . . . . . . . . . . . . . . . . . . . . . . . . . . . . . . . . . . . . . . . . . 60 TWAIN Interface Options . . . . . . . . . . . . . . . . . . . . . . . . . . . . . . . . . . . . . . . . . . . . . . . . . 61 Calibrating or Cleaning the Scanner from TWAIN . . . . . . . . . . . . . . . . . . . . . . . . . . . . . . . . . 63 Scanning from the Windows Image Acquisition Interface Fine Tuning Your Scans . . . . . . . . . . . . . . . . . . . . . . . . . . . .
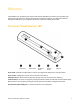
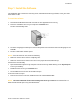
Welcome Congratulations on purchasing your Xerox Travel Scanner 100. With this scanner you can quickly scan paper items such as letters or receipts and place their electronic images on your computer. Powered through the USB port on your computer, this scanner is perfect for taking on the road.
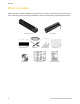
Welcome What’s in the Box Before starting the software installation, please check the contents of the box to make sure that all parts are included. If any items are missing or damaged, contact the dealer where you purchased the scanner.
Welcome What You Need IBM-compatible Pentium 4 PC, or AMD equivalent with: • A DVD-ROM drive • An available Universal Serial Bus (USB) port • Microsoft® Windows® operating system: Windows 2000 (Service Pack 4), 32-bit Windows XP (Service Pack 2 or 3), 32-bit or 64-bit Windows Vista • Windows 2000 and XP: Minimum of 512 megabytes (MB) of internal memory (RAM) Windows Vista: Minimum of 1 gigabyte (GB) of internal memory (RAM) • 350 MB minimum of free hard disk space A VGA or SVGA Monitor The recomm
Installation Installation Installation is a quick, two-step process: 1. Install the software 2. Connect the scanner Before You Begin Please make sure of the following before you begin installation: • The information in this guide may cover software not provided with the scanner you purchased. Please disregard any information about the software not applicable to your scanner. Visit our web site at www.xeroxscanners.com for the latest software updates for your Xerox scanner.
Installation Step 1: Install the Software The Installation Disc contains the necessary driver, and additional scanning software, to use your Xerox Travel Scanner 100. To install the software: 1. Start Microsoft Windows and make sure that no other applications are running. 2. Insert the installation disc into your computer’s DVD-ROM drive. The disc automatically starts. 3. The Select Language window opens. Click the drop-down menu arrow and select the language to use. Click OK. 4.
Installation 5. On the Main Menu, select Install Products. 6. Make sure the boxes for Nuance PaperPort® and Scanner Driver are checked. NOTE: The software provided with your scanner may differ slightly from the list shown in the window. 7. Click Install Now. The PaperPort Installation begins: 1. The Select Language window opens. Click the drop-down menu arrow and select the language to use. Click OK. 2. On the PaperPort Welcome window, click Next.
Installation 3. Read the PaperPort license agreement and select I accept the terms in this agreement, then click on Next. If you choose not to accept the license agreement, the installation will terminate and the PaperPort software will not be installed. 4. On the Customer Information window, accept the current values or enter new information, then click Next. 5. On the Setup Type window, keep the default Setup Type and click Next. 6. Click Install to begin the installation. 7.
Installation 4. The next window lists the choices of the drivers that you can install for your scanner. 5. Select the option that you want then click on Next. • Full Install (OneTouch and TWAIN)—This is the recommended installation. It installs the One Touch 4.0 software which provides the necessary driver software for the scanner. It also installs the scanning interface for the TWAIN driver. Installing this option means that you can use several different methods to scan, as explained in this User Guide.
Installation 8. STOP when you see the “Complete the installation by connecting your hardware” window. Do NOT click OK yet. Leave the window open and proceed to the next section.
Installation Step 2: Connect the Scanner NOTE: The scanner does not have an external power supply. It draws its power directly from the computer through the USB cable. If you use a USB hub with your computer, the hub must have its own power supply. The scanner does not have an on/off switch. The scanner is ready to scan as soon as its software is finished loading onto your computer. After you plug in the scanner you will be prompted perform a calibration. Please have your calibration page ready.
Installation 4. The calibration utility opens. Follow the instructions on screen for calibrating the scanner. 5. Place the calibration page in the scanner in the direction printed on the page. The black strip should be face down. 6. The scanner will pull the calibration page through the scanner. The page will move back and forth as the scanner calibrates for the difference between dark and light. 7. When calibration is complete, the scanner will back the page out of the paper feed.
Installation 8. When you’re certain that the software has completely loaded, return to the “Complete the installation by connecting your hardware” window. To see a quick overview about accessing and navigating the One Touch Button Panel, click More. When you’re finished reading the additional information, click OK. 9. Click OK to complete the installation process. 10. Click Close on the Installation Complete window to close and exit the software installer.
Installation Additional Applications Available with Your Scanner Your scanner includes free, additional applications as described in the following table. 1. Return to the disc’s Main Menu and click Install Products. 2. Select the additional applications you want to install, then click Install Now. 3. Follow the instructions on the screen to install each of the additional products.
Installation View the User Guides 1. On the Main Menu, click User Guides. The User Guides are in Adobe® Acrobat® PDF format. If you need to, click Adobe Acrobat Reader to install it now. Follow the instructions on the installation windows. If your computer already has Adobe Acrobat Reader installed, please do not select it unless the version provided on the installation DVD is a newer version than the one currently installed on your computer. 2.
Installation Register Your Scanner and Check for Updates Registering your scanner is important as it provides you with access to our free telephone support service. Registration also gives you free access to software updates for your scanner. To register your scanner: 1. Right-click on the One Touch icon in the Windows Notification Area (at the bottom right corner of the screen). The One Touch Icon 2. Choose Check for Online Updates from the pop-up menu. 3.
Scanning Scanning You have several different scanning options with your Xerox scanner. Each method scans equally well, so use the one with appropriate options for the item you are scanning. • One Touch AutoLaunch—To use the scanner’s AutoLaunch feature, simply insert a document in the scanner and it is automatically scanned using predefined settings from the OneTouch software. See “Scan Using AutoLaunch” on page 17.
Scanning Scanning using One Touch One Touch is your main scanning interface for using the scanner. Placing a page in the scanner automatically starts the scanner and sends the image to the destination selected in the One Touch properties. NOTE: Always remove any staples or paper clips from documents before inserting them into the scanner’s paper feed. Staples and paper clips can jam the feed mechanism and scratch the internal components.
Scanning 3. You can now work with the image in the Destination Application. Turn AutoLaunch Off/On If you want to scan from One Touch button panel on screen, or to be able to place a page in the scanner and wait until you are ready to initiate the scan, you can turn the AutoLaunch feature off. This option is in the Device Settings for your scanner’s hardware properties. To turn AutoLaunch off or on: 1. Click on the One Touch icon in the Windows notification area on the right side of the screen.
Scanning 4. In the Device Settings tab, click on Enable the generation of events when paper is inserted into the scanner to deselect this option. 5. Click on OK to save the changes and close the window. Click on OK to close the Hardware Properties window. The AutoLaunch feature is now turned off. Your scanner will not start scanning until you click on the scan button on the One Touch button panel, or on the scanning interface from the application you are using.
Scanning Scan from the One Touch Button Panel Scanning from the button panel on your computer’s screen works like inserting a page in the scanner when AutoLaunch is turned on. To scan from the One Touch Button panel: Follow the steps in the previous section to turn off the AutoLaunch feature before scanning with the One Touch panel. If AutoLaunch is turned on, the scanner will automatically scan when a page is inserted in the scanner. 1.
Scanning Features of the One Touch Button Panel The One Touch panel is your on-screen set of controls for the scanner. From the panel you can access the hardware settings for your scanner and configure the PaperIn button. Click on the One Touch icon to open the panel. The Hardware View The Button View The Title Bar • Green arrows—click to cycle through the panel’s 2 views. • Scanner icon—click to open the scanner’s hardware properties. • Red “X”—click to close the One Touch panel.
Scanning Configuring One Touch AutoLaunch When you installed the scanner, the software configured One Touch with all applications on your computer that you can scan to. The button consists of: a Destination Application, a Scan Configuration, and a File Format. You can open the One Touch Properties window by pressing the button on the scanner, or by opening it from the One Touch Panel on screen. 1. Click on the One Touch icon. 2.
Scanning Selecting New Settings Click the Options tab to select options. Select a file format for your scanned images. Select the Destination Application that will open when you are finished scanning. You use the destination application to view and work with your scanned images. Select a configuration for scanning the item.
Scanning These icons next to each scan configuration indicate the scanning mode. Color Black and White Grayscale Configure Before Scan See the sections “Creating a New Scan Configuration” on page 25 and “Editing or Deleting Scan Configurations” on page 31. NOTE: Use Configure Before Scan if you want to set the scanning mode manually before scanning. See “Configure Before Scan” on page 32. Select Format—A set of file formats for the scanned image for the selected button.
Scanning Creating a New Scan Configuration The scan configurations are where you select the scanning resolution, brightness, mode (color, black&white, or grayscale), and a number of other settings. To create a new configuration: 1. Scroll through the applications in the Select Destination list and click the application you want for the new scan configuration. 2. Click the New button. If you want to start from the settings of another configuration, select the configuration, then click the Copy button.
Scanning The Scan Settings Tab 1. On the Scan Configuration Properties dialog box, type a name. Type a new name for the configuration. Select the scan mode and drag the slider to set the resolution. If the configuration is locked, click the lock to unlock it. The icon becomes a key. Drag the sliders to set the Brightness and Contrast. 2. Select scan settings for the new scan configuration. Mode—Select a scanning mode: • Black&White to scan in black and white.
Scanning The Page Settings tab Click the Page Settings tab to select options applicable to how you want the image to appear after scanning. Click the name to toggle between inches and millimeters. Size—Click Standard, click the menu arrow and choose a page size from the list, or click Custom and enter the horizontal and vertical page dimensions in the boxes. The maximum size is 8.5" x 14". The units of measurement can be inches or millimeters.
Scanning • Color Filter—Color filter is the ability of your scanner to automatically remove a color from a scanned image. For example, if you are scanning a letter with a red watermark, you can choose to filter out the red so the scanned letter just shows the text and not the red watermark. Color filter applies to Black & White or GrayScale scanning modes. The original with a red watermark over black text. The scanned item with the red filtered out.
Scanning The Device Settings Tab A Device Settings tab is on the Scan Configurations dialog box when your selected Destination Application sends the scanned image to a printer, fax application, or other device. You use the options on the Device Settings tab to select settings for the device. 1. Click on the Device Settings tab. Fit to page, reduce image if necessary—If the scanned image is too big to be printed or faxed on a single page, the image will automatically be reduced to fit the page.
Scanning The Storage Options Tab (Archive) A Storage Options tab is on the Scan Configurations dialog box when the Destination Application is Transfer to Storage. You use the options on this tab to select where to save your scanned items for storage when scanning with that particular Scan Configuration. 1. Click on the Storage Options tab. 2. Click the Storage Layout options you want. All documents are in the root—The scanned documents are saved in the root of the folder specified in the Storage Location.
Scanning Editing or Deleting Scan Configurations Editing and deleting is normally for the configurations you create, not for your scanner’s pre-set configurations. NOTE: Your scanner comes with a number of configurations pre-set at the factory. To ensure that your scanner will always have a set of correct scan configurations, do not delete the pre-set configurations. We also recommend that you keep those configurations locked so they are not inadvertently deleted.
Scanning Configure Before Scan You can set up the scanner so that, when you put a page in, a different scanning interface opens before the scanning starts. To set up the scanner for this capability, you select Configure Before Scan from the scan configuration list. Choosing Configure Before Scan simply opens either the TWAIN or WIA scanning interface when you insert a page. You can then use the interface to change the Resolution, Scan Mode, and other settings.
Scanning To Scan Using Configure Before Scan 1. Put a document in the paper feed slot on the scanner. 2. The TWAIN Interface opens. 3. Choose the scan settings applicable to the document. 4. Click the Scan button on the TWAIN Interface. 5. The item is scanned. When finished, click the Done button and the image will be sent to the Destination Application specified in the One Touch 4.0 Properties window. In the example shown on the previous page, the Destination Application is PaperPort.
Scanning Canceling a Configure Before Scan 1. Click Cancel in the scanning progress window. 2. The following window will open asking if you want to cancel the entire job. • Yes—Scanning stops and all pages scanned in this batch, up to this point, will be deleted. The TWAIN interface will close and you can restart your scan from the beginning. Choose Yes if the TWAIN scan settings are incorrect for your current scanning batch.
Scanning Selecting Document and File Format Options The format option you select determines the file format of the scanned document. Appropriate format options and file types are available for the type of Destination Application selected for the button. The available options are for images and text. Image Formats Text Formats; TEXT is only one of several text formats available. The Text Formats are for text file types. The names of the formats indicate their file types.
Scanning The PDF format is often used to create images of text pages. You may want to select PDF as the format when scanning text pages that do not require OCR processing or other processing. The PDF format is also used to put multi-page documents on web sites as pdf-readable files. As with the JPG option, the PDF format can be reduced in size or quality. To select a JPEG or PDF file size: 1. Select JPG or PDF as the page format. 2. Right-click on the JPG or PDF icon. A menu opens. 3.
Scanning As you select Destination Applications that are text applications, the text format icon changes to match the file type of the application. In some cases, the Destination Application supports several file types, and you can right-click on the icon to choose the particular file type for that application. To select a file type for the text format: 1. Select the Destination Application. 2. Right-click on the text format icon. The menu options depend on the type of Destination Application you select.
Scanning 3. Choose the file type that you want for the text format. Simple Text—The .txt file format. Text with no formatting; used by the standard Microsoft Notepad application. Rich Text Format—The .rtf file format. Text that retains formatting when converted. Available with Microsoft Wordpad and Word. Word Document—The .doc file format used by Microsoft Word. Comma Delimited—The .
Scanning Selecting Options for One Touch The One Touch Options determine the types of Destination Applications available for scanning, as well as additional options for scanning. To select options: 1. Open the One Touch Properties window and click the Options tab. 2. Select options as described below. Show All Destinations—This option selects all the Destination Application categories.
Scanning 3. Click Apply, then click on the button tab you changed these options for to see the new settings. Global Options • Show Progress Window—Select this option to display the progress window of the document(s) during scanning. • Use enhanced folder browser—Select this option if you want to save your scans to a network location that is not a mapped drive on your computer.
Scanning PaperPort Properties These properties apply to PaperPort, and are for designating the folder to receive your scanned items. 1. Select the PaperPort folder where you want the file of the scanned image to be located. 2. Click OK. Text Documents Properties These properties apply to Microsoft Word, Microsoft Excel®, and the other applications indicated by their icons in the list. The properties apply to the Optical Character Recognition (OCR) settings for the applications.
Scanning 1. Click in the OCR settings boxes for the options you want. The options will apply to all the applications in the group. Always send a file, even when no text was found—The scanned file is sent to the OCR reader even if the image does not appear to contain text. This could occur if you scanned a photograph with a scanner button set for text applications. Show message if text recognition failed—A message will open on the screen if the OCR reader does not detect text in the image. 2.
Scanning Image Documents Properties These properties apply to Microsoft Paint and other image processing applications. 1. Click in the Color document handling settings boxes for the options you want. These options will apply to all the applications in the group. Convert Bitmaps using Screen Resolution—Use this option to ensure that an image will fit on the computer’s screen. When a computer screen is set to a lower resolution, bitmap images with a higher resolution may be too big to fit on the screen.
Scanning Storage Properties These properties apply to the Destination Application named Transfer to Storage. If a CD burner is attached to your computer, and your computer is running Windows XP or Windows Vista, you also use this dialog box to start the Burn to CD process. See the section “Scan and Burn to a CD” on page 47. You can also set up multiple configurations to store scanned items in separate locations. See “Transferring Scanned Documents to Storage” on page 50. 1.
Scanning eMail Properties These properties apply to email applications so you can specify the folder for documents that you will attach to an email message. Microsoft Outlook® will accept direct attachment of documents to a blank email message as soon as scanning is finished, but other email applications may not. If you’re using one of those applications, such as America Online® (AOL), you need to know which folder contains the scanned documents so you can manually attach them to your email messages. 1.
Scanning Scanning with Optical Character Recognition (OCR) Optical Character Recognition (OCR) converts text and numbers on a scanned page into editable text and numbers. You can then work with the text and numbers to edit, spell check, change font or type size, sort, calculate, and so forth. NOTE: Xerox recommends that all OCR processing use the original factory settings for OCR scanning that came with your scanner. When scanning with other settings, use at least 300 dpi for the resolution.
Scanning Scan and Burn to a CD If you have a CD burner attached to your computer, you can scan directly from your scanner onto a CD. This feature is available only on computers running Windows XP or Windows Vista. To scan and burn to a CD: 1. Open the One Touch Properties window. 2. Select Burn to CD as the Destination Application. 3. Choose a File Format and a Scan Configuration. 4. Click OK. 5. Place a document in the paper feed slot. The scanner will start scanning.
Scanning Scanning with Event Forwarding (STI) If you want to specify an application to use for scanning at the start of the process, you can use event forwarding. To scan with event forwarding: 1. Open the One Touch Properties window. 2. Select Still Image Client as the Destination Application. You cannot choose a page format for this option because the actual Destination Application is not selected until after you press the scanner button. 3. Choose a Scan Configuration. 4. Click OK. 5.
Scanning Creating an HTML Web Page from Your Scanned Documents You can convert scanned pages to HTML format for posting directly to your web site. To scan and create an HTML web page: 1. Open the One Touch Properties window. 2. Select Microsoft Explorer as the Destination Application. 3. Choose HTML as the Format. Choose HTML 4. Choose a Scan Configuration that has the settings for the image on the HTML page. 5. Click OK. 6. Place a document in the paper feed slot to start scanning.
Scanning Transferring Scanned Documents to Storage With Transfer to Storage scanning, you can scan documents and save them in a folder in one step. The process is ideal for archiving documents without having to manually save or process them. If you choose a text format for the file format, the images are automatically converted by the OCR process into editable text and numbers before being saved. To transfer documents to storage: 1. Open the One Touch properties window. 2.
Scanning When selecting the storage location for scanned documents, you can select a local folder, or a folder on a server or mapped drive. Scanning to Multiple Archive Folders When archiving documents with Transfer to Storage option, you can scan the documents to different folders. For example, one folder might be for “Business Receipts,” a second folder might be for “Personal Receipts,” and a third folder might be for “Annual Receipts.
Scanning 7. Click the Storage Options tab. 8. Click the Browse button. 9. Select the folder you created for storing the scanned documents. 10. Click OK. The selected folder will now be set as the Storage Location, such as “Business Receipts.” 11. Click OK. The new configuration is now listed as a Transfer to Storage configuration. 12. Repeat the process to create additional new configurations, such as one named “Personal Receipts.
Scanning 13. Make sure to designate separate folders as the Storage Locations for the new configurations. You will now have multiple configurations set up for the Transfer to Storage destination, and each configuration scans documents to separate folders. The new configurations apply to the Transfer to Storage Destination Application. Scan to multiple storage folders: 1. Open the One Touch Properties window. 2. Select one of the configurations you created for storage. 3. Click OK.
Scanning Hardware Settings Use the device properties to change your scanner’s hardware settings, monitor the calibration status and initiate cleaning or calibrating as part of your monthly maintenance. Grayed out options on this window are not appropriate for your scanner model. To open the device settings window: 1. Right-click on the One Touch icon and choose Show Hardware from the pop-up menu. 2. The Hardware Properties dialog box opens and shows information about your Xerox Travel Scanner 100.
Scanning 3. Click the Properties button. 4. You can now make changes to the hardware settings for your scanner. Calibration and Cleaning The software keeps track of the last time you calibrated your scanner. The text in the last calibrated field will be red if it is time for you to recalibrate your scanner. Use this screen to initiate the calibration and cleaning utilities.
Scanning Setting PaperIn Options You can set how you want the scanner to respond when you put a page in the scanner. The options are for turning this feature on or off, and changing the amount of time it takes for the scanner to recognize when a page has been place in the paper feed slot.
Scanning Skew Detection By default, the scanner is set to detect when the item being scanned is at an angle, also called skewed. It will stop scanning and back the item out of the scanner. You can turn this feature off or on from the hardware properties Device Settings tab for your scanner. To open the device settings tab: 1. Right-click on the One Touch icon and choose Show Hardware from the pop-up menu. 2.
Scanning from the TWAIN Interface Scanning from the TWAIN Interface You can scan from any TWAIN scanning application instead of scanning from the One Touch buttons on your scanner or the One Touch button panel. A Note About Your Scanner and the TWAIN standard: TWAIN is a widely recognized standard that computers use to receive images from scanners, digital cameras, and other digital devices. The TWAIN scanning interface can be accessed from any TWAIN scanning application you have installed on the computer.
Scanning from the TWAIN Interface Accessing the TWAIN Interface Open the TWAIN interface from One Touch If the One Touch configuration you’re using to scan is set to Configure Before Scan, and the selected option is TWAIN, the TWAIN interface opens right away without opening PaperPort first. For example, the following figure shows the options you would have selected to set up PaperIn to open the TWAIN interface. Placing a document in the scanner’s paper feed slot will bring up the TWAIN interface.
Scanning from the TWAIN Interface Scanning from the TWAIN Interface The TWAIN interface lists the scanning options available with your Xerox Travel Scanner 100. 1. Place a document face down in the scanner’s paper feed slot. 2. Adjust the settings in the TWAIN interface for the item you are scanning. 3. Click the Scan button in the TWAIN interface. If you have multiple pages to scan, after the current page feeds through, place another page in the scanner then click Scan again.
Scanning from the TWAIN Interface TWAIN Interface Options • Mode—Select a scanning mode: Black&White to scan in black and white. Use this setting for letters, memos, and other black and white material. Grayscale to scan items such as documents containing drawings or black and white photographs. You can also scan a color document to turn its colors into gray shades. Color to scan magazine articles, photographs, and other color images in full color.
Scanning from the TWAIN Interface • Define page size—Click this option to activate the Define button, then click the Define button to see the Define page size dialog box for selecting a specific page size. Standard—Click the menu arrow and choose a page size from the list. Custom—Enter the horizontal and vertical page dimensions in the boxes. The maximum size is 8.5" x 14". Click the name of the units, inches or mm (millimeters), to toggle between them. Click OK.
Scanning from the TWAIN Interface Calibrating or Cleaning the Scanner from TWAIN You can access the calibration and cleaning utilities from the TWAIN interface. If you are using Windows 2000 or Windows Vista 64-bit, and did not install One Touch with your scanner, use these instructions for calibrating and cleaning the scanner. 1. On the upper right corner of the TWAIN interface, click on the scanner icon. 2. The Device Settings tab opens. 3. Click on the Calibrate button.
Scanning from the TWAIN Interface 4. Place the calibration page, with the text face up in the scanner. The scanner grabs the page and feeds it slowly through the scanner during calibration. If you are cleaning the scanner, place the cleaning sheet in the scanner with the long edge leading into the paper feed slot. The scanner grabs the sheet and passes it back and forth during the cleaning process. 5. When the calibration or cleaning process is finished, the scanner will exit the page from the scanner.
Scanning from the Windows Image Acquisition Interface Scanning from the Windows Image Acquisition Interface Microsoft Windows XP and Windows Vista include their own scanning interface—known as Windows Image Acquisition (WIA)—for acquiring images from scanners, digital cameras, and other digital devices. This section shows how to use Microsoft Paint to scan using the WIA interface, but you can use PaperPort and other Windows applications as well. To scan using WIA from Microsoft Paint: 1.
Scanning from the Windows Image Acquisition Interface 6. Click on the Scan button in the WIA interface. The scanner starts scanning. 7. The scanned image will appear in Microsoft Paint (or other WIA application you’re using). NOTE: Windows Vista has advanced options available for scanning with the WIA interface. Scanning from Microsoft’s Paint application uses the interface described in this section. Other applications may access the advanced WIA interface available with Windows Vista.
Scanning from the Windows Image Acquisition Interface Fine Tuning Your Scans You can select new settings before you scan an item to fine tune exactly how you want to scan it. 1. On the scan window, click Adjust the quality of the scanned picture. 2. Select the options for scanning. Brightness and Contrast—Drag the sliders to the right or left to adjust the brightness and contrast of the scanned image. Resolution (DPI)—Click the up or down arrow to scroll through the dots per inch (dpi) of the resolution.
Maintenance Maintenance This section contains information about calibrating, cleaning, troubleshooting, uninstalling, scanner specifications and spare parts. Calibrating Your Scanner The scanner needs to be calibrated as part of your monthly maintenance of the scanner. You calibrated the scanner on installation of the software, but the scanner requires calibration to maintain image quality. If the scanner is used daily you may need to calibrate the scanner more often.
Maintenance 3. Click on the Properties button to open the Device Settings for your scanner. 4. Click on the Calibrate button to start the calibration utility. 5. Place the calibration page, with the black bar face down, with the arrows pointing into the scanner. The scanner pulls in the calibration page. The scanner will move the calibration page back and forth during calibration. 6. When calibration is complete the scanner will clear the calibration page out of the scanner.
Maintenance Cleaning Your Scanner If calibration does not resolve any image quality issues you are seeing, you may need to clean the scanner. You will need to have the scanner’s cleaning sheet ready. To clean the scanner: 1. Right-click on the One Touch icon in the Windows notification area (at the lower right corner of the screen) and choose Show Hardware from the pop-up menu. 2. The Hardware Properties for your scanner opens. 3.
Maintenance 5. Place the cleaning sheet in the scanner. The scanner pulls in the cleaning sheet. The scanner will move the cleaning sheet back and forth during cleaning. 6. When cleaning is complete the scanner will clear the cleaning sheet out of the scanner. Remove the cleaning sheet when the utility prompts you to. Do not forcefully pull the page out of the scanner, the scanner will release the page when it has fully exited out of the scanner.
Maintenance Cleaning the scanner using rubbing alcohol: 1. Right-click on the One Touch icon in the Windows notification area (at the lower right corner of the screen) and choose Show Hardware from the pop-up menu. 2. The Hardware Properties for your scanner opens. 3. Click on the Properties button to open the Device Settings for your scanner. 4. Dampen the cleaning sheet with the Isopropyl rubbing alcohol. Try to dampen the cleaning sheet only in the area where the problem exists in the image.
Maintenance 6. Place the cleaning sheet in the scanner. Place the damp side face down. The scanner pulls in the cleaning sheet. The scanner will move the cleaning sheet back and forth during cleaning. 7. When cleaning is complete the scanner will clear the cleaning sheet out of the scanner. Remove the cleaning sheet when the utility prompts you to. Do not forcefully pull the page out of the scanner, the scanner will release the page when it has fully exited out of the scanner.
Maintenance Troubleshooting In addition to the troubleshooting information contained in this section, please see the Readme file on your installation DVD. The Readme file contains additional information that may help you diagnose problems with the scanner. If you try the troubleshooting procedures described in this section and in the Readme file, and the scanner still has problems, visit our web site at www.xeroxscanners.com for additional technical information.
Maintenance Problem: The installation will not complete successfully. If installation finishes, the scanner’s One Touch 4.0 options do not seem to work properly. A likely cause is that some driver programs are already installed on your computer for another scanner. They are interfering with the installation and One Touch options, and you need to remove those other drivers and re-install your Xerox scanner.
Maintenance Uninstalling or Reinstalling Your Scanner To uninstall your Xerox scanner, remove the One Touch 4.0 software, PaperPort, and any other software provided with your scanner. Uninstalling the Scanner and One Touch Software 1. On the Windows taskbar, click Start, point to Settings, then click Control Panel. 2. Windows 2000 and Windows XP: Double-click the Add or Remove Programs icon. Windows Vista: Double-click the Programs and Features icon. 3. From the list of programs, select One Touch 4.0.
Maintenance Xerox Travel Scanner 100 Specifications Optical resolution Output bit depth Scan method Maximum item size Light source Interface Drivers Supported Operating Systems Bundled Software Scanner dimensions Height Width Length Weight Operating temperature Relative humidity USB cable Safety and agency certifications Xerox Travel Scanner 100 User’s Guide 600 dpi 24-bit color, 8-bit grayscale, 1-bit bitonal (black & white) Fast sheetfed 8.5 x 14 inches (21.6 x 35.56 cm) Three-color RGB LEDs USB 2.
Maintenance Xerox Travel Scanner 100 Spare Part List Please use the following part name and number when ordering a replacement USB cable for your scanner. Part Name Part Number Calibration page and Cleaning sheet 05-0679-000 35-0065-000 High Speed USB 2.
Appendix A Notices Section 1: Safety Introduction Notices and Safety Please read the following instructions carefully before operating the machine and refer to them as needed to ensure the continued safe operation of your machine. Your Xerox product and supplies have been designed and tested to meet strict safety requirements. These include safety agency evaluation and certification, and compliance with electromagnetic regulations and established environmental standards.
Section 3: Operational Safety Information Your Xerox equipment and supplies have been designed and tested to meet strict safety requirements. These include safety agency examination, approval, and compliance with established environmental standards. To ensure the continued safe operation of your Xerox equipment, follow these safety guidelines at all times: Do These • Always follow all warnings and instructions that are marked on or supplied with the equipment.
Section 5: Product Safety Certification This product is certified by the following Agency using the Safety standards listed: Agency Standard Underwriters Laboratories Inc.
If you are managing the disposal of your Xerox product, please note that the product contains lamp(s) with mercury, and may contain lead, Perchlorate and other materials whose disposal may be regulated due to environmental considerations. The presence of these materials is fully consistent with global regulations applicable at the time that the product was placed on the market. For recycling and disposal information, contact your local authorities.
Section 8: Illegal Copies USA Congress, by statute, has forbidden the reproduction of the following subjects under certain circumstances. Penalties of fine or imprisonment may be imposed on those guilty of making such reproductions. 1.
8. Selective Service Induction Papers that bear any of the following Registrant’s information: Earnings or Income Dependency Status Court Record Previous military service Physical or mental condition Exception: U. S. Army and Navy discharge certificates may be photographed. 1. Badges, Identification Cards, Passes, or Insignia carried by military personnel, or by members of the various Federal Departments, such as FBI, Treasury, etc. (unless photograph is ordered by the head of such department or bureau.
Other Countries Copying certain documents may be illegal in your country. Penalties of fine or imprisonment may be imposed on those found guilty of making such reproductions. Currency notes Bank notes and cheques Bank and government bonds and securities Passports and identification cards Copyright material or trademarks without the consent of the owner Postage stamps and other negotiable instruments Note: This list is not inclusive and no liability is assumed for either its completeness or accuracy.
86 Xerox Travel Scanner 100 User’s Guide
Index A Actual size 29 Add Application 42, 43 Adobe® Acrobat® Reader® 13 Advanced device settings 29 Advanced Settings tab 28 America Online® (AOL) 45 Apply button 24 Aspect ratio 29 AutoCrop to Length 61 AutoCrop to Original 27, 61 AutoLaunch 16, 17, 19, 20, 22, 62 turn off or on 18 AutoRotate image 29 AutoScan on document insertion 62 CSV file format 38 Custom page size 62 D Define page size 62 Delete button 24 Deskew 27, 61 Destination application 17, 20, 22, 28, 29, 30, 35, 39, 46, 47, 48, 49, 50 Bla
Index H O Hardware properties 18, 21, 54, 68, 70, 72 Help 3, 58 HTM file format 38, 49 HTML Document 38 HTML page 49 Hue 28 OCR options One Touch Mini-Guide 14, 36, 38, 39, 42, 46 OmniPage One Touch 14 OmniPage® Pro 13, 58 One Touch AutoLaunch 16 Button panel 20, 21 icon 15, 18, 20, 21, 22, 68, 70, 72 Install 7 New settings 23 OmniPage OCR Settings 38 Options tab 39 Panel features 21 properties 17, 22, 31, 32, 40, 46, 47, 48, 50 Scan multiple pages 33 Scan with TWAIN interface 59 VRS Settings 14 One Tou
Index Register 15 Reset Device 56 Resolution 26, 32, 61, 67 Rich Text Format 38 RTF file format 23, 38, 46 S Saturation 28 Scan configuration 22, 28, 29, 30, 47, 48, 49, 51 Edit or Delete 31 Lock or unlock 26 New 25 Scan multiple pages 33 Scan Settings Tab 26 Scan to Folder 50 Multiple folders 51 Scanner Device settings 18, 19, 55, 57, 69, 70, 72 hardware 1 Hardware specifcations 77 parts 2, 78 Troubleshooting 74 scanner connecting 10 Scanner button 1 Scanner driver 6 Scanning mode 24, 25, 26, 32, 61, 65
Index 90 Xerox Travel Scanner 100 User’s Guide
P/N 05-0769-100