Version 1.
©2013 Xerox Corporation. All rights reserved. Xerox® and Xerox and Design® are trademarks of Xerox Corporation in the United States and/or other countries. Xerox® and XEROX and Design® are trademarks of Xerox Corporation in the United States and/or other countries. Version 1.
Table of Contents 1 Safety and Regulations Notices and Safety . . . . . . . . . . . . . . . . . . . . . . . . . . . . . . . . . . . . . . . . . . . . . . . . . . . . . . . . . . . . . . . . . . . . . . . . .3 Safety Labels and Symbols . . . . . . . . . . . . . . . . . . . . . . . . . . . . . . . . . . . . . . . . . . . . . . . . . . . . . . . . . . . . . . . . .3 Operational Safety Information . . . . . . . . . . . . . . . . . . . . . . . . . . . . . . . . . . . . . . . . . . . . . . . . . . . . . . . . .
2 WorkCentre® 5845/5855/5865/5875/5890 Getting Started Guide
Safety and Regulations 1 Notices and Safety Please read the following instructions carefully before operating the device. Refer to them as needed to ensure the continued safe operation of your device. Your Xerox device and supplies have been designed and tested to meet strict safety requirements. These include safety agency evaluation and certification, and compliance with electromagnetic regulations and established environmental standards.
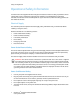
Safety and Regulations Operational Safety Information Your Xerox device and supplies have been designed and tested to meet strict safety requirements. These include safety agency examination, approval, and compliance with established environmental standards. To ensure the continued safe operation of your Xerox device, follow the safety guidelines on this website at all times.
Safety and Regulations Laser Safety Information CAUTION: Use of controls, adjustments, or performance of procedures other than those specified in this manual can result in hazardous radiation exposure. With specific regard to laser safety, the device complies with performance standards for laser products set by government, national and international agencies as a Class 1 laser product. It does not emit hazardous light, as the beam is totally enclosed during all phases of customer operation and maintenance.
Safety and Regulations Emergency Power Off If any of the following conditions occur, turn off the device immediately and disconnect the power cable(s) from the electrical outlet(s). Contact an authorized Xerox Service Representative to correct the problem: • • • • • • The device emits unusual odors or makes unusual noises. The power cable is damaged or frayed. A wall panel circuit breaker, fuse, or other safety device has been tripped. Liquid is spilled into the machine. The machine is exposed to water.
Safety and Regulations • Never throw toner, toner cartridges or toner containers into an open flame. Product Safety Certification This device is certified by the following Agency using the Safety standards listed. • • • Agency: Underwriters Laboratories Inc. Standard: UL60950-1 1st Edition (USA/Canada) Standard: IEC/EN60950-1 2nd Edition This device has been manufactured under a registered ISO9001 Quality system.
Safety and Regulations European Union WARNING: This is a Class A product. In a domestic environment this device may cause radio interference in which case the user may be required to take adequate measures. The CE mark applied to this device symbolizes Xerox’s declaration of conformity with the following applicable Directives of the European Union as of the dates indicated: • • • • December 12, 2006: Low Voltage Directive 2006/95/EC.
Safety and Regulations of install. continuing to use the duplex function will reduce the environmental impact of your work. However, should you require simplex / 1-sided printing, you may change the print settings in the print driver. Paper Types This product can be used to print on both recycled and virgin paper, approved to an environmental stewardship scheme, which complies with EN12281 or a similar quality standard.
Safety and Regulations Copy Regulations United States Congress, by statute, has forbidden the reproduction of the following subjects under certain circumstances. Penalties of fine or imprisonment may be imposed on those guilty of making such reproductions. 1. 2. 3. 4. 5. 6.
Safety and Regulations 7. 8. 9. Immigration papers. Draft Registration Cards. Selective Service Induction papers that bear any of the following Registrant’s information: • Earnings or Income • Court Record • Physical or mental condition • Dependency Status • Previous military service Exception: United States military discharge certificates may be photographed. 10.
Safety and Regulations The above list is provided for your convenience and assistance, but it is not all-inclusive, and no liability is assumed for its completeness or accuracy. In case of doubt, consult your solicitor. Other Countries Copying certain documents may be illegal in your country.
Safety and Regulations You may safely connect the machine to the following standard modular jack: USOC RJ-11C using the compliant telephone line cord (with modular plugs) provided with the installation kit. See installation instructions for details. The Ringer Equivalence Number (REN) is used to determine the number of devices that may be connected to a telephone line. Excessive RENs on a telephone line may result in the devices not ringing in response to an incoming call.
Safety and Regulations Canada Note: The Industry Canada label identifies certified equipment. This certification means that the device meets certain telecommunications network protective, operational and safety requirements as prescribed in the appropriate Terminal Equipment Technical Requirements document(s). The Department does not guarantee the equipment will operate to the user’s satisfaction.
Safety and Regulations South Africa This modem must be used in conjunction with an approved surge protection device. Material Safety Data For Material Safety Data information regarding your machine see the support information for your area. North American material safety data can be found here: www.xerox.com/msds. European Union material safety data can be found here: www.xerox.com/environment_europe. For the Customer Support Center phone numbers, go to www.xerox.com/office/worldcontacts.
Safety and Regulations Product Recycling and Disposal USA and Canada Xerox operates a worldwide equipment take back and reuse/recycle program. Contact your Xerox sales representative (1-800-ASK-XEROX) to determine whether this Xerox device is part of the program. For more information about Xerox environmental programs, visit www.xerox.com/environment.html.
Safety and Regulations Energy Program Compliance All Markets ENERGY STAR The Xerox WorkCentre™ 5845/5855/5865/5875/5890 is ENERGY STAR® qualified under the ENERGY STAR Program Requirements for Imaging Equipment. The ENERGY STAR and ENERGY STAR MARK are registered United States trademarks. The ENERGY STAR Office Equipment Program is a team effort between U.S.
Safety and Regulations Environment, Health and Safety Contact Information For more information on Environment, Health, and Safety in relation to this Xerox device and supplies, please contact the customer help line for your area. Device safety information is also available on the Xerox website www.xerox.com/about-xerox/ environment.
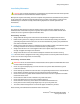
2 Getting Started Identifying the Parts of Your Device Your new device is not simply a conventional copier, it is a digital device capable of copying, faxing, printing and scanning, dependent on your model and configuration. All features and functions described within the User Guide relate to a fully configured WorkCentre and may not be available on your device.
Getting Started 8. 9. 10. 11. 12. 13. 14. 15. 16. 17. Paper Tray 6: This is an optional high capacity paper tray. It is a dedicated tray used for A4 LEF (8.5 x 11” LEF) size media. Optional kits are available to accommodate A3 (11 x 17”), 8.5 x 14” SEF or A 4 SEF (8.5 x 11” SEF) media. Tray 7 (Inserter): An optional paper tray. It is used to insert pre-printed sheets into copy sets. It is not part of the printing process and cannot be used for imaging.
Getting Started Locating the Serial Number for Your Device If you need assistance during or after product installation, please visit www.xerox.com for online solutions and support. If you require further assistance, call our experts at the Xerox Support Center, or contact your local representative. When telephoning please quote the machine serial number. The Xerox Support Center or local representative telephone number is provided when the device is installed. 1.
Getting Started Services and Options Identifying the WorkCentre 5845 Standard and Optional Services There are a number of services and options available for use with your device. Many services and options are provided as standard and simply require enabling, or configuring with additional third party hardware. Additional optional functions and kits are also available and can be purchased and installed. The options available are dependent on your device model.
Getting Started • • • • • • • • • • • • • • • • • • • • • • • Office Finisher 3 Hole Punch Kit enables the Office Finisher to make 3 hole punches. Other hole punch kits are available for this finisher. Only one hole punch kit can be fitted at one time. Office Finisher 4 Hole Punch Kit enables the Office Finisher to make 4 hole punches. Other hole punch kits are available for this finisher. Only one hole punch kit can be fitted at one time.
Getting Started • • • Xerox Standard Accounting is an accounting tool which tracks the number of Copy, Print, Workflow Scanning, Server Fax and Fax jobs for each user. Xerox Copier Assistant Kit provides easier access to the copying capabilities. This assistive technology is an alternative to the standard touchscreen and helps everyone, especially people who are wheelchair users, blind or visually impaired, to easily program copy jobs and make copies.
Getting Started • • • • • • • • • • • • • • • • • • • • • • Offset Catch Tray delivers collated or uncollated output. Office Finisher stacks, collates, staples and offsets your output. A hole punch kit is also available for this finisher. Office Finisher 2 Hole Punch Kit enables the Office Finisher to make 2 hole punches. Other hole punch kits are available for this finisher. Only one hole punch kit can be fitted at one time.
Getting Started • • • • • • • Unicode International Printing Kit enables unicode characters to be printed. Wireless Print Kit enables connection to a wireless network. Xerox Secure Access provides a card reading device to restrict access to the device. Network Accounting enables the tracking of device usage for Print, Copy and Scan jobs from multiple devices over the network. A third party server is needed.
Getting Started • • • • • • • • • • • • • • • • • • • • • • Envelope Tray this tray is fitted instead of paper tray 2 to enable envelope printing. Up to 55 #10 Envelope s (4.1"x 9.5") can be loaded in the tray. Paper Tray 7 (Inserter) adds pre-printed sheets into copy sets. This is only available with the high volume finisher or high volume finisher with booklet maker. Paper Tray Lock Kit locks the trays so that paper cannot be removed, this is a useful feature in libraries.
Getting Started • • • • • • • • • • Scan to PC Desktop Kit enables you to scan to your computer. Standard and Pro versions are available. XPS Enablement Kit enables you to create documents in the XPS (XML Paper Specification) format. McAfee Integrity Control Kit uses McAfee software to detect and prevent modification and execution of files on the device. Unicode International Printing Kit enables unicode characters to be printed. Wireless Print Kit enables connection to a wireless network.
Getting Started Optional • • • • • • • • • • • • • • • • • • • • • • Paper Tray 6 high capacity paper tray. Tray 6 Large Paper Kit converts paper tray 6 to hold larger paper sizes. Tray 6 A4 Short Edge Feed Kit converts paper tray 6 into a short edge feed tray. Envelope Tray this tray is fitted instead of paper tray 2 to enable envelope printing. Up to 55 #10 Envelope s (4.1"x 9.5") can be loaded in the tray. Paper Tray 7 (Inserter) adds pre-printed sheets into copy sets.
Getting Started • • • • • • • • • • • • • LAN Fax enables users to send faxes directly from their PC using the print and fax drivers. Requires the Basic or Extended Fax Kit or a Third Party Fax Server to be configured and installed. Basic Fax Kit (Embedded) this kit enables a single fax line connection. Extended Fax Kit (Embedded) this kit enables two fax lines to be connected. Scan to PC Desktop Kit enables you to scan to your computer. Standard and Pro versions are available.
Getting Started • • • Server Fax enables users to send and receive hard copy faxes via a fax server. Requires a Third Party Fax Server to be configured and installed. Internet Fax allows users to send or receive faxes over the internet or intranet. Scanning enables E-mail and Workflow Scanning services. Optional • • • • • • • • • • • • • • • • • • • • Paper Tray 6 high capacity paper tray. Tray 6 Large Paper Kit converts paper tray 6 to hold larger paper sizes.
Getting Started • • • • • • • • McAfee Integrity Control Kit uses McAfee software to detect and prevent modification and execution of files on the device. Unicode International Printing Kit enables unicode characters to be printed. Wireless Print Kit enables connection to a wireless network. Xerox Secure Access provides a card reading device to restrict access to the device. Network Accounting enables the tracking of device usage for Print, Copy and Scan jobs from multiple devices over the network.
Getting Started Office Finisher • • • • • Holds up to 250 sheets of paper in the Top Tray, and up to 2000 sheets in the Stacker Tray. Paper weight 60 to 216 gsm (16 to 57 lb). The Office Finisher can collate, stack, staple and hole punch (if available) your output depending on the features selected. It staples between 2 and 50 sheets of 80 gsm (20 lb) paper, less if using heavyweight paper or tabs. The finisher stapler has 1 staple cartridge containing 5000 staples.
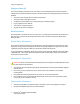
Getting Started Identifying the Control Panel Buttons 1. 2. 3. 4. 5. 6. 7. 8. 9. 10. 11. 12. 13. 14. 15. 16. 34 Services Home: Provides access to the services available on the device. Services: Returns the display to the previous Copy, Fax, or Scan feature screen when the Job Status screen or Machine Status screen is displayed. Job Status: Use to check the progress of active jobs, or display detailed information about completed jobs.
Getting Started Power On and Off Powering the Device On 1. 2. Ensure that your device is connected to a suitable power supply and that the power cord is fully plugged in to the electrical outlet of the device. Press the Power button. The entire powering on process (to power on all installed options) takes less than 3 minutes 50 seconds. Powering the Device Off Power Off ends the current session and turns off the device. 1. 2. 3. Press the Power button on the control panel.
Getting Started Using the Energy Saver Option Energy Saver ends the current session and keeps the device running on low power. When in Energy Saver Mode, press the Power button to wake up the device. 1. 2. 3. Press the Power button on the control panel. Select the Energy Saver button on the touch screen. Select the Energy Saver button again to confirm that the device should go into the Energy Saver state. Note: When Energy Saver mode is confirmed the device will immediately enter Low Power mode.
Getting Started Loading Documents Original documents can be loaded either into the document feeder or onto the document glass. 1. Load your documents face up in the document feeder input tray. Adjust the guide to just touch the documents. Or Lift up the document feeder. Place the document face down onto the document glass and register it to the arrow at the top left corner. Close the document feeder. CAUTION: Do not place objects or documents on the document feeder cover.
Getting Started Making Copies When you press the Start button to make a copy, the device scans your originals and temporarily stores the images. It then prints the images based on the selections made. If Authentication or Accounting has been enabled on your device you may have to enter login details to access the Copy features. 1. Load your documents face up in the document feeder input tray. Adjust the guide to just touch the documents. Or Lift up the document feeder.
Getting Started Print Printing a Document using the PostScript Print Driver You can print to the device from your computer through a print driver. There are a variety of Xerox print drivers available for the device to support all the popular operating systems. The Xerox print drivers allow you to use the specific features available on your device. Your System Administrator may have loaded a specific print driver on your computer.
Getting Started Refer to the System Administrator Guide for further information. Open the document to be printed. From most applications select the Office button or select File, then select Print from the file menu. 2. Enter the number of copies you want to produce. Depending on the application you are using you may also be able to select a page range and make other print selections. 3. Select the Xerox PS driver from the list of print drivers available. 4.
Getting Started In addition to the drivers designed specifically for your device, you can also use the Xerox Global Print Driver or the Xerox Mobile Express Driver. These drivers will not give you access to all the features available with the device specific drivers. • • Global Print Driver is available for PS or PCL printer description languages, the same as the devicespecific drivers mentioned above. This driver works with Xerox and non-Xerox printers.
Getting Started Printing a Document using the Mac Print Driver You can print to the device from your computer through a print driver. There are a variety of Xerox print drivers available for the device to support all the popular operating systems. The Xerox print drivers allow you to use the specific features available on your device. Your System Administrator may have loaded a specific print driver on your computer.
Getting Started Refer to the System Administrator Guide for further information. Open the document to be printed. From most applications select File, then select Print from the file menu. 2. Enter the number of copies you want to produce. Depending on the application you are using you may also be able to select a page range and make other print selections. 3. Select the Xerox driver from the list of print drivers available. 4.
Getting Started In addition to the drivers designed specifically for your device, you can also use the Xerox Global Print Driver or the Xerox Mobile Express Driver. These drivers will not give you access to all the features available with the device specific drivers. • • Global Print Driver is available for PS or PCL printer description languages, the same as the devicespecific drivers mentioned above. This driver works with Xerox and non-Xerox printers.
Getting Started Fax Explaining the Fax Options There are three Fax services which can be installed or enabled on your device, Fax (Embedded Fax), Internet Fax and Server Fax. If the Fax (Embedded Fax) service is installed, your device is connected directly to a telephone line and therefore gives you direct control over your fax transmissions. This type of fax travels over normal telephone lines and will therefore be charged at telephone rates.
Getting Started If Authentication or Accounting has been enabled on your device you may have to enter login details to access the Fax features. 1. Load your documents face up in the document feeder input tray. Adjust the guide to just touch the documents. Or Lift up the document feeder. Place the document face down onto the document glass and register it to the arrow at the top left corner. Close the document feeder. 2.
Getting Started 5. 6. 7. 8. 9. If required, select the Internet Fax tab. This is usually the active tab when the Internet Fax service opens. Select the New Recipient... button. Use the touch screen keyboard to enter the e-mail address of the recipient. • The number of alphanumeric characters that can be entered depends on the size of the characters chosen. Once the end of the entry box has been reached no more characters can be added. • To delete a character use the backspace X button.
Getting Started Press the Services Home button. Select the Server Fax button. If required, select the Server Fax tab. This is usually the active tab when the Server Fax service opens. 6. Select the Enter Fax Number entry box and use the numeric keypad, or the touchscreen keypad to enter the recipient’s fax number. 7. Select the Add button.
Getting Started 4. 5. 6. Open the print driver Properties window - the method will vary depending on the application you are printing from. From most Microsoft applications select the Properties or Preferences button to open the window. If required, click the Printing Options tab. This is usually the active tab when the print driver opens. Select Fax from the Job Type dropdown menu. Either • Click the Add Recipient button to add a new recipient manually.
Getting Started Select Print a Cover Sheet from the Cover Sheet Options menu. • Select the Information tab. This is usually the active tab when the Cover Sheet options box opens. If required, select the Sender Name entry box and use your keyboard to enter your name. If required, select the Sender Organization entry box and use your keyboard to enter your company name. If required, select the Sender Telephone Number entry box and use your keyboard to enter your telephone number.
Getting Started If required, select the Dialing Prefix entry box and use your keyboard to enter a character that should be dialled before the main fax number. • If required, select the Credit Card entry box and use your keyboard to enter a credit card number. • Click the OK button. 11. Click the OK button to save your settings. 12. Select the confirmation button, the name will vary depending on the application you are printing from. From most applications select the OK or Print button. 13.
Getting Started - If required, select the Organization entry box and use your keyboard to enter the recipient’s company name. If required, select the Telephone Number entry box and use your keyboard to enter the recipient’s telephone number. If required, select the E-mail Address entry box and use your keyboard to enter the recipient’s e-mail address. If required, select the Mailbox entry box and use your keyboard to enter the recipient’s mailbox number.
Getting Started If required, select the Sender E-mail Address entry box and use your keyboard to enter your e-mail address. If required, select the Sender Fax Number entry box and use your keyboard to enter the fax number you would like any replies faxed to. If required, select a Recipients option. Show Recipient Names prints the names of all the recipients on the cover sheet. The names used are the names you entered when adding each recipient’s details.
Getting Started 13. Depending on how your device has been set up, the Fax Confirmation screen may display with the fax recipients for your job. If required, click the OK button to confirm. Sending a Fax using the Mac Print Driver You can print to the device from your computer through a print driver. There are a variety of Xerox print drivers available for the device to support all the popular operating systems. The Xerox print drivers allow you to use the specific features available on your device.
Getting Started Note: The recipient’s details are saved on your computer’s hard drive, in your personal address book. - If required, click the Save to Address Book checkbox. Click the OK button. Or • 7. 8. Click the Add From Address Book button to add a recipient stored in the address book. Select the contact required from the list. • If the contact list is long, click in the Search... entry box and use your keyboard to enter the contact details. • Click the OK button to see the search results.
Getting Started 9. 10. 11. 12. 13. If required, select the Cover Sheet Image option required. • New adds a new image. • Text adds a text cover page. • Picture adds an image to the cover page. • Click the OK button. Select the paper size required from the Cover Sheet Paper Size menu. If you want the device to print a confirmation sheet, use a specific send speed or resolution, send at a specific time, use a dialing prefix or include credit card details, click the Options tab.
Getting Started Note: To use this feature, your System Administrator must install and enable the fax option on your device. 1. 2. Open the document to be printed. From most applications select the Office button or select File, then select Print from the file menu. Enter the number of copies you want to send. Note: You only need to select 1 copy even if you are sending the fax to more than one address.
Getting Started If the contact list is long, click in the Search... entry box and use your keyboard to enter the contact details. • Click the OK button to see the search results. Select the Add button. Click the OK button. If required, select more than one recipient from the Recipients list by clicking the first recipient, pressing and holding the Ctrl button on a PC or the Command button on a Mac and then clicking each additional recipient.
Getting Started 10. 11. 12. 13. • Click the OK button. If you want the device to print a confirmation sheet, use a specific send speed or resolution, send at a specific time, use a dialing prefix or include credit card details, click the Options tab. • If required, select Print a Confirmation Sheet from the Confirmation Sheet menu to have the device print a page stating that your job has successfully faxed.
Getting Started Using Workflow Scanning Workflow Scanning converts hard copy documents into electronic images and saves them into network filing destinations (repositories). A Template must be used when a scan is made - the template contains the filing destination address and other scan settings such as the image quality. When making a scan you can edit the scan settings but not the filing destination. Note: This option must be made available by your System Administrator.
Getting Started Sending an E-mail Use the E-mail feature to scan images and send them to a recipient as an attachment to an e-mail. Note: This option must be made available by your System Administrator. If Authentication or Accounting has been enabled on your device you may have to enter login details to access the E-mail features. 1. 2. 3. 4. 5. 6. 7. 8. 9. Load your documents face up in the document feeder input tray. Adjust the guide to just touch the documents. Or Lift up the document feeder.
Getting Started 13. If required, select the File Name button and use the touch screen keyboard to enter a name for the file created from your scanned document. If you choose not to enter a file name a default name entered by your System Administrator will be used. • Select the OK button. 14. Select any options required. 15. Press the Start button on the control panel to scan the original. 16. Remove the original from the document feeder or document glass when scanning has completed.
Getting Started Saved Jobs Saving Jobs Saving Jobs using the PostScript Print Driver You can print to the device from your computer through a print driver. There are a variety of Xerox print drivers available for the device to support all the popular operating systems. The Xerox print drivers allow you to use the specific features available on your device. If Authentication has been enabled on your device you may have to login at the device to see or release your jobs.
Getting Started 10. If required, select the Private radio button to passcode protect your document. • Click in the Passcode entry box and use your keyboard to enter a 4 to 10 digit passcode. Note: To release your job you will enter this passcode using the numeric keypad on the device control panel. Only use numbers, and choose a passcode you will remember but that is not easy for other people to guess. Click in the Confirm Passcode entry box and use your keyboard to re-enter your 4 to 10 digit passcode.
Getting Started Select Use Document Name from the Job Name dropdown menu to save your job with the same name as the original document. 8. Select the folder where your job should be saved from the Save To menu. • If your required folder does not display, you can use your keyboard to enter the name of the folder where your job should be saved. The Default Public Folder is available for all users to save their jobs to. 9. If required, select the Print and Save checkbox to print your document.
Getting Started Select Xerox Features from the print driver properties menu - the name of the menu will vary depending on the application you are printing from. From most applications select the dropdown menu that states Copies and Pages, or that states the application name. 5. Select Paper / Output from the Xerox Features group selection menu. This is usually the active area when the print driver opens. 6. Select Saved Job from the Job Type dropdown menu. 7.
Getting Started Note: Your System Administrator must enable the Job Storage feature on your print driver before you can use the Saved Job option. If you are able to update your own driver settings, this feature can be found by opening the drivers window, right clicking the driver, selecting Printer Properties and then the Configuration tab. Use the dropdown menu to set the Job Storage Module status in the Installable Options section to Installed.
Getting Started Printing Saved Jobs Printing a Saved Job using the Print From Feature The Print From feature prints jobs which have been saved on the device or on a USB stick. This is a useful feature if you have documents that you need to print regularly. Note: This option must be made available by your System Administrator. If Authentication or Accounting has been enabled on your device you may have to enter login details to access the Print From feature.
Getting Started Printing Saved Jobs from Internet Services Internet Services uses the embedded web server on the device. This allows you to communicate with the device over the internet or intranet through your web browser. If Authentication or Accounting has been enabled on your device you may have to enter login details to access this feature. Saved Jobs are documents that are sent to the device and stored there for future use.
Getting Started Enhancing Productivity Your device is a powerful multi-functional device with many digital functions integrated into one sleek system. It is designed to support large workgroups in different office environments.
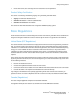
Getting Started Maintenance and Consumables Identifying the Replaceable Units There are several consumables on the device that need replenishing or replacing, such as paper, staples, and customer replaceable units. 1. 2. 3. 4. 5. Toner Cartridge Xerographic Module Fuser Module Waste Toner Bottle Ozone Filter The device will display a message on the touch screen when any of the units need to be re-ordered. This message is a warning that the unit is nearing the end of its life.
Getting Started When you use the document feeder, your documents will pass over the stationary scanner using the Constant Velocity Transport glass. Any dirt or marks on this piece of glass will cause lines or streaks on your copies, faxes or scanned images. Also, any marks or dirt on the Constant Velocity Transport roll may show through the document and appear on your scanned images. 1. 2. 3.
Getting Started Help Accessing the Help Features On the Device When using your device, detailed and timely help is available at your fingertips. You can access Help information and tips from a variety of sources. 1. 2. 3. Press the Help (?) button on the Control Panel at any time to access the Help screens. Use the scroll bar to locate the item required, then select the item. Messages, screen instructions and graphics provide additional information.
Getting Started Accessing the PCL Print Driver Help Pages You can print to the device from your computer through a print driver. There are a variety of Xerox print drivers available for the device to support all the popular operating systems. The Xerox print drivers allow you to use the specific features available on your device. If Authentication has been enabled on your device you may have to login at the device to see or release your jobs.
Getting Started Accessing the XPS Print Driver Help Pages You can print to the device from your computer through a print driver. There are a variety of Xerox print drivers available for the device to support all the popular operating systems. The Xerox print drivers allow you to use the specific features available on your device. If Authentication has been enabled on your device you may have to login at the device to see or release your jobs.
Getting Started Getting Further Assistance For any additional help visit our customer web site at www.xerox.com or contact the Xerox Support Center quoting the machine serial number. The Xerox Support Center will want to know the nature of the problem, the machine serial number, the fault code (if any) plus the name and location of your company.