® Printer Drivers Guide For Windows Release 6.
February 1, 2006 Copyright © 2005 by Xerox Corporation. All rights reserved. Printed in the United States of America. XEROX®, The Document Company®, the digital X®, CentreWare® and the identifying product names and numbers herein are trademarks of XEROX CORPORATION. Other product names and images used in this guide may be trademarks or registered trademarks of their respective companies and are hereby acknowledged.
Table of Contents Chapter 1 CentreWare Printer Drivers for Microsoft Windows . . . . . . . . . . . . . . . . 1-1 What’s Included in this Release? . . . . . . . . . . . . . . . . . . . . . . . . . . . . . . . . . . . . . . . . . . . . . . . . . 1-2 Printer Driver Overview . . . . . . . . . . . . . . . . . . . . . . . . . . . . . . . . . . . . . . . . . . . . . . . . . . . . . . . . 1-3 Types of CentreWare Printer Drivers . . . . . . . . . . . . . . . . . . . . . . . . . . . . . . . . . . . . . . . . . . .
Point and Print Installations . . . . . . . . . . . . . . . . . . . . . . . . . . . . . . . . . . . . . . . . . . . . . . . . . . . . 2-16 Installing Printer Drivers on Other Networks . . . . . . . . . . . . . . . . . . . . . . . . . . . . . . . . . . . . . . . 2-16 Configuring Printer Drivers . . . . . . . . . . . . . . . . . . . . . . . . . . . . . . . . . . . . . . . . . . . . . . . . . . . . 2-17 Preconfiguring Default Driver Settings . . . . . . . . . . . . . . . . . . . . . . . . . . . . . . . . . . .
1 CentreWare Printer Drivers for Microsoft Windows CentreWare is software that brings the power of your Xerox systems to your desktop. CentreWare’s interactive drivers make printing from the desktop simple to perform and easy to understand. With this guide, administrators can install and configure CentreWare printer drivers and general users can increase their productivity using the Xerox system’s printing options. What’s in this chapter: What’s Included in this Release? . . . . . . . . . . . . . . . .
What’s Included in this Release? The CentreWare 6.3 release of the WorkCentre printer drivers supports the following new features and/or hardware. PostScript and PCL drivers for the following models: WorkCentre 7665 WorkCentre 7655 Print quality improvements for multiple media.
Printer Driver Overview A printer driver makes documents created with specialized software applications (word processing, spreadsheets, graphics) compatible with a specific printer. Each type of printer requires unique commands to print correctly and to enable special features. For these reasons, different types of printers require their own printer drivers to operate correctly. With CentreWare printer drivers, you can print from your workstation to a Xerox system in a network environment.
Obtaining CentreWare Drivers CentreWare Print and Fax Services CD The installation .inf files for the Xerox system printer drivers are available in the Drivers folder on the CentreWare Print and Fax Services CD. The following picture illustrates a sample driver directory structure. Browse to the Drivers folder and locate the drivers you need. Figure I-1: Printer Driver Path NOTE: Driver availability may vary by printer model or operating system.
CentreWare Printer Driver Applications The following applications are included on the CentreWare Print and Fax Services CD: Xerox Print Driver Installation utility Admin Config Wizard TIFF Submission Tool Xerox Font Management Utility Xerox Printer Driver Installation Utility This utility is for anyone who would like to install printer drivers directly onto a PC or network server. NOTE: You may require administrator rights to perform the installation.
Driver Documentation The CentreWare printer drivers include the following documentation, designed to get you up and running quickly and easily. CentreWare Printer Drivers Guide for Windows This guide is intended for anyone who installs and configures CentreWare printer drivers and wants to know more about the features available in the printer drivers. The CentreWare Printer Drivers Guide is available on the CentreWare Print and Fax Services CD in electronic (PDF) format.
Support Support for your CentreWare printer drivers is available both online and by telephone. Internet Support Please visit the Xerox Web site (www.xerox.com) for product support information, product overviews, updates, and links to specific product sites. Printer drivers and PPDs can also be downloaded by clicking Support & Drivers. Telephone Support For additional assistance, you may contact the Xerox Welcome Center by telephone to speak with a Product Support Analyst.
1-8 CentreWare Printer Drivers for Microsoft Windows
2 Installing Windows Printer Drivers The CentreWare printer drivers support the special features and functions of Xerox systems, enabling fast, efficient printing from your desktop. This chapter provides installation instructions for all current Windows environments. What’s in this chapter: Requirements . . . . . . . . . . . . . . . . . . . . . . . . . . . . . . . . . . . . . . . . . . . . . . . . . . . . . . . . . . . . . 2-2 Installing Printer Drivers on Windows Networks . . . . . . . . . . . . .
Requirements Printer Drivers The Xerox printer drivers require: A maximum of 32 MB of available hard disk space per CentreWare Windows printer driver. Internet Explorer 5.5 or higher installed on the workstation for Windows NT, 2000, XP, or Server 2003 drivers. Xerox Printer Driver Installation Utility The Xerox Printer Driver Installation Utility and Admin Config Wizard require: Administrator privileges in Windows NT / 2000 / XP / Server 2003. Internet Explorer 5.5 or higher.
Installing Printer Drivers on Windows Networks In Windows environments, you can install a Xerox printer driver by using a direct installation, a custom installation, or a Point and Print installation. Direct Installation Use the Xerox Printer Driver Installation utility to install Xerox printer drivers for your network printers quickly and easily.
Direct Installation You can install the CentreWare printer drivers from the CD, from network location, from a URL, or intranet address. NOTE: After you start the installer, it detects the operating system of the server or workstation. If that operating system does not meet the product requirements, the installer issues a message and exits. This behavior would occur, for example, if you attempted to install drivers housed on a Windows 2000 server onto a client running Windows 3.1.
5 The installer scans supported direct connections as well as the local network subnet for printers. The results appear on the Select Printer screen. Figure 2-1: Discovered Printers Do one of the following: If the printer that you want to install appears in the list of discovered printers, click Select From the Following Discovered Printers and select the printer.
6 Click Options to configure any of the following settings: Figure 2-2: Driver Options Language—Select the language in which to run the installer. Driver Selection (PDL)—Choose at least one of the following PDLs: PCL 5, PCL 6, or PostScript (all printers). The PostScript driver is the default selection. For more information on driver selection, see Types of CentreWare Printer Drivers on page 1-3. NOTE: This setting does not impact installation of a printer that is assigned to a network queue.
7 Click Install. The installer copies the driver files, edits the registry, and adds the printer to the workstation or server. NOTE: If you do not have sufficient rights to install a printer on the designated server, a logon prompt will appear. Enter a valid user name and password to continue the installation. 8 9 The Installation Complete screen appears to report a successful installation.
Customizing the Installation The Admin Config Wizard is for system administrators who would like to set up standardized configuration files to install printer drivers quickly and easily. Using the wizard, you can customize the driver installation process to meet your organization’s needs. The Admin Config Wizard preconfigures installer parameters and saves these settings to a script file. Use this file with tools such as .
6 Click Continue. The Configuration Options dialog appears. Figure 2-4: Configuration Options 7 Configure the settings in the dialog box. See Table 2-1 on page 2-10 for a list of options. 8 Click Save Script to preserve your changes. NOTE: To set up multiple installation scenarios, first create a "baseline" script. Then, use the wizard to edit the baseline script and save each variation to its own path.
Table 2-1 contains the settings that you can customize with the Admin Config Wizard. Field Install Screen Default Location Contact Info Set Printer As Default Share Printer Launch Scanner Install Description Choose the default option for printer selection. This selection controls which printer detection option appears as the default choice. It does not dictate the printer to install. To set that, use the Port Value field described below.
Field Description Single Instance Only Select to prevent multiple copies of the printer definition from installing on a client. This option allows automated printer deployment by incorporating the installation in a login script. Save the Enter the location to save the configuration script file. If this location matches the path Configuration Script entered in the opening screen, the wizard only saves changes to the file to XeroxInstallerAdmin.xml file.
XeroxInstallerAdmin.xml The Admin Config Wizard writes the settings into the XeroxInstallerAdmin.xml file. The original version resides in the ...\Utilities\Installer folder. You may edit this file directly to configure installer settings that are beyond the scope of the Admin Config Wizard, such as an opening message screen or the default gateway and subnet mask for the Advanced search. Table 2-2 lists the fields that you can configure directly in the XeroxInstallerAdmin.
XML Field Description Numeric value that indicates which PDLs to install. 0 - Let the installer decide. 1 - PDL 1 (PostScript). 2 - PDL 2 (PCL 5e, PCL 5c). 4 - PDL 3 (PCL 6). 3 - PDL 1 and PDL 2. 7 - PDL 1, 2, and 3. Numeric value for installing scanner software after printer. Requires Windows 2000 or above and Xerox Multifunction Device. 0 - Do not launch scanner installation. 2 - Launch scanner installation.
Considerations for Enterprise Technologies Large organizations, or organizations with specialized requirements for security, reliability, or remote access frequently employ technologies that impact the installation process. This section briefly describes two technologies that CentreWare printer drivers support—clusters and Citrix MetaFrame—and the role of the Add Printer Driver Wizard in preparing these environments for successful printer definition.
Add Printer Driver Wizard This wizard loads the requested drivers on a Windows print server but does not create a queue or printer object. To run the Add Printer Driver Wizard: 1 At the desktop, click Start > Settings > Printers (Windows 2000) or Start > Printers and Faxes (Windows XP / Server 2003). The Printers window appears. 2 Click File > Server Properties. The Print Server Properties dialog box appears. 3 Click the Drivers tab. 4 Click Add. The Add Printer Driver Wizard appears.
Point and Print Installations This procedure assumes that a Xerox system on a network server has been installed with the appropriate CentreWare printer driver prior to performing Point and Print. NOTE: To standardize the device and document settings for Windows NT / 2000 / XP / Server 2003 printer drivers, see Preconfiguring Default Driver Settings on page 2-17 before installation. To perform Point and Print: 1 At the client workstation, access the desired network Xerox system through My Network Places.
Configuring Printer Drivers To use the CentreWare printer drivers most effectively, configure the drivers to reflect options available on the Xerox system. You can configure the drivers in one of the following ways: Preconfigure standard device and document settings in the driver prior to distributing them for installation. NOTE: This capability is not available for Windows 98 drivers. Configure installable options directly at a workstation.
3 Click Browse and locate the printer driver files for your Xerox system. For information about the driver files, see Obtaining CentreWare Drivers on page 1-4. 4 Copy the printer driver files for the Xerox system to the driver installation directory on the server. 5 Install the printer driver files for the Xerox system to the workstation.
19 Click OK to close the Printing Preferences dialog and the Properties dialog in 2000 / XP / Server 2003 or click OK to close the Document Defaults dialog in NT. 20 Locate the driver filename.dyc file created on the workstation in the Windows/System32/Spool/Drivers/W32x86/3 directory (for 2000 / XP / Server 2003) or WinNT/System32/Spool/Drivers/W32x86/2 directory (for NT). 21 Copy and paste the new driver filename.
3 Select the System Configuration (Configuration) tab. Figure 2-5: System Configuration Tab (Properties Dialog) 4 Click Bi-Directional Setup.... The Bi-Directional Communication dialog opens.
5 Enter the Device Name or TCP/IP address. 6 Select On to enable Bi-Directional communication. 7 Click OK. Bi-Directional communication is enabled. A Status button appears on the Paper/Output tab of the printer driver. By clicking Status, you can access current information about the printer. See About Bi-Directional Printer Drivers on page 2-23. NOTE: To change the SNMP Community Name, click SNMP Community Name.
4 Click Installable Options and select the options that are available on the Xerox system. Figure 2-8: Installable Options Dialog 5 Click OK twice to save the settings and close the dialog. 6 Click OK to close the printer driver.
About Bi-Directional Printer Drivers With Bi-Directional communication, a printer driver communicates with the printer through the network.With Bi-Directional communication, a printer driver communicates with the printer through the network. The Windows NT / 2000 / XP / Server 2003 printer drivers can provide Bi-Directional capabilities for TCP/IP networks.
Bi-Directional Driver Support Supported Operating Systems Bi-Directional drivers are supported for the following Microsoft Operating Systems: Windows NT (Workstation, Server, Enterprise Server) Windows 2000 (Professional, Server, Advanced Server) Windows XP (Home, Professional) Windows Server 2003 (Server, Enterprise Server) Client-Based Implementations Bi-Directional drivers installed on a client workstation communicate with Xerox systems via the following methods: Device Settings SNMP over TCP/IP Job Mo
Uninstalling Windows Printer Drivers NOTE: Before you uninstall CentreWare Windows printer drivers, ensure that the Xerox system you are deleting is not the default printer. If so, select another printer as the default. For Windows 9x and NT To uninstall the Windows 9x and NT printer drivers: 1 At the desktop, select Start > Settings > Printers. 2 Right-click on the icon for the Xerox system you want to delete and select Delete. 3 A confirmation message appears.
2-26 Installing Windows Printer Drivers
3 Printer Driver Features With the CentreWare printer drivers, you have an invaluable tool to save time and increase your productivity. These drivers offer over thirty-five feature options, depending on the type of driver and the installable finisher options, for you to choose how your document will look and print. The Help system is the primary source for information about using the printer drivers. At any time, you can access the Help system through the Help buttons on the driver.
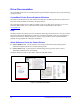
Driver Structure The driver arranges the features on the following tabs: Paper/Output, Special Pages, Image Options, Layout/Watermark, and Advanced. Figure 3-1: Printer Driver Interface The features on the tabs are organized for your convenience with the most frequently used features available when you open the driver. Small icons are placed next to the features so that you can quickly find the features you want. By clicking on the icon you can go through the list of options for that feature.
Tabs Features vary on the driver tabs depending on the driver type and installable options. General Tabs These driver tabs are accessed through the application’s print dialog. Driver setting changes on these tabs apply to the open document and application, and are temporary. Paper/Output The Paper/Output tab has the most frequently used features. For example, you can choose to print on two sides of the paper, select specific media on which to print, or delay your print job to a time you specify.
Default Tabs These driver tabs are accessed through the Printers folder and may be available only with administrative rights. From the desktop select Start > Settings > Printers (Windows NT / 2000) or Start > Printers and Faxes (Windows XP / Server 2003). Right-click on the printer icon and select Properties from the menu. The printer driver dialog appears. Driver settings from this dialog become the default settings.
Quick Reference Cards Feature Cards—Use this card to find out what a printer driver is, where it is located, and how to use it. The card also contains the location on the printer driver of each feature. Print the card to remind you of the many options you can use and where they are located on the printer driver. Feature Facts—Use this card to learn what you can do with some selected features to enhance the printing of your documents. Print the card and post it as a handy reference.
3-6 Printer Driver Features
4 Installing the Xerox Font Management Utility The Xerox Font Management Utility is a tool used to maintain fonts on network printers. Font lists can be developed and modified for your printers. For example, if you have special fonts that are used in documents but are not readily available on your printer(s), use the Xerox Font Management Utility to download the required fonts to the printers.
Installing the Xerox Font Management Utility To install the utility: 1 Insert the CentreWare Print and Fax Services CD into the appropriate drive. The AutoRun program starts. 2 Click Tools and Utilities. 3 Click Install Font Management Utility. 4 The installation wizard opens. Click Next. 5 Select the radio button to accept the license agreement. Click Next. 6 Type the user name and organization. 7 Specify who has access to the application. Click Next.
Uninstalling the Xerox Font Management Utility To uninstall the Xerox Font Management Utility, use the Add/Remove Programs wizard in the Control Panel folder. If you have access to the CentreWare Print and Fax Services CD, you can modify and/or repair the Xerox Font Management Utility. To uninstall the utility: 1 Select Start > Settings > Control Panel > Add/Remove Programs in Windows 9x / Me / NT / 2000 or Start > Control Panel > Add or Remove Programs in Windows XP / Server 2003.
-4 Installing the Xerox Font Management Utility
5 Installing the TIFF Submission Tool With the TIFF Submission Tool, you can submit TIFF (Tagged Image File Format) and PDF (Portable Document Format) files directly to a Xerox system for printing. The primary advantage of this application is that it does not add additional PostScript information to the submitted file (often referred to as a PostScript wrapper). Instead, the TIFF or PDF files are submitted as print-ready files.
Workstation Requirements The TIFF Submission Tool can be used on workstations that meet the following basic requirements: Windows 98 Windows NT Windows 2000 Windows XP 4 MB of hard drive space -2 Installing the TIFF Submission Tool
Installing the TIFF Submission Tool Use the following procedure to install the TIFF Submission Tool software on a Windows workstation. To install the TIFF Submission Tool: 1 Insert the CentreWare Print and Fax Services CD into the appropriate drive. The AutoRun program starts. 2 Click Tools and Utilities. 3 Click Install TIFF Submission Tool. 4 Click Next on the opening dialog of the installation wizard. 5 Read the Software License agreement and click Yes.
Uninstalling the TIFF Submission Tool Use the following procedure to uninstall the TIFF Submission Tool software on a Windows workstation. To uninstall the TIFF Submission Tool: 1 Select Start > Settings > Control Panel > Add/Remove Programs (Windows 9x / Me / NT / 2000) or Start > Control Panel > Add or Remove Programs (Windows XP / Server 2003). The Add/ Remove Programs application opens. 2 Follow the procedures in the application to remove the TIFF Submission Tool from your system.
6 Problem Solving Application, device, and network errors can occur in a variety of printing situations. In many cases, simply restarting the application, the workstation, or the printer will resolve the problem. This chapter includes some of the common problems and Frequently Asked Questions that pertain to CentreWare Printer Drivers and printing to your Xerox system. What’s in this chapter: Troubleshooting a Problem . . . . . . . . . . . . . . . . . . . . . . . . . . . . . . . . . . . . . . . . . . .
Troubleshooting a Problem When a problem persists, document the error messages and gather information to define the problem. The following problem-solving procedures are recommended: Accurately define the problem. When, where, and how does the problem occur? Reproduce the problem. Can the problem be reproduced consistently or is it an intermittent problem? Ask other users if they have encountered the problem, and keep a log to track problem occurrences.
Common Issues This section discusses some common application and printer driver functionality issues. Adobe Acrobat Printing All versions of Adobe Acrobat have exhibited various forms of distorted output when printing from a PCL driver. Stray lines, random character spacing, and data loss have been observed on various PDF documents. A CentreWare PostScript driver is recommended for printing Acrobat PDF files.
PDF Printing When printing a PDF, sending a large file may result in the printing of print limit check error sheets or only a banner sheet. If this occurs, print the PDF file using the PostScript printer driver or try printing the PDF file using LPR. Windows 98 / Me PCL5c printer drivers have occasional problems with some PDF files, resulting in blank characters and incorrect fonts within the printed documents.
Print Colored Text in Black This feature may not work with some applications, or you may have to select the option from within the application if it is supported. Certain applications, such as WordPerfect and MS Publisher, always print text as graphics or may default to the graphics mode when memory is low or when the text is very complex. When these circumstances occur, the Print Colored Text in Black feature in the CentreWare PCL printer drivers will not work.
Frequently Asked Questions How do I obtain printer drivers? Printer drivers are available on the CentreWare Print and Fax Services CD or from the Xerox Web site at www.xerox.com. See Obtaining CentreWare Drivers on page 1-4 for more information.
Index A About Dialog 3-4 Accounting Dialog 3-4 Add Printer Driver Wizard 2-15 Advanced Tab 3-3 B Bi-Directional Printer Drivers 2-23 Bi-Directional Driver Support Client-Based 2-24 Operating Systems 2-24 Server-Based 2-24 Setup 3-4 C Citrix MetaFrame 2-14 Clustering 2-14 Configuration Dialog Accounting 3-4 Bi-Directional Communication Setup 34 Installable Options 3-4 Configuring Installable Options Automatically 2-19 Manually 2-17, 2-21 Configuring printer drivers 2-17 Considerations for Enterprise Technolo
Installing Direct Installation 2-3 Distributed Installation 2-3 Font Management Utility 4-2 Point and Print Installation 2-3 Printer Drivers 2-3 TIFF Submission Tool 5-1, 5-3 Internet Support 1-7 Introducing Font Management Utility 1-5 TIFF Submission Tool 1-5 J Job Notes Tab 3-4 L Layout/Watermark Tab 3-3 O Online Support 1-7 P Paper/Output Tab 3-3 PCL 1-3 Point and Print 2-16 PostScript 1-3 PPD Files 1-4 Printer Drivers Bi-Directional 2-23 Configuration 2-17 Installing 2-3 Overview 1-3 Requirements 2-2 Ta