A USING YOUR MACHINE IN LINUX You can use your machine in a Linux environment.
Getting Started The supplied CD-ROM provides you with Xerox’s MFP driver package for using your machine with a Linux computer. Xerox’s MFP driver package contains printer and scanner drivers, providing the ability to print documents and scan images. The package also delivers powerful applications for configuring your machine and further processing of the scanned documents.
Installing the MFP Driver System Requirements Supported OS • Redhat 7.1 and above • Linux Mandrake 8.0 and above • SuSE 7.1 and above • Caldera OpenLinux 3.1 and above • Turbo Linux 7.0 and above • Slackware 8.1 and above Recommended Hardware Requirements • Pentium IV 1 GHz or higher • RAM 256 MB or higher • HDD 1 GB or higher NOTES: • It’s also necessary to claim swap partition of 300 MB or larger for working with large scanned images. • The Linux scanner driver supports the optical resolution at maximum.
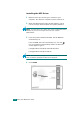
Installing the MFP Driver 1 Make sure that you connect your machine to your computer. Turn both the computer and the machine on. 2 When the Administrator Login window appears, type in root in the Login field and enter the system password. NOTE: You must log in as a super user (root) to install the printer software. If you are not a super user, ask your system administrator. 3 Insert the printer software CD-ROM. The CD-ROM will automatically run.
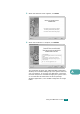
When the welcome screen appears, click Next. 6 When the installation is complete, click Finish. The installation program has added the MFP Configurator desktop icon and Xerox MFP group to the system menu for your convenience. If you have any difficulties, consult the onscreen help that is available through your system menu or can otherwise be called from the driver package windows applications, such as MFP Configurator or Image Editor. Using Your Machine In Linux A.
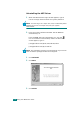
Uninstalling the MFP Driver 1 When the Administrator Login window appears, type in root in the Login field and enter the system password. NOTE: You must log in as a super user (root) to install the printer software. If you are not a super user, ask your system administrator. 2 Insert the printer software CD-ROM. The CD-ROM will automatically run. If the CD-ROM does not automatically run, click the icon at the bottom of the desktop.
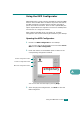
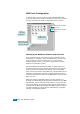
Using the MFP Configurator MFP Configurator is a tool primarily intended for configuring MFP devices. Since an MFP device combines the printer and scanner, the MFP Configurator provides options logically grouped for printer and scanner functions. There is also a special MFP port option responsible for the regulation of access to an MFP printer and scanner via a single I/O channel. After installing the MFP driver (see page A.3), the MFP Configurator icon will automatically be created on your desktop.
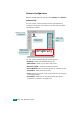
Printers Configuration Printers configuration has the two tabs; Printers and Classes. Printers Tab You can see the current system’s printer configuration by clicking on the printer icon button on the left side of the MFP Configurator window. Switches to Printer configuration. Shows all of the installed printer. Shows the status, model name and URI of your printer. Printer control buttons. See below.
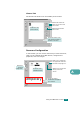
Classes Tab The Classes tab shows a list of available printer classes. Renews the classes list. Allows you to add a new printer class. Shows all of the printer classes. Removes the selected printer class. Shows the status of the class and the number of printers in the class. Scanners Configuration In this window, you can monitor the activity of scanner devices, view a list of installed Xerox MFP devices, change device properties, and scan images.
MFP Ports Configuration In this window, you can view the list of available MFP ports, check the status of each port and release a port that is stalled in busy state when its owner is terminated for any reason. Renews the available ports list. Releases the selected port. Switches to MPF ports configuration. Shows all of the available ports.
Configuring Printer Properties Using the properties window provided by the Printers configuration, you can change the various properties for your machine as a printer. 1 Open the MFP Configurator. If necessary, switch to Printers configuration. 2 Select your machine on the available printers list and click Properties. 3 The Printer Properties window opens. Temporary The following five tabs display at the top of the window: • General: allows you to change the printer location and name.
Printing a Document Printing from Applications There are a lot of Linux applications that you are allowed to print from using Common UNIX Printing System (CUPS). You can print on your machine from any such application. 1 From the application you are using, select Print from the File menu. 2 Select Print directly using lpr. 3 In the Xerox LPR window, select the model name of your machine from the Printer list and click Properties. Click. Temporary 4 Change the printer and print job properties.
The following four tabs display at the top of the window. • General - allows you to change the paper size, the paper type, and the orientation of the documents, enables the duplex feature, adds start and end banners, and changes the number of pages per sheet. • Text - allows you to specify the page margins and set the text options, such as spacing or columns. • Graphics - allows you to set image options that are used when printing images/files, such as color options, image size, or image position.
Scanning a Document You can scan a document using the MFP Configurator window. 1 Double-click the MFP Configurator on your desktop. 2 Click the 3 Select the scanner on the list. button to switch to Scanners Configuration. Click your scanner. Temporary When you have only one MFP device and it is connected to the computer and turned on, your scanner appears on the list and is automatically selected.
5 Load the document to be scanned face up into the ADF (Automatic Document Feeder) or face down on the document glass. For details, see page 7.6. For detailed guidelines for preparing an original document, see page 5.3. 6 Click Preview in the Scanner Properties window. The document is scanned and the image preview appears in the Preview Pane. Drag the pointer to set the image area to be scanned. Temporary 7 Change the scan options in the Image Quality and Scan Area sections.
9 The scanned image appears in the new Image Editor window. If you want to edit the scanned image, use the toolbar. For further details about editing an image, see page A.17. 10 When you are finished, click Save on the toolbar. 11 Select the file directory where you want to save the image and enter the file name. 12 Click Save. Adding Job Type Settings You can save your scan option settings to retrieve for a later scanning.
To save a Job Type setting for the next scan job: 1 Select the setting you want to use from the Job Type dropdown list. 2 Click Save. The next time you open the Scanner Properties window, the saved setting is automatically selected for the scan job. To delete a Job Type setting: 1 Select the setting you want to delete from the Job Type drop-down list. 2 Click Delete.
Tools Function Cancels your last action. Restores the action you canceled. Allows you to scroll through the image. Crops the selected image area. Zooms the image out. Zooms the image in. Allows you to scale the image size; you can enter the size manually, or set the rate to scale proportionally, vertically, or horizontally. Allows you to rotate the image; you can select the number of degrees from the drop-down list. Allows you to flip the image vertically or horizontally.