WorkCentre PE220 User Guide 708P88184
Prepared by: Xerox GKLS European Operations Bessemer Road Welwyn Garden City Hertfordshire AL7 1BU ENGLAND ©2005 by Xerox Corporation. All rights reserved. Copyright protection claimed includes all forms and matters of copyrighted material and information now allowed by statutory or judicial law or hereinafter granted, including without limitations, material generated from the software programs which are displayed on the screen, such as icons, screen displays, looks etc.
Table of Contents 1 Welcome About This Guide . . . . . . . . . . . . . . . . . . . . . . . . . . . . . . . . . . . . . . . . . . . . . . . . . . . . .1-2 Getting to know your machine . . . . . . . . . . . . . . . . . . . . . . . . . . . . . . . . . . . . . . . . . . .1-3 Component location . . . . . . . . . . . . . . . . . . . . . . . . . . . . . . . . . . . . . . . . . . . . .1-3 Control Panel Functions . . . . . . . . . . . . . . . . . . . . . . . . . . . . . . . . . . . . . . . . . . . . . . . .
1 Table of Contents 4 Copying Making Copies . . . . . . . . . . . . . . . . . . . . . . . . . . . . . . . . . . . . . . . . . . . . . . . . . . . . . . .4-2 Loading Paper for Copying . . . . . . . . . . . . . . . . . . . . . . . . . . . . . . . . . . . . . . . .4-2 Preparing a Document . . . . . . . . . . . . . . . . . . . . . . . . . . . . . . . . . . . . . . . . . . .4-2 Making Copies on the Document Glass . . . . . . . . . . . . . . . . . . . . . . . . . . . . . .
Table of Contents 6 Scanning Scanning Basics . . . . . . . . . . . . . . . . . . . . . . . . . . . . . . . . . . . . . . . . . . . . . . . . . . . . . .6-2 Scanning From the Control Panel to an Application . . . . . . . . . . . . . . . . . . . . .6-2 Scanning Process with TWAIN-enabled Software . . . . . . . . . . . . . . . . . . . . . .6-3 Scanning Using the WIA Driver . . . . . . . . . . . . . . . . . . . . . . . . . . . . . . . . . . . . .6-4 7 Faxing Setting Up the Fax System . . . . . . . . . . . . .
1 Table of Contents Maintaining the Smart Kit ® Print Cartridge . . . . . . . . . . . . . . . . . . . . . . . . . . . . . . . . .8-6 Smart Kit ® Print Cartridge Storage . . . . . . . . . . . . . . . . . . . . . . . . . . . . . . . . .8-6 Expected Cartridge Life . . . . . . . . . . . . . . . . . . . . . . . . . . . . . . . . . . . . . . . . . .8-6 Redistributing Print Cartridge Toner . . . . . . . . . . . . . . . . . . . . . . . . . . . . . . . . .8-6 Replacing the Smart Kit ® Print Cartridge . . . . . . .
1 1 Welcome Welcome Thank you for choosing the Xerox PE220. This product has been designed for ease of use, but to use your machine to its fullest potential take some time to read this User Guide.
1 Welcome About This Guide This User Guide provides information you need for setting up your machine. It also provides all the detailed instructions for using your machine as a printer, scanner, copier and facsimile and information for maintaining and troubleshooting the machine. Throughout this User Guide some terms are used interchangeably: • Paper is synonymous with media. • Document is synonymous with original. • Page is synonymous with sheet. • Xerox PE 220 is synonymous with the machine.
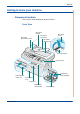
1 Welcome Getting to know your machine Component location These are the main components of your machine: Front View Document Guides Document Input Tray Automatic Document Feeder Document Cover Document Output Tray Document Glass Control Panel Paper Output Extension Smart Kit ® Print Cartridge Paper Input Tray Front Door Output Tray (Face Down) Xerox PE220 Manual Tray 1-3
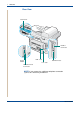
1 Welcome Rear View Rear Cover Parallel Connector Power Switch EXT. Jack USB Connector Line Jack AC Power Cord Connector NOTE: If your country has a different telephone connection system, this socket may be blocked.
1 Welcome Control Panel Functions 1 2 3 4 5 6 7 10 Feature 8 9 Description 1 Lighten/ Darken Adjusts the brightness of the image for the current copy job. 2 Original Type Selects the document type for the current copy job. Reduce/Enlarge Makes the image on the copy smaller or larger than the original.
1 Welcome Feature 6 7 Phone Book Allows you to store frequently-dialed fax numbers as one or two-digit speed dial or group dial numbers for automatic dialing and edit the stored numbers. Also allows you to print a Phonebook list. Manual Dial Engages the telephone line. Broadcasting Allows you to send a fax to multiple destinations. Redial/Pause In Standby mode, redials the last number or in Edit mode, inserts a pause into a fax number.
1 Welcome Special Features Your new machine is equipped with special features that improve the print quality. You can: Print with excellent quality and high speed • You can print up to 600 dots per inch (dpi). • Up to 20 pages per minute in A4 or 20 pages per minute in Letter. Paper tray capacity and media recommendations • Manual tray supports one sheet of envelopes, labels, transparencies, custom-sized materials, postcards and heavy paper.
1 Welcome Customer Support If you need assistance during or after product installation, please visit the Xerox website for online solutions and support: http://www.xerox.com If you require further assistance, call our experts at the Xerox Welcome Center, or contact your local representative. When telephoning please quote the machine serial number.
1 Welcome Safety Notes Read these safety notes carefully before using this product to ensure you operate the equipment safely. Your Xerox product and recommended supplies have been designed and tested to meet strict safety requirements. These include safety agency approval, and compliance to established environmental standards. Please read the following instructions carefully before operating the product and refer to them as needed to ensure the continued safe operation of your product.
1 Welcome Operator Accessible Areas This equipment has been designed to restrict operator access to safe areas only. Operator access to hazardous areas is restricted with covers or guards, which would require a tool to remove. Never remove these covers or guards. Maintenance Any operator product maintenance procedures will be described in the user documentation supplied with the product. Do not to carry out any maintenance on this product, which is not described in the customer documentation.
1 Welcome Disconnect Device The power cable is the disconnect device for this equipment. It is attached to the back of the machine as a plug-in device. To remove all electrical power from the equipment, disconnect the power cable from the electrical outlet. Laser Safety Information CAUTION: Use of controls, adjustments or performance of procedure other than those specified herein may result in hazardous light exposure.
1 Welcome Do Not Do These: • Never use a plug that lacks an earth connection terminal to connect the product to an electrical outlet. • Never attempt any maintenance function that is not specifically described in this documentation. • This equipment should not be placed in a built-in installation unless proper ventilation is provided, please contact your Authorized local dealer for further information. • Never remove covers or guards that are fastened with screws.
1 Welcome For Consumables Store all consumables in accordance with the instructions given on the package or container. • Keep all consumables away from the reach of children. • Never throw toner, print cartridges or toner containers into an open flame. Radio Frequency Emissions United States, Canada, Europe, Australia/New Zealand NOTE: This equipment has been tested and found to comply with the limits for a class A digital device, pursuant to Part 15 of the FCC Rules.
1 Welcome Regulatory Information CE Mark The CE mark applied to this product symbolizes Xerox's declaration of conformity with the following applicable Directives of the European Union as of the dates indicated: January 1, 1995: Council Directive 72/23/EEC amended by Council directive 93/68/EEC, approximation of the laws of the member states related to low voltage equipment.
1 Welcome In order to program this information into your FAX machine refer to Setting the Machine ID – page 2-14 and follow the steps provided. To enter the date and time, please refer Setting the Date and Time – page 2-16. Data Coupler Information: This equipment complies with Part 68 of the FCC rules and the requirements adopted by the Administrative Council for Terminal Attachments (ACTA).
1 Welcome the warranty period is null and void. This equipment must not be used on party lines. Connection to party line service is subject to state tariffs. Contact the state public utility commission, public service commission or corporation commission for information. If your office has specially wired alarm equipment connected to the telephone line, ensure the installation of this Xerox equipment does not disable your alarm equipment.
1 Welcome Europe Certification to 1999/5/EC Radio Equipment & Telecommunications Terminal Equipment Directive This Xerox product has been self-certified by Xerox for pan-European single terminal connection to the analogue public switched telephone network (PSTN) in accordance with Directive 1999/5/EC.
1 Welcome Environmental Compliance USA Energy Star As an ENERGY STAR® partner, Xerox Corporation has determined that (the basic configuration of) this product meets the ENERGY STAR guidelines for energy efficiency. The ENERGY STAR and ENERGY STAR MARK are registered United States trademarks. The ENERGY STAR Office Equipment Program is a team effort between U.S.
1 Welcome Illegal Copies USA Congress, by statute, has forbidden the reproduction of the following subjects under certain circumstances. Penalties of fine or imprisonment may be imposed on those guilty of making such reproductions. 1.
1 Welcome 7. Immigration Papers. 8. Draft Registration Cards. 9. Selective Service Induction Papers that bear any of the following Registrant's information: Earnings or Income Dependency Status Court Record Previous military service Physical or mental condition Exception: United States military discharge certificates may be photographed. 10. Badges, Identification Cards, Passes, or Insignia carried by military personnel, or by members of the various Federal Departments, such as FBI, Treasury, etc.
1 Welcome 8. Documents, registers or records kept by public officials charged with the duty of making or issuing certified copies thereof, where the copy falsely purports to be a certified copy thereof. 9. Copyrighted material or trademarks of any manner or kind without the consent of the copyright or trademark owner. The above list is provided for your convenience and assistance, but it is not all-inclusive, and no liability is assumed for its completeness accuracy.
1 Welcome Product Recycling and Disposal If you are managing the disposal of your Xerox product, please note that the product contains lead, mercury, and other materials whose disposal may be regulated due to environmental considerations in certain countries or states. The presence of lead and mercury is fully consistent with global regulations applicable at the time that the product was placed on the market.
2 2 Getting Started Getting Started Before you start to use your machine, there are a number of tasks to perform. Using the instructions provided in this chapter, unpack and setup your machine.
2 Getting Started Unpacking the machine 1. Remove the machine and all accessories from the packing carton. Make sure that the machine has been packed with the following items: NOTE: The appearance of the power cord and the telephone line cord may differ depending on your country’s specifications. The Power Cord must be plugged into a grounded power socket. NOTE: The CD-ROMs contain the Xerox printer driver, scan drivers, software, User Guide, and ControlCentre.
2 Getting Started 2. Remove the packing tape from the front, back, and sides of the machine. Tape Selecting a Location Select a level, stable place with adequate space for air circulation around the machine. Allow extra space for opening doors and trays. The area should be well-ventilated and away from direct sunlight or sources of heat, cold, and humidity. Do not set the machine close to the edge of a desk or table.
2 Getting Started Installing the Smart Kit ® Print Cartridge 1. Open the front door. 2. Remove the Smart Kit ® Print Cartridge from it’s bag and remove the paper protecting the cartridge by pulling the packing tape. 3. Gently rock the cartridge 5 or 6 times to distribute the toner. This will loosen the toner and make sure that you get the maximum copies from the cartridge. NOTE: If toner gets on your clothing, wipe it off with a dry cloth and wash clothing in cold water.
2 Getting Started 4. Unfold the Smart Kit ® Print Cartridge handle. Hold the handle and insert the cartridge into the machine until it snaps into place. NOTE: When inserting or removing the Smart Kit ® Print Cartridge take care not to scratch it against the machine frame. This will damage the cartridge and may produce marks on the copies. 5. Close the front door. If the door is not firmly closed, printing errors may occur.
2 Getting Started Loading Paper The tray can hold a maximum of 150 sheets of 20 lb (75 g/m2) plain paper. 1. Pull the tray toward you to open. 2. Squeeze the rear guide and pull it out to extend the tray. 3. Fan the edges of the paper stack to separate the pages. Gently tap the stack on a flat surface to even up the edges. 4. Load paper into the tray to register at the rear, left corner of the tray. Make sure that all four corners lay flat in the tray. NOTE: Do not put too much paper in the tray.
2 Getting Started 5. Squeeze the rear guide and side guide and move them so that they just touch the edge of the paper stack. NOTE: Do not push the guides hard against the paper stack to cause the stack to bend. If you do not adjust the paper side guide correctly, paper jams may occur.
2 Getting Started Making Connections 1. Plug one end of the supplied telephone line cord into the LINE jack on the machine and the other end into the telephone wall socket. NOTE: If you want to use your machine to receive both faxes and voice calls, you will need to connect a telephone and/or answering machine to your machine. To the wall socket 2. Plug the cord of your extension phone or answering machine into the EXT. jack.
2 Getting Started connected to the EXT. jack on the machine, the external equipment will fail to ring when receiving an incoming call as the machine is designed to operate with the latest technology. To prevent this incompatibility, use two-wire (newer equipment) telephones or answering machines.
2 Getting Started 3. Connect a USB cable to the USB port on your machine. Connect to the USB port on your computer. 4. If you want to use a parallel printer cable, purchase only an IEEE-1284 compliant parallel cable and connect it to the parallel connector on your machine. Push the metal clips down to fit inside the notches on the cable plug and then to the parallel port on your computer. NOTE: You only need to connect one of the cables mentioned above.
2 Getting Started Switching On the Machine 1. Plug one end of the supplied power cord into the AC socket on the machine and the other end into a properly grounded AC outlet. 2. Press the power switch to turn the machine on. “Warming Up Please Wait” appears on the display indicating that the machine is now on. To view your display text in another language, see Changing the Display Language and Country on page 14. To the AC outlet WARNING: The fusing area inside the machine is hot.
2 Getting Started Installing Printer Software NOTE: You must install software using the supplied CD-ROM after you have set up your machine and connected it to your computer. For details, see Chapter 5, Printing. The CD-ROM provides you with the following software: Programs for Windows To use your machine as a printer and scanner in Windows, you must install the MFP driver.
2 Item Free disk space Internet Explorer Requirements Getting Started Recommended Windows 98/Me/NT 4.0/2000 300 MB or higher 1 GB Windows XP 1 GB or higher 5 GB 5.0 or higher 5.5 Macintosh 10.3 or later - See Chapter 5, Printing Various Linux - See Chapter 5, Printing.
2 Getting Started Changing the Display Language and Country Setting Language To change the language that displays on the control panel, follow these steps: 1. Press Menu until “Machine Setup” appears on the top line of the display. 2. Press the scroll button ( or ) until “Language” appears on the bottom line of the display. 3. Press Enter. The current setting appears on the bottom line of the display. 4. Press the scroll button ( or ) until the language you want appears on the display. 5.
2 Getting Started NOTE: If you make a mistake while entering numbers, press the button to delete the last digit. 5. Press Enter when the number on the display is correct. The display asks you to enter an ID. 6. Enter your name or the company name using the number keypad. 7. You can enter alphanumeric characters using the number keypad, and include special symbols by pressing the 0 button. 8.
2 Getting Started Keypad Letters and Numbers Key Assigned numbers, letters, or characters 1 1 Space 2 A B C 2 3 D E F 3 4 G H I 4 5 J K L 5 6 M N O 6 7 P Q R S 8 T U V 8 9 W X Y Z 0 + - , . 7 9 ‘ / * # & 0 Changing Numbers or Names If you make a mistake while entering a number or name, press the button to delete the last digit or character. Then enter the correct number or character.
2 Getting Started 3. Enter the correct time and date using the number keypad. Unit Range Month 01 - 12 Day 01 - 31 Year Required four digits Hour 01 - 12 (12 hour mode) 00 - 23 (24 hour mode) Minute 00 - 59 NOTE: The date format may differ from country to country. You can also use the scroll button ( or ) to move the cursor under the digit you want to correct and enter a new number. 4. To select “AM” or “PM” for 12-hour format, press the or button. 5.
2 Getting Started Setting the Paper Size and Type After loading paper in the tray, you need to set the paper size and type using the control panel buttons. These settings will apply to copy and fax modes. For PC-printing, you need to select the paper size and type in the print driver you use on your PC. 1. Press Menu. The display shows “Paper Setting” on the top line of the display. 2. Press the scroll button ( or ) to display “Paper Size” on the bottom line and press Enter to access the menu item. 3.
2 Getting Started For the ringer volume, you can select “Off”, “Low”, “Med”, and “High”. Setting “Off” means that the ringer does not sound. The machine works normally even if the ringer is turned off. 4. Press Enter to save the selection. The next sound option appears. 5. If necessary, repeat steps 2 through 4. 6. To return to Standby mode, press Stop/Clear. Speaker Volume 1. Press Manual Dial. A dial tone sounds from the speaker. 2. Press the scroll button ( or ) until you hear the volume you want.
2 Getting Started Using the Save Modes Toner Save Mode Toner Save mode allows your machine to use less toner on each page. Activating this mode extends the life of the Smart Kit ® Print Cartridge beyond what one would experience in the normal mode, but it reduces print quality. NOTE: When PC-printing, you can also turn on or off the toner save mode in the printer properties. For details, see Chapter 5, Printing.
3 Paper Handling 3Paper Handling This chapter explains how to select print materials and load them into your machine.
3 Paper Handling Selecting Print Materials You can print on a variety of print materials, such as plain paper, envelopes, labels, and transparencies. Always use print materials that meet the guidelines for use with this machine. See Paper Specifications on page 10-6. To get the best possible print quality, use only high-quality copier-grade paper. When you choose print materials, consider the following: • Size: You can use any size paper that fits easily within the paper adjusters of the tray.
3 Paper Handling Guidelines for Paper and Special Materials When selecting or loading paper, envelopes, or other special material, keep these guidelines in mind: Xerox PE220 • Always use paper and other materials that conform with the specifications listed under Paper Specifications on page 10-6. • Attempting to print on damp, curled, wrinkled, or torn paper can cause paper jams and poor print quality. • Use only high quality copier grade paper for the best print quality.
3 3-4 Paper Handling • For labels: – Verify that their adhesive material can tolerate a fusing temperature of 200 oC (392 o F) for 0.1 second. – Make sure that there is no exposed adhesive material between them. Exposed areas can cause labels to peel off during printing, which can cause paper jams. Exposed adhesive can also cause damage to machine components. – Do not load a sheet of labels through the machine more than once. The adhesive backing is designed for one pass through the machine.
3 Paper Handling Loading Paper Proper paper loading helps prevent paper jams and ensure trouble-free printing. Do not remove the paper in the tray while a job is printing. Doing so may cause a paper jam. See Paper Type, Input Sources, and Capacities on page 3-2 for acceptable paper size and capacity for the tray. Using the Paper Tray The paper tray holds 150 sheets of paper. For details about loading paper in the tray, see Loading Paper on page 2-6.
3 Paper Handling NOTE: • If you experience jams with card stock feeding, turn the paper over and try again. • Manually loading paper and pressing Start to start feeding is only available with PC printing. • Because the Manual Feed mode does not print jobs automatically and continuously, incoming faxes are stored in memory instead of printing immediately. • When you press Stop/Clear in the Manual Feed mode, the print job in progress is canceled.
4 Copying 4 Copying This chapter gives you step-by-step instructions for copying documents. This chapter includes: NOTE: You need to press Copy to activate Copy mode.
4 Copying Making Copies Loading Paper for Copying The instructions for loading copy materials are the same whether you are printing, faxing, or copying. For further details, see Loading Paper on page 2-6 NOTE: For copying, you can only use Letter, A4, Legal, Folio, Executive, B5, A5, or A6 sized print materials. Preparing a Document You can use the document glass or the Automatic Document Feeder (ADF) to load an original document for copying, scanning, and sending a fax.
4 Copying Making Copies on the Document Glass 1. Lift and open the document cover. 2. Place the document face down on the document glass and align it at the top left corner of the glass. NOTE: Make sure that no documents are in the ADF (Automatic Document Feeder). If a document is detected in the ADF, the machine gives it priority over the document on the document glass. 3. Close the document cover. NOTE: • Lower the document cover gently to avoid damage to the machine or personal injury.
4 Copying • Dust on the document glass may cause black spots on the printout. Always keep it clean. See Cleaning the Scan Unit on page 8-5. • To get the best scan quality, especially for colored or gray-scaled images, use the document glass. Making Copies from the Automatic Document Feeder 1. Load the document face up into the ADF (Automatic Document Feeder). You can insert up to 30 sheets at a time. Make sure that the bottom of the document stack matches the paper size marked on the document tray.
4 Copying Selecting Copy Options Basic Copy Features The buttons on the control panel let you select all basic copy options: brightness, document type, copy size, and copy quantity. Set the following options for the current copy job before pressing Start to make copies. NOTE: If you press Stop/Clear while setting the copy options, all of the options you have set for the current copy job will be canceled and returned to their default status.
4 Copying Reduce/Enlarge Using the Reduce/Enlarge button will reduce or enlarge the size of a copied image from 25% to 400% when you copying from the document glass or from 25% to 100% from the ADF. To select from the predefined copy sizes: 1. Press Reduce/Enlarge. The default setting appears on the bottom line of the display. 2. Press Reduce/Enlarge or the scroll buttons ( or ) to find the size setting you want. 3. Press Enter to save the selection. To fine-tune the size of copies: 1.
4 Copying Special Copy Features You can use the following copy features: • Off: Prints in normal mode. • Clone: Prints multiple image copies from the original document on a single page. The number of images is automatically determined by the original image and paper size. See Clone Copying on page 4-7 • Copy Collate: Sorts the copy job. For example, if you make 2 copies of a 3 page document, one complete 3 page document will print followed by the second complete document.
4 Copying 1 2 1 3 2 Collation Copying 3 This special copy feature is available only when you load documents in the ADF. 1. Load the documents to be copied in the ADF. 2. Press Menu until “Copy Feature” appears on the top line of the display. 3. Press the scroll button ( or ) until “Copy Collate” displays on the bottom line. 4. Press Enter to make your selection. 5. If necessary, customize the copy settings, including Lighten/Darken and original type, by using the control panel buttons.
4 Copying 1. Place the ID Card to be copied on the document glass and close the cover. 2. Press Menu until “Copy Feature” appears on the top line of the display. 3. Press the scroll button ( or ) until “ID Card Copy” displays on the bottom line. 4. Press Enter to confirm your selection. 5. If necessary, customize the copy settings, including Lighten/Darken and original type, by using the control panel buttons. See “Selecting Copy Options” on page 4-5. 6. Press Start to begin copying.
4 Copying 1. Place the document to be copied on the document glass and close the cover. 2. Press Menu until “Copy Feature” appears on the top line of the display. 3. Press the scroll button ( or ) until “Poster” displays on the bottom line. 4. Press Enter to make your selection. 5. If necessary, customize the copy settings, including Lighten/Darken and original type, by using the control panel buttons. See “Selecting Copy Options” on page 4-5. 6. Press Start to begin copying.
4 Copying Copy Setup The copy settings on the machine can be customised to suit your copying requirements. Changing the Default Settings The copy options, including lighten/darken, original type, copy size and copy quantity, can be set to the most frequently used modes. When you copy a document, the default settings are used unless they are changed by using the corresponding buttons on the control panel. To create your own default settings: 1.
4 Copying Setting the Favorite Copy Option A copy feature can be assigned to the Favorite Copy button for quick access to that feature. 1. Press Menu on the control panel until “Copy Setup” appears on the top line of the display. 2. Press the scroll button ( or ) to display “Favorite Copy” on the bottom line. 3. Press Enter to access the menu item. 4. Press the scroll button ( or ) until the feature you want appears on the display.
5 Printing 5 Printing This chapter includes: Xerox PE220 • Printing a Document – page 5-2 • Canceling a Print Job – page 5-2 • Installing Printer Software in Windows – page 5-3 • Advanced Printing – page 5-17 • Sharing the Printer Locally – page 5-26 • Using ControlCentre – page 5-27 • Using Your Printer in Linux – page 5-31 • Using Your Machine with a Macintosh – page 5-45 5-1
5 Printing Printing a Document This machine allows you to print in various Windows applications, a Macintosh computer, or a Linux system. The exact steps for printing a document may vary depending on the application you use. Canceling a Print Job If the print job is waiting in a print queue or print spooler, such as the Printer group in Windows, delete the job as follows: 1. Click the Windows Start button. 2. For Windows 98/NT4.0/2000/Me, select Settings and then Printers.
5 Printing Installing Printer Software in Windows This chapter includes: • Installing Printer Software – page 5-3 NOTE: For Windows NT 4.0/2000/XP, the system administrator should install the software. Installing Printer Software All applications should be closed on your PC before beginning installation. Installing Xerox Drivers in Microsoft Windows XP or Windows 2000 using the USB port 1. Plug the USB cable into the PE220 and connect it to your Personal Computer (PC).
5 Printing 8. The Hardware Wizard will search the CD-ROM drive for the print driver and will display the following screen. 9. When the "Completing the Found New Hardware Wizard" screen displays click Finish. The print driver for the PE220 is now loaded. Installing Xerox Drivers in Microsoft Windows XP, 2000 or Windows 98/ME using the Parallel port 1. Plug the Parallel cable into the PE220 and connect it to your Personal Computer (PC). Start your PC and turn on the PE220. 2.
5 Printing 4. Choose the components you want to install and then click Continue. 5. Click Continue. 6. Click Finish. The driver installation is now complete. Installing Xerox Drivers in Microsoft Windows 98 or Windows Millennium using the USB port 1. Plug the USB cable into the PE220 and connect it to your Personal Computer (PC). Start your PC and turn on the PE220. 2. Insert the Xerox Drivers CD into the CD-ROM drive. 3. The "Add New Hardware Wizard" will display. Click Next. 4.
5 Printing ii) In Windows 98 you must specify the location. Browse to the CD-ROM drive and the "Usb" folder on the CD and click OK. Click Next when prompted then Finish. The USB composite driver is then loaded. 5. The "Add New Hardware Wizard" will display. Click Next to install the USB hardware driver for the PE220. 6. You must specify the location. Browse to the CD-ROM drive and the "Usb" folder on the CD and click OK. Click Next when prompted then click Finish.
5 Printing 11. At the next screen click Have Disk, and browse to your CD-ROM drive. Open the "driver" directory, then open the "Print" directory, then open the "AddPrint" directory and then choose "Win9x" directory and click OK. 12. The next screen will display the "Xerox WorkCentre PE220 Series " driver, click Next. 13. Click the port that the printer cable is attached to, in this case USB and click Next. 14. You can type in a name for your new printer or accept the default then click Next. 15.
5 Printing Basic Printing Printing a Document NOTE: Your printer driver Properties window that appears in this User Guide may differ depending on the printer in use. However the composition of the printer properties window is similar. NOTE: Check the Operating System(s) that are compatible with your printer. Please refer to the OS Compatibility section of Printer Specifications in your Printer User Guide. NOTE: If you need to know the exact name of your printer, you can check the supplied CD-ROM.
5 Printing Printer Settings You can use the printer properties window, which allows you to access all of the printer options you need when using your printer. When the printer properties are displayed, you can review and change the settings needed for your print job. Your printer properties window may differ, depending on your operating system. This User Guide shows the Properties window for Windows XP.
5 Printing Layout Tab The Layout tab provides options to adjust how the document appears on the printed page. The Layout Options includes Multiple Pages per Side and Poster. See Printing a Document on page 5-8 for more information on accessing printer properties. 1 2 Orientation 1 Orientation allows you to select the direction in which information is printed on a page. Portrait prints across the width of the page, letter style. Landscape prints across the length of the page, spreadsheet style.
5 Printing Click the Paper tab to access various paper properties. 1 2 3 4 5 Copies 1 Copies allows you to choose the number of copies to be printed. You can select 1 to 999 copies. Size 2 Size allows you to set the size of paper you loaded in the tray.If the required size is not listed in the Size box, click Custom. When the Custom Page Size window appears, set the paper size and click OK. The setting appears in the list so that you can select it. Enter the custom name you want to use.
5 Printing Type 4 Make sure that Type is set to Printer Default. If you load a different type of print material, select the corresponding paper type. If you use cotton paper, set the paper type to Thick for best printing. To use recycled paper, with weighs from 20lb to 24lb (75~90g/m2), or colored paper, select Color Paper. Scaling 5 Scaling allows you to automatically or manually scale your print job on a page. You can choose from None, Reduce/Enlarge, and Fit to Page.
5 3 Printing Darkness Use this option to lighten or darken your print job. Normal: This setting is for normal documents. Light: This setting is for bolder line widths or darker gray-scale images. Dark: This setting is for finer line width, higher definition in graphics, and lighter gray-scale images. Advanced Options 4 You can set advanced settings by clicking the Advanced Options button.
5 Printing Other Features Tab You can select output options for your document. See Printing a Document on page 5-8 for more information about accessing the printer properties. Click the Other Features tab to access the following feature: 1 2 3 Watermark 1 You can create a background text image to be printed on each page of your document. For details, see Using Watermarks on page 5-20 Overlay 2 Overlays are often used to take the place of preprinted forms and letterhead paper.
5 Printing Printer Tab If you access printer properties through the Printers folder, you can view the Printer tab. You can set the printer configuration. The following procedure is for Windows XP. For other Windows Operating Systems, refer to the corresponding Windows User's Guide or online help. 1. Click the Windows Start menu. 2. Select Printers and Faxes. 3. Select your printer driver icon. 4. Right-click on the printer driver icon and select Properties. 5. Click the Printer tab and set the options.
5 Printing Using Help Your printer has a help screen that can be activated by clicking the Help button in the printer properties window. These help screens give detailed information about the printer features provided by the printer driver. You can also click on any setting.
5 Printing Advanced Printing This section explains printing options and advanced printing tasks. NOTE: Your printer driver Properties window that appears in this User Guide may differ depending on the printer in use. However the composition of the printer properties window is similar. NOTE: If you need to know the exact name of your printer, you can check the supplied CD-ROM.
5 Printing Select Print Page Border to print a border around each page on the sheet. 5. Click the Paper tab, select the paper source, size, and type. 6. Click OK and print the document. Printing Posters This feature allows you to print a single-page document onto 4, 9, or 16 sheets of paper, for the purpose of pasting the sheets together to form one postersize document. 1. To change the print settings from your software application, access printer properties. See Printing a Document on page 5-8. 2.
5 Printing Specify an overlap in millimeters or inches to make it easier to paste the sheets together. 0.15 inches 0.15 inches 4. Click the Paper tab, select the paper source, size, and type. 5. Click OK and print the document. You can complete the poster by pasting the sheets together. Printing a Reduced or Enlarged Document You can change the size of a page’s content to appear larger or smaller on the printed page. 1.
5 Printing Fitting Your Document to a Selected Paper Size A This printer feature allows you to scale your print job to any selected paper size regardless of the digital document size. This can be useful when you want to check fine details on a small document. 1. To change the print settings from your software application, access printer properties. See Printing a Document on page 5-8. 2. From the Paper tab, select Fit to Page in the Type drop-down list. 3.
5 Printing 2. Click the Other Features tab, and select the desired watermark from the Watermark drop-down list. You will see the selected watermark in the preview image. Preview Image 3. Click OK and start printing. NOTE: The preview image shows how the page will look when it is printed. Creating a Watermark 1. To change the print settings from your software application, access printer properties. See Printing a Document on page 5-8. 2.
5 Printing 3. Enter a text message in the Watermark Message box. You can enter up to 40 characters. The message displays in the preview window. When the First Page Only box is selected, the watermark prints on the first page only. 4. Select watermark options. You can select the font name, style, size, or grayscale level from the Font Attributes section and set the angle of the watermark from the Message Angle section. 5. Click Add to add a new watermark to the list. 6.
5 Printing Using Overlays What is an Overlay? Dear ABC Regards WORLD BEST An overlay is text and/or images stored in the computer hard disk drive (HDD) as a special file format that can be printed on any document. Overlays are often used to take the place of preprinted forms and letterhead paper. You can create an overlay containing the exact same information that is currently on your letterhead.
5 Printing 4. In the Edit Overlay window, click Create Overlay. 5. In the Create Overlay window, type a name of up to eight characters in the File name box. Select the destination path, if necessary. (The default is C:\Formover). 6. Click Save. The name appears on the Overlay List box. 7. Click OK or Yes to finish creating. The file is not printed. Instead it is stored on your computer hard disk drive. NOTE: The overlay document size must be the same as the documents you print with the overlay.
5 Printing 5. If the overlay file you want does not appear in the Overlay list, click Edit button and Load Overlay, and select the overlay file. If you have stored the overlay file in an external source, you can also load the file when you access the Load Overlay window. Select the file and click Open. The file appears in the Overlay List box and is available for printing. Select the overlay from the Overlay List box. 6. If necessary, click Confirm Page Overlay When Printing.
5 Printing Sharing the Printer Locally You can connect the printer directly to a selected computer, which is called “host computer,” on the network. The following procedure is for Windows XP. For other Windows OS, refer to the corresponding Windows User's Guide or online help. NOTE: • Check the Operating System(s) that are compatible with your printer. Please refer to the OS Compatibility section of Printer Specifications in your Printer User Guide.
5 Printing Using ControlCentre Using ControlCentre, you can create and edit Phonebook entries from your computer and configure the destination launches when you use the corresponding button on the control panel. You can also update the firmware of the machine. 1. To install the Xerox ControlCentre, insert the supplied Xerox Drivers CD. 2. From within Windows click Start and then Run. Type E: Xinstall.exe, replacing "E" with the letter of your CD-ROM drive. 3.
5 Printing To open ControlCentre: 1. Start your Windows. 2. Click the Start button on your desktop computer. 3. From the Programs or All Programs, select your printer driver name and then Control Centre. The ControlCentre window opens. The ControlCentre window provides the following tabs: Scan Settings, Phonebook (only available for the fax model), and Firmware Update. 4. To exit, click the Exit button at the bottom of each tab.
5 Printing The Scan Settings Tab Click the Scan Settings tab to configure the scan destination list. Scan the image to any of the software programs in the destination list. You can also configure the scan settings, such as the output type and resolution. 1 Select the program from the Available Scan Destinations and click to add it to the Front Panel Destination List. To delete the selected program, click . 2 Restore Defaults 3 2 Click to restore the default settings.
5 Printing 7 Group dial... Allows you to set up group dial numbers. When you click Group dial, the following window opens. 1 1 Enter a name for the group. 2 Shows the numbers included in the group. To remove a number, select it and click Remove. 2 3 3 Shows the Phonebook entries you can include in the group. Select a number and click Add to move it to the Included numbers list. 4 4 OK Click to save the group dial number after adding or removing numbers for the group.
5 Printing Using Your Printer in Linux You can use your machine in a Linux environment. Getting Started The supplied CD-ROM provides you with the Xerox MFP driver package for using your machine with a Linux computer. The Xerox MFP driver package contains printer and scanner drivers, providing the ability to print documents and scan images. The package also delivers powerful applications for configuring your machine and further processing the scanned documents.
5 Printing NOTE: • It is necessary to claim swap partition of 300 MB or larger when working with large scanned images. • The Linux scanner driver supports the optical resolution at maximum. Please refer to the scanner and copy section of Specifications in your Printer User Guide. • You can check your printer name in the supplied CD-ROM. Software • Linux Kernel 2.4 or higher • Glibc 2.2 or higher • CUPS • SANE Installing the MFP Driver 1.
5 Printing 5. When the welcome screen appears, click Next. 6. When the installation is complete, click Finish. The installation program has added the MFP Configurator desktop icon and Xerox MFP group to the system menu for your convenience. If you have any difficulties, consult the onscreen help that is available through your system menu or can otherwise be called from the driver package windows applications, such as MFP Configurator or Image Editor. Uninstalling the MFP Driver 1.
5 Printing NOTE: The installation program runs automatically if you have an autorun software package installed and configured. 4. Click Uninstall. 5. Click Next. 6. Click Finish. Using the MFP Configurator MFP Configurator is a tool primarily intended for configuring MFP devices. Since an MFP device combines the printer and scanner, the MFP Configurator provides options logically grouped for printer and scanner functions.
5 Printing 2. Press each button on the Modules pane to switch to the corresponding configuration window. Printers Configuration button Scanners Configuration button MFP Ports Configuration button You can use the onscreen help by clicking Help. 3. After changing the configurations, click Exit to close the MFP Configurator. Printers Configuration Printers configuration has the two tabs; Printers and Classes.
5 Printing • Remove Printer: removes the selected printer. • Set as Default: sets the current printer as a default printer. • Stop: stops the printer. • Test: allows you to print a test page to check if the machine is working properly. • Properties: allows you to view and change the printer properties. For details, see Configuring Printer Properties on page 5-38. Classes Tab The Classes tab shows a list of available printer classes. Shows all of the printer classes.
5 Printing Scanners Configuration In this window, you can monitor the activity of scanner devices, view a list of installed Xerox MFP devices, change device properties, and scan images. Switches to Scanners configuration. Shows all installed scanners. Shows the vendor, model name and type of your scanner. • Properties... : Allows you to change the scan properties and scan a document. See Scanning a Document on page 5-41. • Drivers... : Allows you to monitor the activity of the scan drivers.
5 Printing Sharing Ports Between Printers and Scanners Your machine can be connected to a host computer via the parallel port or USB port. Since the MFP device contains more than one device (printer and scanner), it is necessary to organize proper access of “consumer” applications to these devices via the single I/O port. The Xerox MFP driver package provides an appropriate port sharing mechanism that is used by the Xerox printer and scanner drivers.
5 Printing • Jobs: shows the list of print jobs. Click Cancel job to cancel the selected job and select the Show completed jobs check box to see previous jobs on the job list. • Classes: shows the class that your printer is in. Click Add to Class to add your printer to a specific class or click Remove from Class to remove the printer from the selected class. 5. Click OK to apply the changes and close the Printer Properties Window.
5 Printing 4. Change the printer and print job properties. The following four tabs display at the top of the window. • General - allows you to change the paper size, the paper type, and the orientation of the documents, enables the duplex feature, adds start and end banners, and changes the number of pages per sheet. • Text - allows you to specify the page margins and set the text options, such as spacing or columns.
5 Printing When you type only lpr and press Enter, the Select file(s) to print window appears first. Select any files you want to print and click Open. 2. In the LPR window, select your printer from the list, and change the printer and print job properties. For details about the Properties window, see Printing a Document on page 5-39. 3. Click OK to start printing. Scanning a Document You can scan a document using the MFP Configurator window. 1. Double-click the MFP Configurator on your desktop. 2.
5 Printing The document is scanned and the image preview appears in the Preview Pane. Drag the pointer to set the image area to be scanned. 7. Change the scan options in the Image Quality and Scan Area sections. • Image Quality: allows you to select the color composition and the scan resolution for the image. • Scan Area: allows you to select the page size. The Advanced button enables you to set the page size manually.
5 Printing If you want to edit the scanned image, use the toolbar. For further details about editing an image, see Using the Image Editor on page 5-43. 10. When you are finished, click Save on the toolbar. 11. Select the file directory where you want to save the image and enter the file name. 12. Click Save. Adding Job Type Settings You can save your scan option settings to retrieve for a later scanning. To save a new Job Type setting: 1. Change the options from the Scanner Properties window. 2.
5 Printing You can use the following tools to edit the image: Tools Function Saves the image. Cancels your last action. Restores the action you canceled. Allows you to scroll through the image. Crops the selected image area. Zooms the image out. Zooms the image in. Allows you to scale the image size; you can enter the size manually, or set the rate to scale proportionally, vertically, or horizontally. Allows you to rotate the image; you can select the number of degrees from the drop-down list.
5 Printing Using Your Machine with a Macintosh Your machine supports Macintosh systems with a built-in USB interface. When you print a file from a Macintosh computer, you can use the CUPS driver by installing the PPD file. Installing Software for Macintosh The CD-ROM that came with your printer provides you with the PPD file that allows you to use the CUPS driver or Apple LaserWriter driver (only available when you use a printer which supports the PostScript driver), for printing on a Macintosh computer.
5 Printing 1. Insert the CD-ROM which came with your printer into the CD-ROM drive. 2. Double-click CD-ROM icon that appears on your Macintosh desktop. 3. Double-click the Installer folder. 4. Double-click the Printer folder. 5. Double-click the Xerox MFP Installer_OS X icon. 6. Enter the password and click OK. 7. Select Uninstall and then click Uninstall. 8. When the uninstallation is complete, click Quit. Uninstalling the Scan driver 1.
5 Printing Setting Up the Printer For a USB-connected Macintosh 1. Follow the instructions on Installing Software for Macintosh on page 5-45 to install the PPD and Filter files on your computer. 2. Open Print Setup Utility from the Utilities folder. 3. Click Add on the Printer List. 4. Select the USB tab. 5. Select Xerox in Printer Model and your printer in Model Name. 6. Click Add. Your printer appears on the Printer List, and is set as the default printer.
5 Printing Make sure that your printer is selected. Mac OS 10.3 or later Changing Printer Settings You can use advanced printing features when using your printer. From your Macintosh application, select Print from the File menu. The printer name which appears in the printer properties window may differ depending on the printer in use. Layout Setting The Layout tab provides options to adjust how the document appears on the printed page. You can print multiple pages on one sheet of paper.
5 Printing Printer Features Setting The Printer Features tab provides options for selecting the paper type and adjusting print quality. Select Printer Features from the Presets drop-down list to access the following features: Mac OS 10.3 or later Paper Type 1 Make sure that Paper Type is set to Printer Default. If you load a different type of print material, select the corresponding paper type. 1 Resolution 2 The Resolution options you can select may vary depending on your printer model.
5 Printing Printing Multiple Pages on One Sheet of Paper You can print more than one page on a single sheet of paper. This feature provides a cost-effective way to print draft pages. 1. From your Macintosh application, select Print from the File menu. 2. Select Layout. Mac OS 10.3 or later 3. Select the number of pages you want to print on one sheet of paper on the Pages per Sheet drop-down list. 4. Select the page order from the Layout Direction option.
6 Scanning 6 Scanning Scanning with your machine lets you turn pictures and text into digital files on your computer. Then you can fax or e-mail the files, display them on your web site or use them to create projects that you can print using the WIA driver. This chapter includes: • Scanning Basics – page 6-2. • Scanning From the Control Panel to an Application – page 6-2. • Scanning Process with TWAIN-enabled Software – page 6-3. • Scanning Using the WIA Driver – page 6-4.
6 Scanning Scanning Basics Your WorkCentre PE220 offers three ways to scan. These are: • From the control panel on your machine to an application: Use the Scan button on the control panel to initiate scanning. Assign the TWAIN-compliant software, such as Adobe Photo Deluxe or Adobe Photoshop, to the machine by selecting it from a list of available applications via the Scan button.
6 Scanning 4. Press the scroll button ( or ) to select an application to receive the scanned image. 5. Press Start to start scanning. The selected application window opens with the scanned image. Scanning Process with TWAIN-enabled Software If you want to scan documents using other software, you will need to use TWAIN-compliant software, such as Adobe PhotoDeluxe or Adobe Photoshop. The first time you scan with your machine, select it as your TWAIN source in the application you use.
6 Scanning Scanning Using the WIA Driver Your machine also supports the Windows Image Acquisition (WIA) driver for scanning images. WIA is one of the standard components provided by Microsoft® Windows® XP and works with digital cameras and scanners. Unlike the TWAIN driver, the WIA driver allows you to scan and easily manipulate images without using additional software. NOTE: The WIA driver works only on Windows XP with USB port. 1. Load the document(s) face up into the ADF.
7 Faxing 7 Faxing This chapter gives you information about using your machine as a fax machine. This chapter includes: • Setting Up the Fax System – page 7-2 • Sending a Fax – page 7-5 • Receiving a Fax – page 7-10 • Automatic Dialing – page 7-14 • Other Ways to Fax – page 7-19 • Additional Features – page 7-24 NOTE: You need to press Fax to activate Fax mode.
7 Faxing Setting Up the Fax System Changing the Fax Setup options 1. Press Menu until “Fax Setup” appears on the top line of the display. The first available menu item, “Default-Change”, displays on the bottom line. 2. Press the scroll button ( or ) until you see the desired menu item on the bottom line and press Enter. 3. If you select “Default-Change”, you will see “Resolution”. Press Enter again. 4.
7 Option Redial Term Xerox PE220 Faxing Description Your machine can automatically redial a remote fax machine if it was busy. Intervals from 1 to 15 minutes can be entered. Redials You can specify the number of redial attempts, from 1 to 13. MSG Confirm You can set your machine to print a report showing whether a transmission was successful, how many pages were sent, and more. The available options are On, Off, and On-Err, which prints only when a transmission is not successful.
7 7-4 Faxing Option Description DRPD Mode You can receive a call using the Distinctive Ring Pattern Detection (DRPD) feature, which enables a user to use a single telephone line to answer several different telephone numbers. In this menu, you can set the machine to recognize which ring patterns to answer. For details about this feature, see Receiving Faxes Using the DRPD Mode on page 7-12. Receive Mode You can select the default fax receiving mode.
7 Faxing Sending a Fax Loading a Document You can use the Automatic Document Feeder (ADF) or the document glass to load an original document for faxing. Using the ADF, you can load up to 30 sheets of 20 lb (75 g/m2 bond) paper at a time. You can, of course, place only one sheet at a time on the document glass. For details about preparing a document, see Making Copies on page 4-2. To fax a document using the Automatic Document Feeder (ADF): 1. Load the document face up into the ADF.
7 Faxing To fax a document from the document glass: 1. Lift and open the document cover. 2. Place the document face down on the document glass and align it with the top left corner of the glass. NOTE: Make sure that no other documents are in the ADF (Automatic Document Feeder). A document in the ADF has priority over a document on the document glass. 3. Close the document cover. Adjusting the Document Resolution The default document settings produce good results when using typical textbased documents.
7 Faxing The document types recommended for the resolution settings are described in the table below: Mode Standard Fine Super Fine Recommended for: Documents with normal sized characters. Documents containing small characters or thin lines or documents printed using a dot-matrix printer. Documents containing extremely fine detail. Super Fine mode is enabled only if the machine with which you are communicating also supports the Super Fine resolution. See the notes below.
7 Faxing After all of the pages are scanned, press the scroll button ( or ) to display "No" and press Enter when the display shows "Another Page?". 7. The number is dialed and then the machine begins sending the fax when the receiving fax machine is ready. NOTE: When you want to cancel a fax job, press Stop/Clear at any time while sending. Sending a Fax Manually 1. Load the document(s) face up into the ADF, or place a single document face down on the document glass.
7 Faxing Confirming Transmission When the last page of your document has been sent successfully, the machine beeps and returns to Standby mode. If your fax fails, an error message appears on the display. For a list of error messages and their meanings, see Clearing LCD Error Messages on page 9-8. If you receive an error message, press Stop/Clear to clear the message and try to send the document again.
7 Faxing Receiving a Fax About Receiving Modes • In Fax mode, the machine answers an incoming fax call and immediately goes into the fax reception mode. • In Tel mode, you can receive a fax by pressing Manual Dial (you can hear a fax tone from the sending machine) and then pressing Start on the control panel of your machine. You can also pick up the handset of the extension phone and then press the remote receive code (see Receive Code on page 7-3).
7 Faxing Receiving Automatically in Fax Mode Your machine is preset to Fax mode at the factory. When you receive a fax, the machine answers the call on a specified number of rings and automatically receives the fax. To change the number of rings, see Ring To Answer on page 7-2. If you want to adjust the ringer volume, see Setting Sounds on page 2.18.
7 Faxing Receiving Manually Using an Extension Telephone This features works best when you are using an extension telephone connected to the EXT. jack on the back of your machine. You can receive a fax from someone you are talking to on the extension telephone without going to the fax machine. When you receive a call on the extension phone and hear fax tones, press the keys 9 on the extension telephone. The machine receives the document. Press the buttons slowly in sequence.
7 Faxing When the machine completes learning, the LCD displays “End DRPD Setup”. If the DRPD setup fails, “DRPD Ring Error” appears. Press Enter when “DRPD Mode” displays and retry from step 3. 7. To return to Standby mode, press Stop/Clear. When the DRPD feature is set up, the DRPD option is available in the Receive Mode menu. To receive faxes in the DRPD mode, you need to set the menu to DRPD; see DRPD Mode on page 7-4.
7 Faxing Automatic Dialing Speed Dialing You can store up to 100 frequently dialed numbers in one or two-digit speed dial locations (0-99). Storing a Number for Speed Dialing 1. Press the Fax button. 2. Press Phone Book on the control panel. 3. Press Phone Book or the scroll button ( or ) to display “Store&Edit” on the bottom line of the display. Press Enter. 4. Press Enter when “Speed Dials” appears on the display. The display prompts you to enter a location number, showing the first available number.
7 Faxing For details about loading a document, see Loading a Document on page 7-5 2. Press the Fax button. 3. Adjust the document resolution to suit your fax needs (see Adjusting the Document Resolution on page 7-6). If you need to change the brightness, see Lighten/Darken on page 7-2. 4. Enter the speed dial number. – For a one-digit speed dial number, press and hold the appropriate digit button. – For a two-digit speed dial number, press the first digit button and press and hold the last digit button.
7 Faxing You can also select the speed dial number stored in the machine by pressing the scroll button ( or ) and then press Enter. 7. When the display confirms the number to be added to the group, press Enter. 8. Repeat steps 6 and 7 to enter other speed dial numbers into the group. 9. Press the Exit button when you have entered all of the desired numbers. The display prompts you to enter a group ID. 10. To assign a name to the group, enter the name you want.
7 Faxing 9. When you enter the specific number in the group, the display shows “Delete?”. When you enter a new number, the display shows “Add?”. 10. Press Enter to add or delete the number. 11. To change the group name, press Exit. 12. Enter a new group name and press Enter. 13. If you want to edit another group, press Enter and repeat from step 5. Or To return to Standby mode, press Stop/Clear.
7 Faxing While searching through the machine’s memory, each entry is preceded by either “S” for speed dial or “G” for group dial numbers. These letters tell you how the number is stored. 5. When the name and/or the number you want displays, press Start or Enter to dial. Searching with a Particular First Letter 1. Press the Fax button. 2. Press Phone Book. 3. Press Enter when “Search&Dial” appears on the display. 4. Press the button labeled with the letter you want to search for.
7 Faxing Other Ways to Fax Sending Broadcast Faxes Using the Broadcasting button on the control panel, you can use the broadcast fax feature, which allows you to send a document to multiple locations. Documents are automatically stored in memory and sent to a remote station. After transmission, the documents are automatically erased from memory. 1. Load the document(s) face up into the ADF, or place a single document face down on the document glass.
7 Faxing To send the fax immediately, press the scroll button ( or ) to display "No" and press Enter. 9. The machine begins sending the document to the numbers you entered in the order in which you entered them. Sending a Delayed Fax You can set your machine to send a fax at a later time when you will not be present. This allows a user to take advantage of lower phone rates. 1. Load the document(s) face up into the ADF, or place a single document face down on the document glass.
7 Faxing 10. Press Enter. The display shows the current time and asks you to enter the starting time when the fax is to be sent. 11. Enter the time using the number keypad. To select “AM” or “PM” for 12-hour format, press the number button. or button or any If you set a time earlier than the current time, the document will be sent at that time on the following day. 12. Press Enter when the starting time displays correctly. 13. The document is scanned into memory before transmission.
7 Faxing You can also press and hold the digit button of the speed dial number if you have assigned one. To store the speed dial number, see Storing a Number for Speed Dialing on page 7.14. 6. Press Enter to confirm the number. The display asks you to enter a name. 7. To assign a name to the transmission, enter the name you want. For details about entering characters, see Entering Characters Using the Number Keypad on page 2-15. If you do not want to assign a name, skip this step. 8. Press Enter.
7 Faxing Canceling a Scheduled Fax 1. Press Menu until “Fax Feature” appears on the top line of the display. 2. Press the scroll button ( or ) to display “Cancel Job” on the bottom line and press Enter. The display shows the last job reserved in memory. 3. Press the scroll button ( or ) until you see the fax job you want to cancel, and press Enter. 4. When the display confirms your selection, press the scroll button ( or ) to display "Yes" and press Enter.
7 Faxing Additional Features Using Secure Receiving Mode To prevent your received faxes from being accessed by unauthorized people. You can turn on Secure Receiving mode to restrict printing of received faxes when the machine is unattended. In Secure Receiving mode, all incoming faxes go into memory. When the mode is deactivated, any stored faxes are printed. To turn Secure Receiving mode on: 1. Press Menu until “Advanced Fax” appears on the top line of the display. 2.
7 Faxing 3. Press the scroll button ( or ) to display “Off” on the bottom line and press Enter. 4. Enter the four-digit password and press Enter. The mode is deactivated and the machine prints all faxes stored in memory. 5. To return to Standby mode, press Stop/Clear. Printing Reports Your machine can print reports the following reports: Phonebook List This list shows all of the numbers currently stored in the machine’s memory as speed dial and group dial numbers.
7 Faxing Junk Fax Number List This list shows up to 10 fax numbers specified as junk fax numbers. To add or delete numbers to or from this list, access the Junk Fax Setup menu: see Junk Fax Setup on page 7-28. When the Junk Fax Barrier feature is turned on, incoming faxes from those numbers are blocked. This feature recognize the last 6 digits of the fax number set as a remote fax machine’s ID.
7 Faxing Using Advanced Fax Settings Your machine has various user-selectable setting options for sending or receiving faxes. These options are preset at the factory, but you may need to change them. To find out how the options are currently set, print the System Data list. For details about printing the list, see above. Changing Setting Options 1. Press Menu until “Advanced Fax” appears on the top line of the display. 2.
7 Faxing Option Description Junk Fax Setup Using the Junk Fax Barrier feature, the system will not accept faxes sent from remote stations whose numbers are stored in the memory as junk fax numbers. This feature is useful for blocking any unwanted faxes. Select Off to turn the feature off. Your machine accepts all faxes. Select On to turn the feature on. You can set up to 10 fax numbers as junk fax numbers using the Set option.
8 Maintenance 8 Maintenance This chapter provides information for maintaining the machine and replacing the print cartridge. This chapter includes: Xerox PE220 • Clearing the Memory – page 8-2. • Cleaning Your Machine – page 8-3. • Maintaining the Smart Kit ® Print Cartridge – page 8-6. • Consumables and Replacement Parts – page 8-9. • Replacing the ADF Rubber Pad – page 8-10.
8 Maintenance Clearing the Memory You can selectively clear information stored in your machine’s memory. CAUTION: Before clearing the memory, make sure that all fax jobs have been completed. 1. Press Menu on the control panel until “Maintenance” appears on the top line of the display. 2. Press the scroll button ( or ) until you see “Clear Memory” on the bottom line and press Enter. The first available menu item, “Clear All Mem.”, displays on the bottom line. 3.
8 Maintenance Cleaning Your Machine To maintain print quality, follow the cleaning procedures below each time the print cartridge is replaced or if print quality problems occur. CAUTION: Cleaning the covers of the machine with cleaning materials containing large amounts of alcohol, solvent, or other strong substances can discolor or crack the covers. CAUTION: While cleaning the inside of the machine, be careful not to touch the transfer roller located underneath the print cartridge.
8 Maintenance 3. Pull the print cartridge out, lightly pushing it down. Set it on a clean flat surface. CAUTION: To prevent damage to the print cartridge, do not expose it to light for more than a few minutes. Cover it with a piece of paper, if necessary. CAUTION: Do not touch the green underside of the print cartridge. Hold the cartridge using the handle on the cartridge to avoid touching this area. 4. Pull out and remove the Manual Tray. 5.
8 Maintenance 6. Locate the long strip of glass (LSU) inside the top of the cartridge compartment. Gently wipe the glass to remove any toner. 7. Re-insert the manual tray, print cartridge and close the door. 8. Plug in the power cord and switch on the machine. Cleaning the Scan Unit Keeping the scan unit clean helps ensure the best possible scanned images. We suggest that you clean the scan unit at the start of each day and during the day, as needed. 1.
8 Maintenance Maintaining the Smart Kit ® Print Cartridge Smart Kit ® Print Cartridge Storage To get the most from the print cartridge, follow these guidelines: • Do not remove the print cartridge from its package until you are ready to install it. • Do not refill the print cartridge. The machine warranty does not cover damage caused by using a refilled cartridge. • Store print cartridges in the same environment as your machine.
8 Maintenance 2. Pull the print cartridge out and remove it from the printer. 3. Gently shake the print cartridge from side to side five or six times to redistribute the toner. NOTE: If toner gets on your clothing, wipe it off with a dry cloth and wash clothing in cold water. Hot water sets toner into fabric. CAUTION: Do not touch the green underside of the print cartridge. Use the handle on the cartridge to avoid touching this area. 4. Reinstall the cartridge and close the front door.
8 Maintenance 1. Press Menu on the control panel until “Maintenance” appears on the top line of the display. 2. Press the scroll button ( or ) to display “Notify Toner ” on the bottom line and press Enter. 3. Enter a four-digit password you want to use, using the number keypad and press Enter. (If you select this menu, for the first time after purchasing or after clearing all memory, re-enter the password to confirm it and press Enter.) 4. Press the scroll button ( or ) to change the setting.
8 Maintenance Consumables and Replacement Parts From time to time, you need to replace the Smart Kit ® Print Cartridge and ADF Rubber Pad to maintain optimum performance and to avoid print quality problems and paper feed problems resulting from worn parts. The following items should be replaced after you have printed the specified number of pages: Items Yield (Average) Smart Kit ® Print Cartridge (initial) Approx. 1,000 pages Smart Kit ® Print Cartridge (replacement) Approx.
8 Maintenance Replacing the ADF Rubber Pad You can purchase an ADF rubber pad from your Service Agent or the Retailer where you bought your machine. 1. Open the ADF cover. 2. Remove the ADF rubber pad from the ADF, as shown. 3. Install a new ADF rubber pad. 4. Close the ADF cover.
9 Troubleshooting 9 Troubleshooting This chapter gives helpful information for what to do if you encounter an error.
9 Troubleshooting Clearing Document Jams When a document jams while passing through the ADF (Automatic Document Feeder), “Document Jam/Remove&Reload” appears on the display. Input Misfeed 1. Remove any remaining page(s) from the ADF and input tray. 2. Open the ADF cover. 3. Pull the document gently out of the ADF. 4. Close the ADF cover. Then load the removed page(s), if any, back into the ADF. NOTE: To prevent document jams, use the document glass for thick, thin, or mixed paper-type documents.
9 Troubleshooting Exit Misfeed 1. Remove any remaining page(s) from the ADF. 2. Open the ADF cover. 3. Remove the misfed documents from the document output tray 4. Close the ADF cover. Then load the removed page(s), if any, back into the ADF.
9 Troubleshooting Clearing Paper Jams When a paper jam occurs, “Paper Jam” appears on the display. Refer to the table below to locate and clear the paper jam. Message Location of Jam Go to Open Front Door Remove Paper In the tray or manual tray In the fuser area or around the print cartridge page 9-4 page 9-5 Open Rear Cover Remove Paper In the paper exit area page 9-6 To avoid tearing the paper, pull out the jammed paper gently and slowly.
9 Troubleshooting In the Manual Tray 1. Remove the jammed paper in the tray by gently pulling it straight out. If there is any resistance and the paper does not move when you pull, or if you cannot see the paper in this area, check the fuser area around the print cartridge. See In the Fuser Area or Around the Print Cartridge – page 9-5. 2. Open and close the front door to resume printing. In the Fuser Area or Around the Print Cartridge WARNING: The fuser area is hot.
9 Troubleshooting 4. Remove the jammed paper by gently pulling it straight out. 5. If necessary, push the manual tray back into the machine. 6. Reinstall the print cartridge and close the front door. Printing automatically resumes. In the Paper Exit Area. 1. Open and close the front door. The jammed paper automatically exits the machine. If the paper does not exit, continue to step 2. 2.
9 Troubleshooting 3. If there is any resistance and the paper does not move when you pull, or if you cannot see the paper in the output tray, open the rear cover by pulling the tab on it. 4. Remove the jammed paper by gently pulling it straight out. WARNING: It is hot inside the machine. Take care when removing paper. 5. Close the rear cover. 6. Open and close the front door to resume printing Tips for Avoiding Paper Jams By selecting the correct paper types, most paper jams can be avoided.
9 Troubleshooting • Do not use creased, damp, or highly curled paper. • Do not mix paper types in the tray. • Use only recommended print materials. Paper Specifications on page 106. • Ensure that the recommended print side of print materials is facing up in the tray. Clearing LCD Error Messages Display Meaning Suggested Solutions Cancel? 1:Yes 2:No Your machine’s memory has become full while trying to store a document into memory. To cancel the fax job, press the 1 button to accept “Yes”.
9 Display Xerox PE220 Troubleshooting Meaning Suggested Solutions Group Not Available You have tried to select a group location number where only a single location number can be used, such as when adding locations for a broadcast operation. Use a speed dial number or dial a number manually using the number keypad. Incompatible The remote machine did not have the requested feature, such as a delayed transmission.
9 Troubleshooting Display Meaning Memory Full The memory is full. Delete unnecessary documents and retransmit after more memory becomes available. Alternatively, split the transmission into more than one operation. No Answer The receiving fax machine has not answered after several redial attempts. Try again. Make sure that the receiving machine is operational. No Cartridge Detected The print cartridge is not installed. Install the print cartridge.
9 Troubleshooting Display Meaning Suggested Solutions Remove Documents from ADF The Favorite Copy button is set to Clone, Autofit, ID Card Copy or Poster and you press the button. The Clone, Autofit, ID Card Copy or Poster feature does not work with ADF. Remove the documents in the ADF. Retry Redial? The machine is waiting for a specified time interval to redial a previously busy station. You can press Enter to immediately redial, or Stop/ Clear to cancel the redial operation.
9 Troubleshooting Solving Other Problems The following chart lists some conditions that may occur and the recommended solutions. Follow the suggested solutions until the problem is corrected. If the problem persists, please call for service. Paper Feeding Problems Condition 9-12 Suggested solutions Paper is jammed during printing. Clear the paper jam. See Clearing Paper Jams on page 9-4. Paper sticks together. Ensure that there is not too much paper in the tray.
9 Troubleshooting Printing Problems Condition The machine does not print. Possible cause Suggested solutions The machine is not receiving power. Check the power cord connections. Check the power switch and the power source. The machine is not selected as the default printer. Select your printer as your default printer in your Windows. Check the machine for the following: The front door is not closed. Paper is jammed. After locating the problem, clear it. No paper is loaded.
9 Troubleshooting Condition Suggested solutions The machine selects print materials from the wrong paper source. The paper source selection in the printer properties may be incorrect. For many software applications, the paper source selection is found under the Paper tab within the printer properties. Select the correct paper source. For details, refer to Printing chapter on page 5-1. A print job is extremely slow. The job may be very complex.
9 Condition Pages print, but are blank. An error occurs repeatedly when you are printing with the USB connection. Xerox PE220 Troubleshooting Possible cause Suggested solutions The print cartridge is defective or out of toner. Redistribute the toner, if necessary. See Redistributing Print Cartridge Toner on page 8-6. If necessary, replace the print cartridge. The file may have blank pages. Check the file to ensure that it does not contain blank pages.
9 Troubleshooting Printing Quality Problems If the inside of the machine is dirty or paper has been loaded improperly, you may notice a reduction in print quality. See the table below to clear the problem. Condition Light or faded print AaBbCc AaBbCc AaBbCc AaBbCc AaBbCc Toner specks AaBbCc AaBbCc AaBbCc AaBbCc AaBbCc Dropouts AaBbCc AaBbCc AaBbCc AaBbCc AaBbCc 9-16 Suggested solutions If a vertical white streak or faded area appears on the page: The toner supply is low.
9 Condition Vertical lines AaBbCc AaBbCc AaBbCc AaBbCc AaBbCc Gray background AaBbCc AaBbCc AaBbCc AaBbCc AaBbCc Suggested solutions If black vertical streaks appear on the page: The drum inside the print cartridge has probably been scratched. Remove the print cartridge and install a new one. Replacing the Smart Kit ® Print Cartridge on page 8-7. If white vertical streaks appear on the page: The surface of the LSU part inside the machine may be dirty. Clean the LSU (Cleaning the Inside on page 8-3).
9 Troubleshooting Condition Background scatter A Background scatter results from bits of toner randomly distributed on the printed page. The paper may be too damp. Try printing with a different batch of paper. Do not open packages of paper until necessary so that the paper does not absorb too much moisture. If background scatter occurs on an envelope, change the printing layout to avoid printing over areas that have overlapping seams on the reverse side. Printing on seams can cause problems.
9 Condition Troubleshooting Suggested solutions Back of printouts are dirty Check for leaking toner. Clean the inside of the machine. Cleaning the Inside on page 8-3. Parts of the machine may have toner on them. If defects occur, the problem will likely correct itself after running five (5) blank sheets. Black pages The print cartridge may not be installed properly. Remove the cartridge and re-insert it. The print cartridge may be defective and need replacing.
9 Troubleshooting Copying Problems Condition 9-20 Suggested solutions Copies are too light or too dark. Use the Lighten/Darken button to darken or lighten the background of the copies. Smears, lines, marks, or spots appears on copies. If defects are on the original, press the Lighten/ Darken button to lighten the background of your copies. If no defects are on the original, clean the scan unit. See Cleaning the Scan Unit on page 8-5. Copy image is skewed.
9 Troubleshooting Scanning Problems Condition Suggested solutions The scanner does not work. Make sure that you place the document to be scanned face down on the document glass, or face up in the Automatic Document Feeder. There may not be enough available memory to hold the document you want to scan. Try the Prescan function to see if that works. Try lowering the scan resolution rate. Check that the USB or parallel cable is connected properly. Make sure that the USB or parallel cable is not defective.
9 Troubleshooting Condition 9-22 Suggested solutions Faxes are not received automatically. Fax mode should be selected. Make sure that there is paper in the tray. Check to see if the display shows “Memory Full”. The machine does not send. Make sure that the document is loaded in the ADF or on the document glass. “TX” should show up on the display. Check the fax machine you are sending to, to see if it can receive your fax. The incoming fax has blank spaces or is of poor-quality.
9 Troubleshooting Common Linux Problems Problem The machine doesn’t print. Xerox PE220 Possible Cause and Solution Check if the printer driver is installed in your system. • Open MFP configurator and switch to the Printers tab in Printers configuration window to look at the list of available printers. Make sure that your machine is displayed on the list. If not, please, use the Add New Printer wizard to set up your device. Check if the printer is started.
9 Troubleshooting 9-24 Problem Possible Cause and Solution The machine doesn’t appear on the scanners list. Check if your machine is attached to your computer. Make sure that it is connected properly via the USB port and is turned on. Check if the scanner driver for your machine is installed in your system. • Open MFP Configurator, switch to Scanners configuration, then press Drivers. Make sure that driver with a name corresponding to your machine's name is listed in the window.
9 Xerox PE220 Troubleshooting Problem Possible Cause and Solution I can’t print when I installed both Linux Print Package (LPP) and MFP driver on the same machine simultaneously. Since both Linux Printer Package and MFP driver make a symbolic link to “lpr” printing command, which is commonly used on Unix clones, it is not recommended to use both package on the same machine. If you still want to use both packages simultaneously, please install the LPP first.
9 Troubleshooting Common Macintosh Problems Problems in Printer Setup Utility Problem 9-26 Possible Cause and Solution After you click Add and Select USB, the error message "driver not installed" is displayed in the Product List Window. Software is not installed correctly. Uninstall and then reinstall the software. See Printing on page 5-1. Make sure that you are using a USB cable. Your product is not listed in the Product List Window after you click Add and Select USB.
10 10 Specifications Specifications This chapter includes: Xerox PE220 • General Specifications – page 10-2 • Scanner and Copier Specifications – page 10-3 • Printer Specifications – page 10-4 • Facsimile Specifications – page 10-5 • Paper Specifications – page 10-6 10-1
10 Specifications General Specifications Item Description Model PE 220 Automatic document feeder Up to 30 sheets (20 lb, 75 g/m2) ADF document size Width: 5.6 to 8.5 inches (142 to 216 mm) Length: 5.
10 Specifications Scanner and Copier Specifications Item Description Compatibility TWAIN standard / WIA standard Scanning method ADF and Flat-bed CIS (Contact Image Sensor) module Resolution Optical: 600 x 600 dpi (Mono and color) Enhanced: 4,800 x 4,800 dpi Effective scanning length Platen: 11.7 inches (297 mm) ADF: 14 inches (356 mm) Effective scanning width Max. 8.
10 Specifications Printer Specifications Item Description Printing method Laser Beam Printing Printing speeda Up to 20 ppm in A4 (20 ppm in Letter) First print out time Standby mode: 11 seconds Power save mode: 41 seconds Paper size Letter, Legal, A4, Folio, Executive, A5, A6 card, Envelope 10, Envelope DL, Envelope C5, Envelope C6, Envelope 7-3/4 (Monarch), JIS B5, ISO B5 * Min.: 3 x 5 in. (76 x 127 mm) Max.: 8.5 x 14 in.
10 Specifications Facsimile Specifications Item Description Compatibility ITU-T Group 3 Applicable linea Public Switched Telephone Network (PSTN) or behind PABX Data coding MH/MR/MMR (ECM Mode)/JPEG Modem speed 33.6 Kbps Transmission speed Approx. 3 seconds/page * Transmission time applies to memory transmission of text data with ECM compression using only ITU-T No.1 Chart. Maximum document length Platen: 11.7 in. (297 mm) ADF: 14 in.
10 Specifications Paper Specifications Overview Your machine accepts a variety of print materials, such as cut-sheet paper (including up to 100% recycled fiber content paper), envelopes, labels, transparencies and custom-size paper. Properties, such as weight, composition, grain and moisture content, are important factors affecting the machine’s performance and the output quality.
10 Specifications Supported Sizes of Paper Dimensionsa Paper Letter 8.5 x 11 inches (216 x 279 mm) A4 8.3 x 11.7 in. (210 x 297 mm) Executive 7.3 x 10.5 inches (184 x 267 mm) Legal 8.5 x 14 inches (216 x 356 mm) A5 5.8 x 8.2 inches (148 x 210 mm) A6 4.1 x 5.8 inches (105 x 148 mm) ISO B5 6.9 x 9.8 inches (176 x 250 mm) JIS B5 7.2 x 10.1 inches (182 x 257 mm) Folio 8.5 x 13 inches (216 x 330 mm) Minimum size (custom) 3 x 5 inches (76 x 127 mm) Maximum size (custom) 8.
10 Specifications Guidelines for Using Paper For the best result, use conventional 20 lb (75 g/m2) paper. Ensure that the paper is of good quality, and free of cuts, nicks, tears, spots, loose particles, dust, wrinkles, voids, and curled or bent edges. If you are unsure of what type of paper you are loading, such as bond or recycled paper, check the label on the package.
10 Category Specifications Specifications Curl in ream Flat within 0.02 in. (5 mm) Cut edge conditions Cut with sharp blades with no visible fray. Fusing compatibility Must not scorch, melt, offset or release hazardous emissions when heated to 200 °C (392 °F) for 0.1 second.
10 Specifications • Paper should be stored at or near room temperature. • The air should not be too dry or too humid. • The best way to store an opened ream of paper is to rewrap it tightly in its moisture-proof wrapping. If the machine environment is subject to extremes, unwrap only the amount of paper to be used during the day’s operation to prevent unwanted moisture changes. Envelopes Envelope construction is critical.
10 Specifications Be sure the seam extends all the way to the corner of the envelope as illustrated below. Correct Incorrect Envelopes with Adhesive Strips or Flaps Envelopes with a peel-off adhesive strip or with more than one flap that folds over to seal must use adhesives compatible with the heat and pressure in the machine. The extra flaps and strips might cause wrinkling, creasing or even jams and may even damage the fuser.
10 Specifications – To prevent serious jams, always load one sheet of paper at a time to print labels. – Never print on the same sheet of labels more than once and never print on a partial sheet of labels. When selecting labels, consider the quality of each component: • Adhesives: The adhesive material should be stable at 180°C (356°F), the machine’s fusing temperature. • Arrangement: Only use labels with no exposed backing between them.
Index Numerics number of pages 4-6 original type 4-5 special features 4-7 time out, set 4-11 2/4-up, special copy 4-9 A adding documents 7-22 ADF (Automatic Document Feeder), load 4-4, 7-5 ADF rubber pad, replace 8-10 advanced printing, use 5-1, 5-17 auto fit, special copy 4-8 automatic dialing D date and time, set 2-16 delayed fax 7-20 display language, change 2-14 document jam, clear 9-2 loading ADF 4-4, 7-5 document glass 4-3, 7-6 preparing 4-2 group 7-15 speed 7-14 automatic redialing 7-9 B do
Index Windows 5-3 installing Linux software 5-31 J jam, clear document 9-2 paper 9-4 L Layout properties, set Macintosh 5-48 Windows 5-10 Linux common problems 9-23 driver, install 5-32 printer properties 5-38 printing 5-39 scanning 5-41 load paper manual tray 3-5 tray 2-6 M machine ID, set 2-14 Macintosh common problems 9-26 driver install 5-45 uninstall 5-45 printing 5-47 scanning 5-50 setting up the printer 5-47 MFP driver, install Linux 5-32 N paper jam, clear 9-4 paper load manual tray 3-5 tr
Index install Macintosh 5-45 Windows 5-3 uninstall Macintosh 5-45 printing Secure Receiving mode 7-24 sending a fax automatically 7-7 manually 7-8 setting darkness 5-12 favorites 5-15 image mode 5-12 resolution Macintosh 5-49 Windows 5-12 toner save 5-12 true-type option 5-12 document 5-2 from Linux 5-39 Phonebook list 7-18 reports 7-25 priority fax 7-21 problem, solve copying 9-20 error messages 9-8 faxing 9-21 Linux 9-23 Macintosh 9-26 paper feeding 9-12 printing 9-13 printing quality 9-16 scanning
Index V delete 5-22 edit 5-22 print 5-20 volume, adjust alarm 2-18 key 2-18 ringer 2-18 speaker 2-19 W watermark create 5-21 Index-4 Welcome Center Canada 1-8 US 1-8 WIA, scan 6-4 Z zoom rate, copy 4-6 Xerox PE220