
WorkCentre User Guide PE220


6 Scanning
6-2 Xerox PE220
Scanning Basics
Your WorkCentre PE220 offers three ways to scan. These are:
• From the control panel on your machine to an application:
Use the Scan button on the control panel to initiate scanning. Assign the
TWAIN-compliant software, such as Adobe Photo Deluxe or Adobe
Photoshop, to the machine by selecting it from a list of available
applications via the Scan button. To compose the list of available
applications, you must configure it in the scan settings tab of the Printer
Settings ControlCentre program. For details, see Chapter 5, Printing.
• From TWAIN-compliant software:
You can use other software including Adobe PhotoDeluxe and Adobe
Photoshop. For details, see Chapter 5, Printing.
• From the Windows Images Acquisition (WIA) driver:
Your machine also supports the WIA driver for scanning images. For
details, see Chapter 5, Printing.
NOTE: To scan with your machine, you must install the software.
1. Insert the Xerox Drivers CD into the CD-ROM drive. In Microsoft Win-
dows click Start and then Run. Type E: Xinstall.exe, replacing "E" with
the letter of your CD-ROM drive and click OK.
2. When the language selection window appears, select the appropriate
language and then click Continue.
3. Choose the components you want to install and then click Continue.
4. Click Continue.
5. Click Finish. The driver installation is now complete.
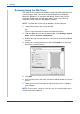
Scanning From the Control Panel to an Application
1. Make sure that your machine and computer are turned on and properly
connected to each other.
2. Load the document(s) face up into the ADF, or place a single document
face down on the document glass.
For details about loading a document, see Loading Paper on page 2-6.
3. Press Scan. The first available menu item, for example “Microsoft Paint”,
appears on the display.