
User's Manual


Scanning from TWAIN and WIA
Xerox
®
DocuMate
®
4799
User’s Guide
7-138
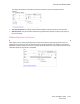
• Start at—click the up or down arrow to change the first number printed on the first page. The starting
number is limited to the number you set in the Pad to field.
• Count by—click the up or down arrow to change how the numbers count. You can set the count from 1 to a
maximum of 9 digits at a time. For example, if you want the imprinter to print the number of images
scanned, and you are scanning in duplex, you can set the Count by number to 2 so that the printer string
reflects the number of images captured in the scanned file. If you want to track the actual number of pages
scanned, set the counter digit to 1.
For example, if you were to input in the text format template: Scanned {YYYY/MM/DD} – {#0b}
With the fields set for Counter digits:6, Start at:500, and Count by:2
The resulting printed character string for a pre-imprinter on 4 pages would be:
• Scanned 2012/01/31 – 000500
• Scanned 2012/01/31 – 000502
• Scanned 2012/01/31 – 000504
• Scanned 2012/01/31 – 000506
Note that when using the token that inserts the 3-letter month {DD MMM.,YYYY}, the text inserted is the English
3-letter month abbreviation. For example, 31 Jan., 2012.
Tip: save the changes to a Preset when you are done setting the imprinter options.
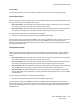
Image Enhancements
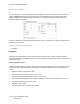
Click on the Image Enhancements icon to select options applicable to what type of image processing you want
applied for the items being scanned.
• Main panel—this panel contains the most commonly used scan settings. Some of the options in this panel
may have adjustment options on the other panels in this section. When the Basic source configuration mode
is selected, this is the only panel available. Change to the Advanced source configuration mode to enable
the other panels which are also described in this section.
The Image enhancements section when the Basic document source configuration mode is selected.