
User's Manual


Scanning from TWAIN and WIA
Xerox
®
DocuMate
®
4799
User’s Guide
7-155
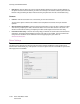
Color Correction
Select the optimization style for color correction.
•"Printer" will optimize the image for duplicating on a printer.
•"Monitor" will optimize the image for displaying on a monitor.
Images optimized for a monitor, when printed, will not match the original scanned item.
Select Perform Color Correction on the Color Processing tab in the Image Enhancements section to enable this
option.
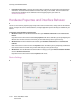
Scanner Details
• Firmware version—this is the current hardware processor chip version number.
• Serial number—the scanner’s unique identification number.
• LLD version—the scanner’s base driver version. This is not the OneTouch software revision, TWAIN or WIA
driver versions.
• Driver version—this is the version of the scanner’s TWAIN driver.
Firmware Update
• Check for update—check the scanner’s firmware version against the version included with the scanner
driver. When the scanner is connected to the computer and this option is selected, or when a different
scanner of the same model is connected, a notification will show indicating that the firmware version is out
of date. Deselect this option to stop being notified of the different version if you do not want to update the
firmware.
• Update—click this button to update the scanner’s firmware with the latest revision provided in the driver
installer. Follow the instructions on-screen to update the scanner’s firmware. Do not turn off the scanner or
close any on-screen dialogues while the firmware update is in process. Turning off the scanner or closing any
on-screen dialogues before you are prompted could irrevocably damage the scanner and prevent it from
working. The firmware update software will prompt you when it is safe to power cycle the scanner.
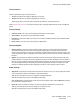
Power Settings
• Sleep mode—sleep mode is the low-power state when the scanner is not in use. You can adjust the amount
of time you want the scanner to wait before it goes into low power.
Click the green enter button to save any changes in the Sleep mode field.
Click the red reset button to reset to the default timeout value.
Click the Sleep button to immediately put the scanner into low power mode. Click the Wake button to bring
the scanner out of low power mode.
• Power off—input the number of minutes you want the scanner to wait before it turns itself off.
Click the green enter button to save any changes in the power off field.
Click the red reset button to reset to the default timeout value.