ea i: oO ITEM NO.
Contents 1. Preface 2. Naming 3. Maintenance & Main Parts . 4, The Transmitter Functions . 5. Assemble the Battery {transmitter} 6. Assemble the Quad copter. 7. Charge the Lithium Battery .. 8. Hover Control 9. Flight Operation 10. Recapitalization Flip, 11. Headless Mode 12. WIFI Camera Function 13. Spare Parts Notice: Tir ensure fuse operation of your quad copter, please read oll instructions before your first flight. Keep the manual for further reference.
To make your experience with this drone as straightforward and convenient as possible, please read this instruction manual carefully before operation. Keep it safe for fissure reference to ensure continued, safe and enjoyable use of your drone. 1.This product is not just a toy. It is a high precision adopter integrating various electronic stability and control mechanisms.
1.The information and guidance within this peck and instruction manual is important for the safe operation and ‘maintenance of your drone. Please keep it oafs for futures reference. 2.You accept sole responsibility for any injury, loss or damage that result from your operation of the device, 3.Always follow the instructions when assembling ar operating the drone, Always keep at least 2 meters between the user or viewers and the model to avoid risk of injury.
1.Clean the product after each use with a clean, soft cloth, 2.Avoid prolonged exposure to direct sunlight and avoid heat buildup in the drone. 3.This device is not waterproof and must not be submerged in water under any circumstances. Failure of the unit will result from water contamination. 4.Check the charging plug and other accessories for signs of damage frequently. If any part of the device is damaged refrain from flying until maintenance can be carried out.
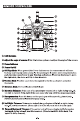
REMOTE CONTROLLER SLE 2.4G Antenna © Adjust the angle of camera: Slide this button up/down to adjust the angle of the camera @ Power Indicator @ Power On/Off (® 3D Flips Mode: When pressed, the Power Indicator on the remote control will start flashing and beeping continuously.Fly the quad copter 5 meters above the ground,then push the right control lever to any direction and release. Whatever direction you move the right stick, the drone will flip in that direction.
@ Invalid button for HS400 model. @ One key return: Press down the One Kay Return button, the drone would fly back to the direction where the tail of the drone points to when the drone is being paired, @® Engine Start/Stop: Press this to start the engine and get ready for take off(when the button pressed, the blades begin to rotate). Press the button to land the quad when it is flying. {B Invalid button for HS400 model. §® Speed Control: Press this button to switch three different speed modes.
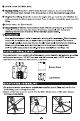
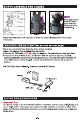
HOW TO ASSEMBLE THE CAMERA Please make sure the foot of the camera STEP 1.3 Please note that the shock absorbed and camera should be installed in the correct orientation. CHARGING THE BATTERY(See picture on next page) Please take out the battery from the drone before charging. L Insert the adapter (not included) into the socket. 2.Connect the USB cable with the adapter. The red indicator light will flash. 3.Connect the wire of battery with USB cable.
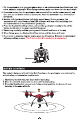
1. Fly the quad copter in a spacious indoors area, or an outdoors area free of obstacles, rain, snow, animals, and people. When flying outdoors, make sure there isn't too much wind. 2. Insert the battery into the quarterdeck and connect it. Turn on the remote control, and then turn on the power switch of quad copter. Place the quad copter on a level surface for takeoff. 8. Quickly shift the throttle stick (left stick) up and down.
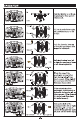
OPERATION Push the throttle up or down, the quad copter flies upward or downward. Pull the throttle left or right, the quad copter turns to left or right. Push the direction lever up or down, the quad copter flies forward or backward. Pull the direction lever left or right, the quad copter leans to left side or right side. When the nose of the quad copter rotates left or right during take-off, use this to correct. (Trim right if the nose leans left; trim loft if the nose leans right).