Tablet PC Users Manual Brand name:Vivitar Model name:PI070H04CB FCC ID:RQ2PI070H04CB This manual is specially formulated for the users first using this MID with the purpose of providing the information about basic operations and important functions.
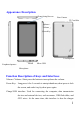
Appearance Description Front-facingCam era Rear Camera TF Card Slot Volume + Volume _PowerKey Loud Speaker EarphoneAperture HDMI Micro USB Microphone Function Description of Keys and Interfaces Volume+/Volume-: Short press the button to turn up/down the volume. Power Key:Long press it for 5 seconds to startup/shutdown; short press to lock the screen, and wake it up by short press again.
interface. TF Card Slot: Externally connect the TF card. Basic Operations Startup/Shutdown In status of power-off, after long press the power key for 5 seconds, it will enter into the main screen after displaying the startup picture. In status of power-on, after long press the power key for 5 seconds, it will pop up the dialogue box, and select “OK” key to shutdown, and the “Cancel” key to keep the power-on state.
Windows Vista, Windows 7 and the above versions, while Windows Media Play 10 or the above version need to be installed in Windows XP if need to support MTP. There are MTP-support software packages in Mac and Linux. Charging Please timely charge the MID when prompting the low-battery on the screen. Please use the charger provided by the manufacturer to charge. Charging can be conducted in status of power-off, and the whole charging process needs about 3.5 hours.
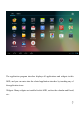
interface after displaying the startup picture. Screen Lock: Drag the screen lock icon to the unlocking direction to unlock the screen. Then, enter into the main screen, which displays as follows: (Note: There’s not only one method to unlock the screen lock, and it can be selected through the operations: Settings----Safety----Screen Lock).
Create Shortcuts: By long pressing the applications and the widget icons for 3 seconds, the icons will be enlarged, then drag this icon to the main interface to create the shortcut. Delete Shortcuts: Long press the icon needs to be deleted on the main screen for 3 seconds, and then drag the icon to the X icon appears on the screen (see the picture below), thus the shortcut can be deleted.
Various touching functions are as follows: Return: Touch this icon can go back to the catalog one level up. Main Screen: Touch this icon can go back to the main screen. Multi-tasks List: Displays the application thumbnails latest operated, and the user can close a certain application to release the memory. Dragging the application thumbnails on the screen right or left can remove it from the multi-tasks list.
The application program interface displays all applications and widgets in this MID, and you can enter into the related application interface by touching any of the application icons. Widgets: Many widgets are installed in this MID, such as the calendar and Email, etc..
Important Settings: WIFI network settings are as follows: Step 1: Open WIRELESS & NETWORKS. The system will automatically search the networks available. Step 2: Select the target network, and input the correct network password. And then select “Connect” to connect with WIFI networks. (Notes: If the network is not encrypted, the WIFI network will be connected by directly click “Connect”.
Bluetooth Bluetooth is a short-range wireless communications technology that devices can use to exchange information over a distance of about 10 meters. The most common Bluetooth devices are headphones for making calls or listening to music, hands-free kits for cars, and other portable devices, including laptops and cell phones. Touch Settings > Bluetooth. Check Bluetooth to turn it on. You must pair your phone with a device before you can connect to it.
The settings of location services are as follows: Users can confirm the general location through WIFI. Notes: The location confirmation can be used only in case that the user has downloaded the corresponding map software, such as Google Map, etc., and at the same time, opening the “Google’s Location Service” is needed.
MyPad Multi-choice/Open mode: By clicking this icon, several documents can be selected once a time, and can copy, cut, paste and rename the selected documents. Click again to cancel the multi-choice mode. Double-click the Music/Movies icons to directly play the music and video files this MID supports.
Applications Installation On the application interface, after clicking the icon , the system can automatically scanned out all the APK programs of the third party stored on this MID, and the related APK programs can be installed or uninstalled by clicking them.
The dialogue box popped by clicking the installed applications is as follows: Click “OK” to uninstall the application, and click “Cancel” to return to the catalogue one level up. FAQ Handling (I) MID Startup Failure Handling Methods: a. Check whether the MID is in power, and connect the power adapter to restart. b. Use paper clips or something like to press the reset key in the reset aperture to reset.
If the MID still can’t be started using the methods above, please contact with our retailer. (II). Serious Noise Handling Methods: a. Please check whether the music files are damaged. You can confirm that by playing other music files. If the files are damaged, they will cause serious noise. (III). Messy Codes on the Screen Handling Methods: a. Please check whether the right language option has been set. (IV). Files Download Failure Handling Methods: a. Please check whether the memory space is full. b.
This device complies with part 15 of the FCC rules. Operation is subject to the following two conditions: (1) this device may not cause harmful interference, and (2) this device must accept any interference received, including interference that may cause undesired operation. This device is acting as slave device and operating in the 2.4 GHz (2412 – 2462 MHz) band. Ad Hoc function is supported but not able to operate on non-US frequencies.
which can be determined by turning the equipment off and on, the user is encouraged to try to correct the interference by one or more of the following measures: - Reorient or relocate the receiving antenna. - Increase the separation between the equipment and receiver. -Connect the equipment into an outlet on a circuit different from that to which the receiver is connected.