LogiCORE™ IP Initiator/Target v5.
R Xilinx is disclosing this Document and Intellectual Property (hereinafter “the Design”) to you for use in the development of designs to operate on, or interface with Xilinx FPGAs. Except as stated herein, none of the Design may be copied, reproduced, distributed, republished, downloaded, displayed, posted, or transmitted in any form or by any means including, but not limited to, electronic, mechanical, photocopying, recording, or otherwise, without the prior written consent of Xilinx.
Version 04/04/02 2.2.1 06/24/02 3.0 Revision Updated trademarks page in ug000_title.fm. Initial Xilinx release of corporate-wide common template set, used for User Guides, Tutorials, Release Notes, Manuals, and other lengthy, multiple-chapter documents created by both CMP and ITP. See related documents for further information. Descriptions for revisions prior to v3.0 have been abbreviated. For a full summary of revision changes prior to v3.0, refer to v2.2.1 template set. 10/30/02 3.
Version Revision 10/10/07 9.5 Updated for IP2 Jade Minor release. Added section regarding configuration pins to device family chapter. 3/24/08 10.0 Updated tools for IP0K release. PCI-X v5.1 165 Getting Started Guide UG158 March 24, 2008 www.xilinx.
Table of Contents Schedule of Figures . . . . . . . . . . . . . . . . . . . . . . . . . . . . . . . . . . . . . . . . . . . . . . . . . . . . . . . . . . 7 Preface: About This Guide Guide Contents . . . . . . . . . . . . . . . . . . . . . . . . . . . . . . . . . . . . . . . . . . . . . . . . . . . . . . . . . . . . . . 9 Conventions . . . . . . . . . . . . . . . . . . . . . . . . . . . . . . . . . . . . . . . . . . . . . . . . . . . . . . . . . . . . . . . . 10 Typographical . . . . . . . . . . . . . . .
Verilog . . . . . . . . . . . . . . . . . . . . . . . . . . . . . . . . . . . . . . . . . . . . . . . . . . . . . . . . . . . . . . . . . . 31 VHDL . . . . . . . . . . . . . . . . . . . . . . . . . . . . . . . . . . . . . . . . . . . . . . . . . . . . . . . . . . . . . . . . . . . 36 Exemplar LeonardoSpectrum . . . . . . . . . . . . . . . . . . . . . . . . . . . . . . . . . . . . . . . . . . . . . . 40 Xilinx XST . . . . . . . . . . . . . . . . . . . . . . . . . . . . . . . . . . . . . . . . . . . . . . .
Schedule of Figures Chapter 1: Getting Started Chapter 2: Licensing the Core Chapter 3: Family Specific Considerations Figure 3-1: PCI/PCI-X Output Driver VCCO Generation . . . . . . . . . . . . . . . . . . . . . . . . . . . 23 Chapter 4: Functional Simulation Chapter 5: Synthesizing a Design Figure 5-1: Create a New Project . . . . . . . . . . . . . . . . . . . . . . . . . . . . . . . . . . . . . . . . . . . . . . . 31 Figure 5-2: Main Project Window . . . . . . . . . . . . . . . . . . . . . . . . . . . .
PCI-X v5.1 165 Getting Started Guide UG158 March 24, 2008 www.xilinx.
R Preface About This Guide The Initiator/Target v5.1 for PCI-X Getting Started Guide provides information about the LogiCORE™ IP interface core for Peripheral Component Interconnect Extended (PCI-X), which provides a fully verified, pre-implemented PCI-X bus interface targeting devices based on the Virtex™ FPGA architecture. The guide also includes an example design in both Verilog-HDL and VHDL that lets you simulate, synthesize, and implement the interface to understand the design flow for PCI-X.
R Preface: About This Guide Conventions Typographical The following typographical conventions are used in this document: Convention Meaning or Use Example Courier font Messages, prompts, and program files that the system displays speed grade: - 100 Courier bold Literal commands you enter in a syntactical statement ngdbuild design_name angle brackets < > Variables in a syntax statement for which you must supply values References to other manuals See the Initiator/Target User Guide for more infor
R Conventions Online Document The following conventions are used in this document: Convention Meaning or Use Blue text Cross-reference link to a location in the current document Blue, underlined text Hyperlink to a website (URL) PCI-X v5.1 165 Getting Started Guide UG158 March 24, 2008 www.xilinx.com Example See “Additional Resources” for details. See “Title Formats” in Chapter 1 for details. Go to http://www.xilinx.com for the latest speed files.
R 12 Preface: About This Guide www.xilinx.com PCI-X v5.
R Chapter 1 Getting Started The Initiator/Target core for PCI-X provides a fully verified, pre-implemented PCI-X bus interface targeted for devices based on the Virtex architecture. This chapter provides information about the example design, resources for additional documentation, obtaining technical support, and providing feedback to Xilinx about the core and its documentation.
R Chapter 1: Getting Started Step-by-step instructions using supported design tools are provided in this guide to simulate, synthesize, and implement the Userapp example design. Additional Documentation For more information about the core interface, see the following documents, provided in the CORE Generator zip file: • Initiator/Target v5.1 for PCI-X User Guide • Initiator/Target v5.
R Chapter 2 Licensing the Core This chapter provides instructions for installing and obtaining a license for the Initiator/Target core for PCI-X, which you must do before using it in your designs. The core is provided under the terms of the Xilinx LogiCORE Site License Agreement, which conforms to the terms of the SignOnce IP License standard defined by the Common License Consortium. Purchase of the core entitles you to technical support and access to updates for a period of one year.
R Chapter 2: Licensing the Core Full License The Full license is provided when you purchase the core, and provides full access to all core functionality both in simulation and in hardware, including: • Gate-level functional simulation support. • Back annotated gate-level simulation support. • Full implementation support including place and route and bitstream generation. • Full functionality in the programmed device with no time-outs.
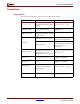
R Chapter 3 Family Specific Considerations This chapter provides important design information specific to the core interface targeting Virtex devices. Design Support Table 3-1 provides a list of supported device and interface combinations, consisting of a device, a bus interface type, and two or three specific implementation files.
R Chapter 3: Family Specific Considerations Table 3-1: Device and Interface Selection Supported Device 2VP7-FF672-6C/I 2VP7-FF672-6C/I 2VP7-FF672-6C/I 2VP7-FF672-6C/I Bus Type Wrapper File Simulation Model 66 MHz PCI-X pcix_lc_64x 3.3V 64-bit pcix_core 100 MHz PCI-X pcix_lc_64xf 3.3V 64-bit pcix_fast 133 MHz PCI-X pcix_lc_64xf 3.3V 64-bit pcix_fast 33 MHz PCI pcix_lc_64s 66 MHz PCI-X pcix_core Constraints File 2vp7ff672_64x.ucf 2vp7ff672_64xf.ucf 2vp7ff672_64xf.ucf 2vp7ff672_64s.
R Design Support Table 3-1: Device and Interface Selection Supported Device 2VP40-FF1152-6C/I 2VP40-FF1152-6C/I 2VP40-FF1152-6C/I 2VP40-FF1152-6C/I Bus Type Wrapper File Simulation Model 66 MHz PCI-X pcix_lc_64x 3.3V 64-bit pcix_core 100 MHz PCI-X pcix_lc_64xf 3.3V 64-bit pcix_fast 133 MHz PCI-X pcix_lc_64xf 3.3V 64-bit pcix_fast 33 MHz PCI pcix_lc_64s 66 MHz PCI-X pcix_core Constraints File 2vp40ff1152_64x.ucf 2vp40ff1152_64xf.ucf 2vp40ff1152_64xf.ucf 2vp40ff1152_64s.ucf 3.
R Chapter 3: Family Specific Considerations Table 3-1: Device and Interface Selection Supported Device 4VLX25-FF668-10C/I 4VLX25-FF668-10C/I 4VSX35-FF668-10C/I 4VSX35-FF668-10C/I 4VSX35-FF668-10C/I 4VSX35-FF668-10C/I Bus Type Wrapper File Simulation Model 100 MHz PCI-X pcix_lc_64x 3.3V 64-bit pcix_core 133 MHz PCI-X pcix_lc_64x 3.3V 64-bit pcix_core 33 MHz PCI pcix_lc_64.ng 3.3V 64-bit pcix_core 66 MHz PCI-X pcix_lc_64x 3.3V 64-bit pcix_core 100 MHz PCI-X pcix_lc_64x 3.
R Device Initialization Device Initialization Immediately after FPGA configuration, both the core interface and the user application are initialized by the startup mechanism present in all Virtex devices. During normal operation, the assertion of RST# on the PCI-X bus reinitializes the core interface and threestate all PCI-X bus signals. This behavior is fully compliant with the PCI Local Bus Specification. The core interface is designed to correctly handle asynchronous resets.
R Chapter 3: Family Specific Considerations bitstream is in use. When this occurs, external circuitry is responsible for re-initializing the FPGA and loading an alternate bitstream. This requires storage for two complete bitstreams and another device, such as a CPLD, for managing the reconfiguration process. The reconfiguration process cannot be controlled by the FPGA because the FPGA becomes inactive during configuration.
R Electrical Compliance It is important to note that the frequency of this clock is not guaranteed to be constant. In fact, in a compliant system, the clock may be any frequency, up to and including the maximum allowed frequency, and the frequency may change on a cycle-by-cycle basis. Under certain conditions, the PCI-X core may also apply phase shifts to this clock.
R Chapter 3: Family Specific Considerations Input Delay Buffers Input delay buffers are used to provide guaranteed hold time on all bus inputs when in PCI bus mode. Where possible, the core interface targeting Virtex devices uses input delay elements present in the IOBs of the FPGA device. The use of these delay buffers is selected through the implementation specific constraints file. Virtex-4 FPGA implementations that support PCI bus mode make use of the new IDELAY input delay buffer primitives.
R Generating Bitstreams Generating Bitstreams The bitstream generation program, bitgen, may issue DRC warnings when generating bitstreams for PCI-X designs. The number of these warnings varies depending on the configuration options used for the PCI-X core. Typically, these warnings are related to nets with no loads generated during trimming by the map program. Some of these nets are intentionally preserved by statements in the user constraints file.
R 26 Chapter 3: Family Specific Considerations www.xilinx.com PCI-X v5.
R Chapter 4 Functional Simulation This chapter describes how to simulate the Userapp example design using the supported functional simulation tools. If you are using a design with reference clocks, substitute pcix_top with pcix_top_r and test_tb with test_tb_r. Supported functional simulation tools include • Cadence IUS v6.1 • Mentor Graphics ModelSim v6.3c Cadence IUS Before attempting functional simulation, ensure that the IUS environment is properly configured. 1.
R Chapter 4: Functional Simulation ../../src/xpci/pcix_lc.v ../../src/xpci/pcix_core.v +libext+.vmd+.v -y /verilog/src/unisims -y /verilog/src/simprims This subset list does not include any configuration file, user application, top-level wrapper, or test bench. These additional files are required for a meaningful simulation. 5. To run the IUS simulation, type the following: ncverilog -f test_tb.f IUS processes the simulation files and exits.
R Mentor Graphics ModelSim Most of the files listed are related to the example design and its test bench. For other test benches, the following subset must be used for proper simulation of the core interface: ../source/glbl.v ../../src/xpci/pcix_lc.v ../../src/xpci/pcix_core.v +libext+.vmd+.v -y /verilog/src/unisims -y /verilog/src/simprims This list does not include any configuration file, user application, top level wrapper, or test bench.
R Chapter 4: Functional Simulation vlib simprim vcom -93 -work simprim /vhdl/src/simprims/simprim_Vpackage_mti.vhd vcom -93 -work simprim /vhdl/src/simprims/simprim_Vcomponents_mti.vhd vcom -93 -work simprim /vhdl/src/simprims/simprim_VITAL_mti.vhd vlib unisim vcom -93 -work unisim /vhdl/src/unisims/unisim_VPKG.vhd vcom -93 -work unisim /vhdl/src/unisims/unisim_VCOMP.
R Chapter 5 Synthesizing a Design This chapter describes the use of supported synthesis tools using the Userapp example design for step-by-step instructions and illustrations. If you are using a design with reference clocks, substitute pcix_top with pcix_top_r and test_tb with test_tb_r.
R Chapter 5: Synthesizing a Design 2. Under File Type, select Project File and enter the project name (flowtest in this example) and synthesis directory: /verilog/example/synthesis 3. Click OK to return to the project window (Figure 5-2). Figure 5-2: 4. Main Project Window To add source files to the new project, click Add. The first file (used by any design that instantiates Xilinx primitives) is located in: /lib/xilinx 32 www.xilinx.com PCI-X v5.
R Synplicity Synplify 5. Navigate to the virtex.v file (Figure 5-3); then click Add to move this source file into the Files To Add list. Figure 5-3: Files to Add (Virtex Library) The next files are located in: /verilog/src/xpci 6. Navigate to the xpci directory (Figure 5-4), select the simulation model and the wrapper files (pcix_core.v and pcix_lc.v), and click Add to move these files into the Files To Add list. (Ctrl + click to select multiple files.
R Chapter 5: Synthesizing a Design 7. Navigate to the source directory (Figure 5-5), select the cfg_test_s.v, pcix_top.v, and userapp.v files, and then click Add. Figure 5-5: 8. After adding the three final files (for a total of six source files), click OK to return to the main project window. 9. In the Source Files list, view the list of newly added source files by double-clicking the flowtest/verilog folder (if it is not already open).
R Synplicity Synplify 10. Click Change Result File to display the EDIF Result File dialog box; then move the to following directory: /verilog/example/synthesis 11. Name the file pcix_top_s.edf and click OK to set the name of the result file and return to the main project window. Note: In practice, the directory for the EDIF result file does not need to be changed.
R Chapter 5: Synthesizing a Design 15. On the Implementation Results tab, deselect Write Vendor Constraint File. 16. Click OK to return to the main project window. 17. From the main project window, click Run. Synplify synthesizes the design and writes out an optimized EDIF file. In the lowerright corner of the window, the various stages or synthesis, such as Compiling or Mapping, are displayed. When the process is complete, Done is displayed.
R Synplicity Synplify 3. Click OK to exit the dialog and return to the project window (Figure 5-10). Figure 5-10: 4. Main Project Window To add source files to the new project, click Add. The first file (used by any design that instantiates Xilinx primitives) is located in: /lib/xilinx 5. Select the virtex.vhd file (Figure 5-11); then click Add to move the file into the Files To Add list. Figure 5-11: PCI-X v5.
R Chapter 5: Synthesizing a Design The next files are located in: /vhdl/src/xpci 6. Navigate to the xpci directory (Figure 5-12), select the simulation model and the wrapper files (pcix_core.vhd and pcix_lc.vhd), and click Add to move these files into the Files To Add list. (Ctrl + click to select multiple files.) Figure 5-12: Files to Add (LogiCORE Files) The final set of design files (the user application) is located in: /vhdl/example/source 7.
R Synplicity Synplify 8. In the Source Files list, view the list of newly added source files by double-clicking the flowtest/vhdl folder (if it is not already open). Drag to reorder the source files in the hierarchical order shown in Figure 5-14. Figure 5-14: 9. Main Project Window Click Change Result File to display the EDIF Result File dialog box; then move the to following directory: /vhdl/example/synthesis 10. Name the file pcix_top.
R Chapter 5: Synthesizing a Design 11. From the main project window, click Change Target to display the Options for Implementation dialog box, as shown in Figure 5-15. Figure 5-15: Options for Implementation: Device 12. On the Device tab, set the Technology, Part, Speed, and Package options to reflect the targeted device (a 2V1000FG456-5 in this example). Be sure that Disable I/O Insertion is deselected. 13.
R Xilinx XST Note: if you run LeonardoSpectrum with the graphical user interface, the quick setup form cannot be used to synthesize the design. Instead, choose File > Run Script from the menu. The end result of the synthesis step is an EDIF file that is fed into the Xilinx implementation tools during the implementation step. In practice, the provided script file must be modified to accommodate other designs. To provide insight into the synthesis script, the major steps are presented below: 1.
R 42 Chapter 5: Synthesizing a Design www.xilinx.com PCI-X v5.
R Chapter 6 Implementing a Design This chapter describes the use of supported FPGA implementation tools using the Userapp example design. If you are using a design with reference clocks, substitute pcix_top with pcix_top_r and test_tb with test_tb_r. Supported FPGA implementation tools are included with the ISE Foundation v10.1 software. ISE Foundation Before implementing a design, ensure that the Xilinx environment is properly configured and that the design has been successfully synthesized. 1.
R Chapter 6: Implementing a Design 3. ♦ The trce command performs a static timing analysis based on the design constraints originally specified in the user constraints file. ♦ The netgen command generates a simulation model of the placed and routed design. Implement the design by running the appropriate script. During initial processing trials, it is useful to enter the commands one at a time from the command line, instead of running the script, so that you may inspect the output of each step.
R Chapter 7 Timing Simulation This chapter describes the use of supported timing simulation tools using the Userapp example design. If you are using a design with reference clocks, substitute pcix_top with pcix_top_r and test_tb with test_tb_r. Supported timing simulation tools include • Cadence IUS v6.1 • Mentor Graphics ModelSim v6.3c Note: The stimulus source file delivered with the example design (source/stimulus.
R Chapter 7: Timing Simulation The SimVision browser may be used to view simulation results. SimVision is started with the following command: simvision Mentor Graphics ModelSim Before attempting functional simulation, ensure that the ModelSim environment is properly configured for use. Verilog 1. Navigate to the timing simulation directory and copy the back annotated timing models from the implementation directory: cd /verilog/example/post_sim cp ../xilinx/*.v ./ cp ../xilinx/*.sdf ./ 2.
R Mentor Graphics ModelSim 3. Invoke ModelSim, and ensure that the current directory is set to: /vhdl/example/post_sim 4. Create the SimPrim and UniSim libraries. This step only needs to be done once, the first time you perform a simulation: vlib simprim vcom -93 -work simprim /vhdl/src/simprims/simprim_Vpackage_mti.vhd vcom -93 -work simprim /vhdl/src/simprims/simprim_Vcomponents_mti.