
User Manual


- 15 -
�
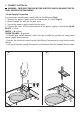
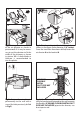
Fig.3: Put together the two parts
of the air deviator as shown in
picture no 3.1. It may be neces-
sary to cut the deviator to fit the
width of the chimney as shown
in picture 3.2. A sharp blade or
Hacksaw is recommended to
trim the plastic.
Fig.4: Take the air diverter A and drill two holes as
shown in the gure (hole diameter: 1/4" inches).
Once the two holes have been drilled, fasten the
air diverter A to the bracket H.
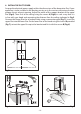
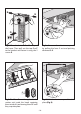
Fig.5: Fasten the air diverter
permanently to the wall with a
screw (the hole previously drilled
in Fig.2).
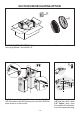
Fig.6: Once the air diverter has been inserted
into the bracket and fastened to the wall connect
the exible (6" ROUND FLEXIBLE METAL DUCT
PIPE NOT INCLUDED) pipe to the diverter, use
duct tape to seal.
6" ROUND
FLEXIBLE
METAL
DUCT PIPE NOT
INCLUDED