WATCH THE INSTALLATION VIDEO ON OUR CHANNEL XOU15BCGO PANEL READY BEVERAGE CENTER I worked really hard on this manual so please read it...
UNDERCOUNTER When buying any XO appliance you can be confident you have chosen a high quality, innovative and stylish product from a company that cares about you! If you require service or have questions, Help is only a phone call away call: 973-403-8900 Talk to one of our undercounter experts.
where things are 4 - 7 Before You Get Started Installer Checklist Find Your Model Safet y Instructions Electrical and Grounding Instructions 8 - 13 Installation Instruc tions Sizes and Installation Dimensions Integrated Panel Dimensions Leveling Your XO O p erating Instruc tions Product Over view Control System Over view Set ting the Temperature Fun ction s Wine and Beverage Storage Shelf In structions 14 - 20 Care an d C l ean in g H elpful Hints Cleaning the Interior / Exterior Changing the Carbon Ai
the job isn’t done until To ensure that the installation process is successfully completed, here are few things to review... O Is the unit plugged in? O Are the controls on? (Panel will illuminate.
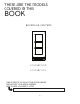
2 these are the models covered in this book BEVERAGE CENTERS XOU15BCGOR XOU15BCGOL take a minute to circle your model above and record your serial number here in case you need it later 5
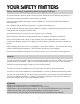
your safety matters Pl ease re ad t hro ugh compl etely befo re using yo ur XO Unit To prevent damage to the door gasket, the door must be opened all the way before pulling shelves out. The appliance must be positioned so that the plug is accessible. Empty your XO unit before attempting to move the appliance. Moving while loaded may damage or distort the frame. The compressor will get HOT during operation / touching it may cause injury.
Failure To Fo llow All El ec trical Safet y M easures M ay Result in Serious Injur y, Fi re Or Deat h All electrical work should only be performed by an experienced, licensed electrician. INDOOR USE ONLY: All XO units MUST be grounded for safe operation and come equipped with a 3 Prong molded cord/plug for that purpose. NEVER remove or disable the 3rd prong with an adapter. NEVER use an extension cord to operate your XO unit.
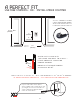
a perfect fit use free standing - or - install under counter ALL XO UNDERCOUNTER UNITS ARRIVE PRE-WIRED WITH LOW PROFILE PLUGS FOR EASY INSTALLATION 34 1/4” MIN (870mm) 7" (178mm) 4" (100mm) WALL 15” (381mm) 90° Door Swing DOOR MUST BE ABLE TO OPEN A MINIMUM OF 90 o . Clearance Gap THE DOOR STOP IS SET AT 110 WHEN INSTALLING WITH THE HINGE SIDE NEXT TO A WALL LEAVE ADEQUITE SPACE FOR CABINET HANDLES o o o - BUT CAN BE RESET TO 90 OR 140 IF NEEDED.
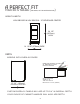
a perfect fit your xo is this big ( or small, as the case would be ) height & width XOU15BCGOR & XOU15BCGOL 15” BEVERAGE CENTER 34 1/8” H (867mm) HIGH 14 15/16” (379mm) WIDE W depth MODELS WITH OVERLAY DOORS DOOR MUST BE ABLE TO OPEN 90 O MINIMUM TO ALLOW RACKS TO EXTEND 140 o 110 o 90o WITH THE DOOR OPEN AT 90o THE UNIT HAS A DEPTH OF 37 5/16” (948mm) 23 3/4” (603mm) includes 3/4” thick door D CUSTOM OVERLAY PANELS MAY ADD UP TO 3/4” IN OVERALL DEPTH YOUR CHOICE OF CABINET HANDLES WILL ALSO ADD
overlay panel dimensions xou15bcgo 14 3/4” * (375mm) 3 1/4” (86mm) 5” (127mm) 2 7/8” (73mm) 2 7/8” (73mm) 5” (127mm) 5” (127mm) * IF FRAME WIDTH EXCEEDS 14 3/4” WHEN MOUNTING TO THE DOOR ALIGN THE FRAME EVEN WITH THE HINGE SIDE, LETTING THE EXCESS OVERHANG THE HANDLE SIDE TO AVOID INTERFERENCE WITH THE ZERO CLEARANCE HINGE.
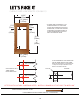
let’s face it BEFORE BEGINNING - REST THE UNIT ON ITS BACK, WITH THE DOOR FACING UP 1. Remove the two screws that hold the toe kick in place. Remove the toe kick and set aside. 2. Remove the three screws holding the lower hinge in place. Remove the hinge and set aside. 3. Pull the door down away from the upper hinge to remove it and lay it flat face down on a pad to prevent scratches. 4. Starting at one corner, gently pull the rubber door gasket out of the channel. Lay it aside, flat.
8. Remove the clamps and re-install the rubber gasket by pressing it into the slot making sure it is evenly seated. 9. Place the door back in position and slide to up onto the upper hinge pin, then square it up with the cabinet. OPTIONAL o The door hinge stop is set at 110 . o o change it to either 90 or 140 . Simply change the position of the stop screw in the lower hinge plate as shown. 10. Replace the lower hinge using the three screws removed in Step 2. 11.
it’s like zen but cooler get your level out DO NOT NEGLECT THIS IMPORTANT STEP Rotate to raise or lower the LEVELING LEGS located at each of the four corners until all four legs are seated firmly on the floor and the interior floor of the unit is level both front to back and side to side. Failure to follow this important step may cause problems with proper door operation, excessive condensation, vibration and noise.
meet your xo BEVERAGE CENTER XOU15BCGO_ CONTROL PANEL (Hiding up here) CARBON FILTER CARTRIDGE (replace every 3 to 6 months) RECIRCULATION FAN GLIDE OUT SHELVES (adjust to 15 positions two included additional shelves available) LOCK FRONT COOLING VENTS LEVELING LEGS WHAT’S THAT NOISE... You new XO is designed for quiet operation but you may hear some sounds your old unit didn’t make. Because they are new you might be concerned, but they are usually normal.
a little extra beverage center Your 15” XOU15BCGO Beverage Center comes with a removable 3 bottle wine cradle which can be used to store, display or serve. The cradle is designed to fit in the bottom of the unit below the bottom shelf. The cradle is included, the wine is not. Sorry.
take control temperature Your XO Beverage Center has and easy to use digital touch control panel. Beverage Center Temp. Settings o o Adjustable Range: 34 F to 50 F Your XO Beverage Center remembers your last temperature setting in case of a power failure and automatically adjusts to the previous setting when power is restored. When the +/- button is pressed, your beverage center automatically enters set up mode. The LED Display will begin flashing and display the temperature setting.
nd<é"UHUd H<6:n
single zone control beverage centers ON /OFF But ton Press & Hold for 1 Second to turn ON Press & Hold for 3 Seconds to turn OFF Press to Silence Alarm Light Function But ton Toggle Bet ween 3 Light Functions L1, L2, L3 TEMPER ATURE D ISPL AY Press to raise temperature Press to lower temperature Ch anges interior light colo r Toggles bet ween different operating modes Th e temperature set ting can be adjusted from 34-50°F. Your controls are simple and int ui t ive to operate.
how many 12 oz cans can this hold 36 18 12 66 TOTAL Store wine in seal ed bot tl es only Avoid overloading Storing lit t l e or no produc t can cause excessive condensation 19
juggling space is easy with xo STEP 1: Remove the shelf FULLY EX TEND THE SHELF STEP 2: Remove and re -position the shelf glides REAR SHELF GLIDE SUPPORT LIFT UP LIFT THE FRONT REAR SHELF GLIDE SUPPORT FRONT SHELF GLIDE SUPPORT PULL OUT STRAIGHT FRONT SHELF GLIDE SUPPORT SHELF GLIDE SHELF GLIDE STEP 3: Reverse the steps. Install the right and lef t SHELF GLI DES in their new position by pushing the pins into the slots and click the front of the glide down to secure. Replace the shelf.
a little tlc goes a long way Cl eaning t h e Insid e : Walls, floor, inside window, and shelves - Some water deposits and dust can be removed with a dry paper towel, others may require a damp cloth. Cl eaning t h e Outsid e : Outer case - It is important to keep the area clean where the door seals against the cabinet. Clean this area with a soapy cloth. Rinse with a damp cloth and let dry. Control Panel and Door - Wipe with a damp cloth and dry thoroughly.
a breathe of fresh air for best results change every 3 to 6 months Your Air Refresh Ch arcoal Filter I s Located H ere P/N: XOUAIRFILTER Rotate the filter 1/4 turn to un lock Pull straight out to remove Align the t abs and inser t the new filter Rotate filter 1/4 tu rn to lock in place 22
faq’s Q. There doesn’t appear to be any power to the unit. A. There are 3 easy to check common causes: (1) Check to see if a fuse has blown or circuit breaker has tripped & replace or reset. (2) Check to ensure the plug is fully inserted into the outlet. (3) A power surge may have caused the unit to shut down to protect itself - Unplug the unit, wait 5 seconds and plug it back in. Q. The cabinet temperature is too high. A. Check these 5 things: (1) Check the temperature setting and adjust as needed.
we’ve got your back 90 DAY LOVE IT or LEAVE IT. For 90 Days all our products are backed by our unique Love it or Leave it Guarantee. TWO-YEAR PARTS & LABOR LIMITED WARRANTY. XO warrants to the original purchaser of every new XO refrigerated unit, the cabinet and all parts thereof, to be free from defects in material or workmanship under normal and proper use and maintenance as specified by XO and upon proper installation and start-up in accordance with the instruction packet supplied with each XO unit.