XOU24BCGOA ALL PURPOSE BEVERAGE CENTER I worked really hard on this manual so please read it.
UNDERCOUNTER When buying any XO appliance you can be confident you have chosen a high quality, innovative and stylish product from a company that cares about you! If you require service or have questions, Help is only a phone call away call: 973-403-8900 Talk to one of our undercounter experts. CONGRATULATIONS on purchasing your XO. Before you proceed, take just a moment to register your XO at: www.xoappliance.
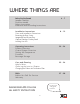
where things are 4 - 7 Before You Get Started Installer Checklist Find Your Model Safet y Instructions Electrical and Grounding Instructions 8 - 19 Installation Instruc tions S izes and Installation Dimensions Reversing the Door Swing Integrated Panel Dimensions Optional Stainless Overlay Panel Leveling Your XO Operating Instruc tions Product Over view Control System Over view Set ting the Temperature Fun ction s Beverage Storage 20 - 24 Care and Cl eaning H elpful Hints Cleaning the Interior / Exterio
the job isn’t done until To ensure that the installation process is successfully completed, here are few things to review... O Is the unit plugged in? O Are the controls on? (Panel will illuminate.
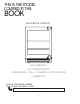
2 this is the model covered in this book BEVERAGE CENTER XOU24BCGOA ACCOMMODATES EUROPEAN | ADA | AMERICAN STANDARD CABINETRY record your serial number here in case you need it later 5
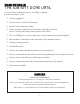
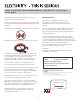
your safety matters Pl ease re ad t hro ugh compl etely befo re using yo ur XO Unit To prevent damage to the door gasket, the door must be opened all the way before pulling racks out. The appliance must be positioned so that the plug is accessible. Empty your XO unit before attempting to move the appliance. Moving while loaded may damage or distort the frame. The compressor will get HOT during operation / touching it may cause injury.
Failure To Fo llow All El ec trical Safet y M easures M ay Result in Serious Injur y, Fi re Or Deat h All electrical work should only be performed by an experienced, licensed electrician. INDOOR USE ONLY: All XO units MUST be grounded for safe operation and come equipped with a 3 Prong molded cord/plug for that purpose. NEVER remove or disable the 3rd prong with an adapter. NEVER use an extension cord to operate your XO unit.
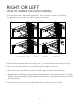
right or left how to change the door opening Your XO arrives with a right hand hinged door - but it is easily to reverse if you choose. To reverse the hinge on your unit, follow the directions below: 3 Fig.A Fig.B 2 4 1 Fig.C Fig.D 1 4 4 1. Screw hole covers 2. Door 3. Hinge 4.Screws 1.Open the door and remove the screw hole covers (1) on the left hand side as shown in Fig A. 2. Start screws into these positions as per Fig B, but do not tighten the screws. 3.
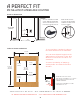
a perfect fit your xo is this big ( or small, as the case would be ) height, width & depth XOU24BCAGO 24” BEVERAGE CENTER 21-11/16” 550mm 23-7/16” 595mm 19-15/16” 507mm 3-3/8” 85mm 2-3/16” 55mm 2-3/16” 55mm Minimum 32-1/4” 820mm 27-15/16” (710mm) Maximum 34-13/16” 885mm 3-3/8” 85mm 3-9/16” (90mm) WALL 3-7/16” (88mm) 90° Door Swing TOP VIEW Clearance Gap INSTALLING NEXT TO A WALL, ENSURE ADEQUATE CLEARANCE FOR THE HANDLE 90o WITH THE DOOR OPEN AT 90o THE UNIT HAS A DEPTH OF 46 1/16” (1170mm
a perfect fit installation under ada counter rough in dimensions ALL XO UNDERCOUNTER UNITS ARRIVE PRE-WIRED WITH LOW PROFILE PLUGS FOR EASY INSTALLATION NEED MORE SPACE CUT INTO AN ADJOINING CABINET TO REACH AN OUTLET THERE 32 1/2” MIN (825mm) 7” (178mm) 4” (102mm) 24” (610mm) overlay frame dimensions To conceal door completely observe the frame dimensions as minimums. 23-5/8” 600mm To reduce possibility of warping overlay frame should be finished on all sides.
a perfect fit installation european cabimets rough in dimensions (720mm door height and 150mm plinth) ALL XO UNDERCOUNTER UNITS ARRIVE PRE-WIRED WITH LOW PROFILE PLUGS FOR EASY INSTALLATION NEED MORE SPACE CUT INTO AN ADJOINING CABINET TO REACH AN OUTLET THERE 34 1/4” MIN (870mm) 7” (178mm) 4” (102mm) 23-5/8” (600mm) overlay frame dimensions To conceal door completely observe the frame dimensions as minimums.
a perfect fit installation us standard height cabinets rough in dimensions FILLER STRIP* ALL XO UNDERCOUNTER UNITS ARRIVE PRE-WIRED WITH LOW PROFILE PLUGS FOR EASY INSTALLATION NEED MORE SPACE CUT INTO AN ADJOINING CABINET TO REACH AN OUTLET THERE 34 1/2” MIN (876mm) 7” (178mm) 4” (102mm) * For US cabinets, use a filler strip to close the gap above the unit behind the door (an ell bracket is included) For European cabinets with a 6” toekick, raise the unit by 2” using the leveling legs and install a cust
talking toe kicks TOE KICKS CAN VARY IN SIZE DEPENDING ON THE STYLE OF CABINETRY. MOST COMMON IN THE US ARE 3-1/2 INCH TOE KICKS WHICH ARE 3 INCHES DEEP. EUROPEAN CABINETS ARE SUPPORTED BY ADJUSTABLE LEGS AND TOE KICKS (PLINTHS) RUN THE WIDTH OF THE CABINETS, CLIPPED TO THE ADJUSTABLE LEGS, TYPICALLY 4 1/2” TO 6” HIGH. SEE THE ILLUSTRATION BELOW SHOWING SIDE VIEWS OF EACH.
installation under a C counter - 4” toe kick D A B A OVERLAY PANEL B DOOR C TRIM BLOCK (optional) SIDE VIEW UNDER COUNTER D TRIM BRACKET (included) IMPORTANT Finish panel mounts to door even with the bottom of cabinets. Legs are extended only enough to level unit. The XOU24 “A ”model is 32 1/4" Tall. The standard US undercounter refrigerator is 34" Tall. The trim bracket (D) is 1 3/4" Tall and will attach to the top of the refrigerator to fill the void.
BEFORE BEGINNING: Attach any handle hardware before mounting the panel to the door frame. 1. Fully open the door and starting at one corner pull the gasket out of the gasket channel. 2. After removing the gasket lay it out on a flat surface to retain its shape. 3. Using clamps to hold it securely in place, position the overlay panel against the door. 4. Using the frame as a guide, drill six (6) pilot holes 1/8” (3mm) in dia. into the finish panel taking care not to drill through the panel. 5.
optional stainless steel door panel kit p/n: The stainless door panel mounts in the same fashion as a wooden cabinet door. 23-7/16” 595mm 3-9/16” 90mm Place the handle (B) over the 2 mounting studs (A) on the door frame with the set screws (C) pointing down.
foot sliders USING THE FOOT SLIDERS REAR 2-9/16” 65mm FRONT To compensate for different height cabinetry, your XO has leveling legs that can extend as much as 2-9/16” (65mm). When installing your XO with the leveling legs extended, use the FOOT SLIDERS provided under the feet on each side to help avoid catching and damaging the legs.
it’s like zen but cooler get your level out DO NOT NEGLECT THIS IMPORTANT STEP Rotate to raise or lower the LEVELING LEGS located at each of the four corners until all four legs are seated firmly on the floor and the interior floor of the unit is level both front to back and side to side. Failure to follow this important step may cause problems with proper door operation, excessive condensation, vibration and noise.
finishing touches TIE IN BRACKET With the door open, using the screws provided connect the tie in bracket in the upper corner of the wine cooler opposite the hinge then screw the flange of the bracket to the cabinet. TOE KICK | PLINTH Your XO comes with a 4” (100mm) toe kick | plinth. It can accommodate up to a 6” (150mm) toe kick | plinth.
meet your xo BEVERAGE CENTER HIDDEN CONTROL PANEL XOU24BCGOA_ REVERSIBLE DOOR HINGE CARBON FILTER CARTRIDGE RECIRCULATION FAN (replace every 3 to 6 months) GLIDE OUT GLASS SHELVES REVERSIBLE DOOR HINGE FRONT COOLING VENTS LEVELING LEGS WHAT’S THAT NOISE... You new XO is designed for quiet operation but you may hear some sounds your old unit didn’t make. Because they are new you might be concerned, but they are usually normal. Sounds can also be amplified by hard surfaces like flooring or tiles.
take control temperature Your XO Beverage Center has and easy to use digital touch control panel. Beverage Center Temp. Settings o o Adjustable Range: 34 F to 50 F Your XO Beverage Center remembers your last temperature setting in case of a power failure and automatically adjusts to the previous setting when power is restored. When the +/- button is pressed, your beverage center automatically enters set up mode. The LED Display will begin flashing and display the temperature setting.
take control When you turn your XO wine cooler on, the interior lights will be white. Press the icon and the lights will change to midnght blue. Press the icon again and the lights will change to honey amber. When you turn you XO Unit on, it is set to work in Standard Mode. Press and ECO Mode is turned on, ECO Mode is an energy saver function. Press again and ECO Mode is turned off, the unit returns to Standard Mode. Sabbath Mode was designed for use on the Jewish Sabbath and Holidays.
single zone control beverage centers ON /OFF But ton Press & Hold for 1 Second to turn ON Press & Hold for 3 Seconds to turn OFF Press to Silence Alarm Light Function But ton Toggle Bet ween 3 Light Functions L1, L2, L3 TEMPER ATURE D ISPL AY Press to raise temperature Press to lower temperature Ch anges interior light color Toggles bet ween different operating modes Th e temperature set ting can be adjusted from 34-50°F. Your controls are simple and int ui tive to operate.
how many 12 oz cans will this model hold With the shelves arranged in this manner, your XO will hold a maximum of standard 12 oz cans.
a little tlc goes a long way Cl eaning t h e Insid e: Walls, floor, inside window, and shelves - Some water deposits and dust can be removed with a dry paper towel, others may require a damp cloth. Cl eaning t h e Outsid e: Outer case - It is important to keep the area clean where the door seals against the cabinet. Clean this area with a soapy cloth. Rinse with a damp cloth and let dry. Control Panel and Door - Wipe with a damp cloth and dry thoroughly.
a breathe of fresh air for best results change every 3 to 6 months P/N: XOUAIRFILTER Rotate the filter 1/4 turn to unlock Pull straight out to remove Align the tabs and inser t the new filter Rotate filter 1/4 turn to lock in plac e 26
faq’s Q. There doesn’t appear to be any power to the unit. A. There are 3 easy to check common causes: (1) Check to see if a fuse has blown or circuit breaker has tripped & replace or reset. (2) Check to ensure the plug is fully inserted into the outlet. (3) A power surge may have caused the unit to shut down to protect itself - Unplug the unit, wait 5 seconds and plug it back in. Q. The cabinet temperature is too high. A. Check these 5 things: (1) Check the temperature setting and adjust as needed.
we’ve got your back 90 DAY LOVE IT or LEAVE IT. For 90 Days all our products are backed by our unique Love it or Leave it Guarantee. TWO-YEAR PARTS & LABOR LIMITED WARRANTY. XO warrants to the original purchaser of every new XO refrigerated unit, the cabinet and all parts thereof, to be free from defects in material or workmanship under normal and proper use and maintenance as specified by XO and upon proper installation and start-up in accordance with the instruction packet supplied with each XO unit.