XOUIM1565S & XOUIM1565SP XOUIM1565O & XOUIM1565OP UNDERCOUNTER GOURMET ICE MAKER I worked really hard on this manual so please read it...
UNDERCOUNTER When buying any XO appliance you can be confident you have chosen a high quality, innovative and stylish product from a company that cares about you! If you require service or have questions, Help is only a phone call away call: 973-403-8900 Talk to one of our undercounter experts. CONGRATULATIONS on purchasing your XO. Before you proceed, take just a moment to register your XO at: www.xoappliance.
where things are 4 - 7 Before You Get Started Installer Checklist Find Your Model Safet y Instructions Electrical and Grounding Instructions 8 - 23 Installation Inst ruc tions S izes and Installation Dimensions Plumbing With & Without Drain Pump Reversing the Door Door panel Installation Outdoor Use O perating Inst ruc tions Features & Specifications Operating Instructions 24 - 26 Ca re and C l e anin g Stainless Steel Interior Washing Cleaning Sanitization Maintenance Schedule Winterizing 27 - 35 T
heres’s ten steps for a quick & easy install 1 Inspect cabinet opening for water, drain and electrical connections. 2 The 1/4” O.D. water supply line must include isolation valve and should include an inline water filter (consult manual). Do NOT use a self-piecing valve for the supply connection. Water supply must have a minimum pressure of 20 psi and a maximum of 80 psi. Cold water o o should be between 50 F and 90 F - NOTE: warmer water will slow ice production. is strongly recommended.
2 these are the models covered in this book INDOOR / OUTDOOR GOURMET ICE MAKER STAINLESS STEEL XOUIM1565S & XOUIM1565SP PANEL READY XOUIM1565O & XOUIM156OP take a minute to circle your model above and record your serial number here in case you need it later 5
your safety matters Pl ease re ad t hro ugh comp l etely be fore using your XO Unit Periodic maintenance is essential for safe operation - the unit must be easily pulled out for full access. The appliance must be positioned so that the plug and water shutoff are readily accessible. Empty your XO unit before attempting to move the appliance. Moving while loaded may damage or distort the frame. The compressor will get HOT during operation / touching it may cause injury.
Failure To Follow All E l ec trical Safe t y M easures M ay Result in Se rious Inju r y, Fire O r D e a t h All electrical work should only be performed by an experienced, licensed electrician. FOR INDOOR OR OUTDOOR USE: All XO units MUST be grounded for safe operation and come equipped with a 3 Prong molded cord/plug for that purpose. NEVER remove or disable the 3rd prong with an adapter. XO Ice Makers shown in this manual are rated for Indoor and Outdoor use.
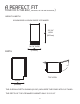
a perfect fit install under counter ALL XO UNDERCOUNTER UNITS ARRIVE PRE-WIRED WITH LOW PROFILE PLUGS FOR EASY INSTALLATION 7" (178mm) 4" (100mm) 15 ” (381mm) MINIMUM WALL 34” MINIMUM (864mm) 90° Door Swing WHEN INSTALLING WITH THE HINGE SIDE NEXT TO A WALL LEAVE ADEQUATE SPACE FOR YOUR DOOR HANDLE Clearance Gap When installing, remember you need to leave ready access to both the power Cut access to an adjoining cabinet to locate outlet and water there.
a perfect fit your xo is this big ( or small, as the case would be ) height & width XOUIM1565G & XOUIM1565GP ICE MAKER 33- 3/4” HIGH H (857mm) 14-7/8” WIDE W (378mm) depth 105 º TOP VIEW 23-3/8” D (594mm) THE OVERALL DEPTH SHOWN (22-5/8”) INCLUDES THE DOOR WITH 3/4” PANEL.
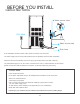
before you install check a few things Water source valve 115V~60Hz Water source tub e Drain hose Is the installation location COOL, DRY, LEVEL and away from direct sun. The water supply valve must provide positive shut off capability and be readily accessible. Does the unit have a dedicated 115V three prong grounded outlet? (use GFI outdoors) o o The Cold Water supply is 1/4” O.D. tube, it should be 50 to 90 F and be between 20 and 80 psi.
water quality All water contains some impurities and minerals. Your XO Ice Maker is designed to produce crystal clear, gourmet ice. It does this by reducing the mineral content in the water as the ice is forming. PURER WATER YIELDS PURER ICE. Cubes are formed by cold water spraying against a chilled mold. Pure water freezes faster than water containing impurities.
the plumbing Plan the arrangement of the water supply pipes. You will need both a water supply line and a drain (see section on installing a gravity drain unit or pump drain unit) 1/4” O.D. If the tap water has a high level of minerals, an inline filter will be required. Attach the water supply line to the rear of the unit with flexible tube to the fitting indicated here. The tubing must be long enough to permit the unit to be pulled out for service.
with gravity drain INSTALLING THE XOUIM1565S without a drain pump. Position the ice maker in front of the opening. Level the unit using the leveling legs. Wash and flush the water supply tube and connect the unit to the cold water isolation valve. Prepare the drain. The drain must be pitched downward at a drop of 1/4” per foot to drain properly. Horizontal runs of 5’ or more must be anchored to a wall for support to prevent sagging.
with drain pump INSTALLING THE XOUIM1565SP with DRAIN PUMP. Position the ice maker in front of the opening. Level the unit using the leveling legs. Wash and flush the water supply tube and connect the unit to the cold water isolation valve. Cut the 3/8” diameter drain hose to the required length. Immerse the hose in warm water to make installation easier, then connect the drain hose to the drain using hose clamps.
reversing the door Your XO Ice Maker is shipped with the hinge on the right hand side but it can be easily reversed. IMPORTANT NOTE: Stainless Steel door models and Panel Ready models use different hinges and Panel Ready models require additional steps when reversing the door. TOP HINGE 1. While supporting the door, remove the two (2) screws (shown in RED) that hold the Top Hinge in place. LEFT HAND POSITION Remove the door by lifting it straight up.
reversing the door cont. 3. At the rear of the unit, there are three (3) screws along the top. Remove these screws. On the top front of the unit, there is one (1) additional screw on the left hand side, remove this screw. The Top Cover plate will now lift off. TOP COVER REAR OF UNIT TOP HINGE SUPPORT 4. Remove the Top Hinge Support which is held in place by one (1) screw from the right hand side and transfer it to the left hand side re-attaching it with the screw. .
overlay panel dimensions xouim1565o & xouim1565op 3/4" 14 3/4" TOP 29 3/8” MIN. FRONT The panel has a minimum height of 29 3/8” - If making the panel 29 3/8” tall no further adjustments are needed. If the panel is taller than 29 3/8” proceed to pages 18 and 19, a notch or recess is required. WATCH THE INSTALLATION VIDEO ON OUR CHANNEL https://www.youtube.com/channel/UCT-Ip-dM9hoPydpxZfrZzRA www.xoappliance.com o AFTER INSTALLTION UNDER COUNTER, OVERLAY DOOR MUST BE ABLE TO OPEN 90 .
overlay panel dimensions xouim1565o & xouim1565op 14 3/4" Door panels taller than 29 3/8” require a notch as seen in Detail A & B on the hinge side. If making the panel 29 3/8”, no notch (detail A,B) is required. TOP DOORS TALLER THAN 29 3/8” The bottom of the notch should always be 29 3/8” from the bottom of the panel. To get the exact measurement subtract 29 3/8“ from the panel height.
overlay panel dimensions xouim1565o & xouim1565op handling handleless doors: Handleless doors have a profile similar to that shown SIDE VIEW REAR VIEW 5/8” 5/8” 1” 29 1/4” TO BOTTOM OF DOOR Instead of a notch, if the design of the door will allow, a recess can be cut out with a router to accommodate the hinge extension.
installing the overlay panel Installing the overlay panel is easy if you folllow these simple steps. You will need the following tools: A drill with 3/16” and 5/16” bits - and a #2 Phillipshead screwdriver 1. While supporting the door, remove the two (2) screws (shown . in RED) that hold the Top Hinge in place. TOP HINGE REMOVED Then remove the door by lifting it straight up. 2.
installing the overlay panel 5. Center the panel on the door and clamp it in place to prevent shifting during attachment. 6. Using the HINGE ANGLE BRACKETS installed on the door as a guide, drill two holes: One 3/16” Hole down from the top into the door 1/2” deep. Remove the plastic bushing from the lower angle bracket. One 5/16“ Hole up from the bottom into the door 1/2” deep. Replace the plastic bushing into the lower angle bracket. This is to accommodate the hinge pins. PANEL DOOR 7.
installing the overlay panel 10. Remove clamps and any debris that may remain from drilling the pilot holes from the door gasket groove. 11. Beginning at one corner, replace the door gasket by pressing it into the groove it was removed from in Step 2. 12. Replace the door by lowering it onto the lower hinge pin and replacing the top hinge removed in Step 1.
for outdoor use When using your XO Ice Maker outdoors - follow these additional steps. Different regions of the country can have radically different seasonal weather which can affect performance and the influence your selection for the physical location of the unit. In outdoor installations care must be taken to protect the unit from excessive heat or direct sun, dusty or damp conditions or in a location where it may be rained on or splashed by water. The unit must be connected to a grounded circuit.
2 features & specs Produces up to 65lbs of crystal clear, gourmet ice per day Rectangular Bell Shaped Cubes designed to melt slowly and cool beverages while minimizing dilution Gravity drain and pump drain models available Reversible Panel Ready steel door Front venting - designed for under counter installation o o Rated for Indoor or Outdoor use (50 - 90 ) Automatically pauses ice production when bin is full MAXIMUM CAPACITY 65 lbs per day CUBES per CYCLE 24 TIME per CYCLE 20-30 min DIMENSIONS (
operating Initial operation ① Open the water supply valve connected with the ice maker. ② Insert the plug of the ice maker into the electric outlet. ③ Open the door and turn the switch to the “ICE” position.” ④ Discard the first batch of ice. ⑤ Good-quality ice is produced 1-2 hours later. Using the ice maker Use of the ice maker is very simple. Simply turn the switch at the lower end of the product to the “ICE” position.
operating cont. Operation time It takes about 20-35 minutes to produce a set of 24 ice pieces. The length of one cycle of the ice maker (ice production and ice removal) differs depending upon the cleanness of the ice maker, the surrounding temperature, and the temperature of the water supplied to the ice maker. It takes about 10-12 hours to fill the empty ice container with ice. Ice production The ice production process largely consists of two cycles-ice production and ice removal.
stainless steel cleaning the exterior Stainless Steel: Stainless steel does not stain, corrode, or rust as easily as ordinary steel, but it is not stain or corrosion proof. Stainless steels can discolor or corrode if not maintained properly. Stainless steels differ from ordinary carbon steels by the amount metals such as chromium and nickel used in the alloy. It is the chromium which provides an invisible protective film on the surface called chromium oxide.
washing (interior) Proper maintenance, cleaning and santizing is essential to ensure your ice is safe, fresh and odor free. Cleaning the nozzle / ice slide / water tank 1. Open the door and remove two front injection bolts on the top cover. 2. Pull the top cover to remove it. 3. Slightly lift the ice slide to remove it. 4. Clean the slide with soft plastic brush or sponge.
washing (interior) cont. Proper maintenance, cleaning and santizing is essential to ensure your ice is safe, fresh and odor free. 5. Clean the gap of the nozzle frame fixed on the vessel sheet (water tank). 6. Lift the drain connection inside the vessel sheet (water tank), clean it, and drain the water. * The drain connection must be re-assembled in the correct position after cleaning or it will continue to drain and be unable to make ice.
washing (interior) cont. Proper maintenance, cleaning and santizing is essential to ensure your ice is safe, fresh and odor free. Cleaning the ice tank and water tank filters WATER TANK ICE TANK Always unplug the unit before performing maintenance. Open the door of the Ice Maker and remove the filter screens from the bottom of the water tank and ice tank (position indicated above). Rinse them clean thoroughly with running water. Replace the tank filters in the positions shown.
the condenser improve efficiency & performance Cleaning the condenser Remove dust and dirt from the surface of the condenser coils with a vacuum cleaner Remove two screws on the front panel at the center of the inside Vacuum the condenser coils Reassemble the panel using the two screws to after cleaning 31
cleaning/descaling Ice makers must be thoroughly cleaned a minimum of 2-4 times each year, more frequently if circumstances require it. All cleansers and sanitizing agents must comply with 40CFR 180.9403 as Food Contact Sanitizers. The end user is responsible for maintaining this ice maker in accordance with the instructions in this manual. Failure to do so may void warranties and cause an unsafe condition.
cleaning cont. If necessary, remove the top cover and disassemble the evaporator cover, water curtain, ice guide and nozzle frame. Place all components into a basin to soak with approximately 3 quarts of the detergent water mixture for 5 to 20 minutes depending on how much lime scale build up is present. Disassemble the spray bar by removing the left and right silicon plugs, and separate the nozzles and inserts while soaking.
sanitizing Ice makers must be sanitized monthly, more frequently if circumstances require it. All cleansers and sanitizing agents must comply with 40CFR 180.9403 as Food Contact Sanitizers. The end user is responsible for maintaining this ice maker in accordance with the instructions in this manual. Failure to do so may void warranties and cause an unsafe condition. Basic sanitization and maintenance will both increase reliability and performance, asa well as reduce the consumption of electricity and water.
sanitizing cont. Make sure the switch is in the “OFF” position and restore power by plugging the unit in or turning on the breaker. AUTOMATIC SANITIZING: Start the automatic sanitizing process by turning the switch to the “WASH” position. This will also sanitize the piping. The automatic sanitizing cycle takes 21 minutes to complete. After it is finished set the switch in the “OFF” position. RINSING: If any disinfectant solution remains in the water tank, remove the drain plug to empty the tank.
winterizing Where seasonal installation ambient temperatures fall below 50 o F Clean and sanitize your system Turn off the power Empty the water container completely Disconnect the pump hose - this requires the removal of the back panel Close the water supply valve and disconnect the water supply line from the rear of the unit Turn on the power and set the switch to the “WASH” position.
troubleshooting PROBLEM Unit does not operate POSSIBLE CAUSE Ice maker is unplugged Breaker tripped Switch turned to “OFF” The ice tank is full CHECK THIS Plug ice maker in Reset breaker - if it happens again, call for service Turn switch to “ICE” Ice detection sensor is activated Cubes are too large Low ambient temperature Ice thickness control does not work Call Customer Service Call Customer Service Cubes are too small High ambient temperature Too little water in the water tank The water nozzle no
we’ve got your back 90 DAY LOVE IT or LEAVE IT. For 90 Days all our products are backed by our unique Love it or Leave it Guarantee. ONE-YEAR PARTS & LABOR LIMITED WARRANTY. XO warrants to the original purchaser of every new XO refrigerated unit, the cabinet and all parts thereof, to be free from defects in material or workmanship under normal and proper use and maintenance as specified by XO and upon proper installation and start-up in accordance with the instruction packet supplied with each XO unit.
notes:
SEE ALL THE LATEST XO PRODUCTS AND ACCESS PARTS AT: WWW.XOAPPLIANCE.