Smart WiFi Plug Kit PK4 User Manual Read before installing or using this product. Keep this guide for future reference. Visit Con�xo.
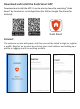
Download and Install the Xodo Smart APP Download and install the APP. It can be also be found by searching "Xodo Smart" by Con�xo Inc. in the App Store (for IOS) or Google Play Store (for Android). Xodo Smart Connect The welcome screen will appear and then you will be asked to login or register a profile. Register an account by entering your email address and se�ng up a profile or logging in with an exis�ng account.
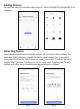
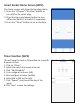
Adding Devices You will be able to manually add a device. Select Plug(WP1)/Socket(WP3) to con�nue. Detec�ng Device When detec�ng devices manually, power on the device and confirm the indicator light is blinking rapidly (Hold the reset bu�on for 5 seconds). Once you confirm the smart device is ready, press the “Confirm indicator rapidly blink” bu�on. Con�nue on to the next step. Pressing the “Help” bu�on will offer some troubleshoo�ng guidelines to follow.
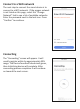
Connect to a WiFi network The next step to connect the smart device is to connect to a WiFi network. If the proper network is not listed on this page, select the “Change Network” link to see a list of available networks. Enter the password next to the lock icon. Press “Confirm” to con�nue. Connec�ng The “Connec�ng” screen will appear. It will usually register within by approximately 30% range. The Device found will checkmark green, then Ini�alizing device will complete.
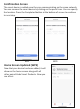
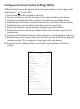
Confirma�on Screen The smart device is added once they are communica�ng on the same network. You can rename the smart device by clicking on the pencil icon. You can specify the loca�on. Press the Completed bu�on at the bo�om of screen to con�nue to next step. WP1 Home Screen Updated (WP3) Now that your device has been added, it will show on the home screen along with all other paired Xodo Smart Products. Now you are all set.
Smart Socket Home Screen (WP3) The home screen will show the live plug status. 1. Press the “All open”/”All close” bu�on to turn off/on the smart plug. 2. Press the big round power bu�on to turn off/on the Switch 1 or Switch 2 separately. 3. Press the “Timer” bu�on to set a schedule. Timer func�on (WP3) This will keep the sock in ON posi�on for a specific dura�on of �me. 1. Click on "Alarm". 2. Select the switch that needs to be set. 3. Click "Add Schedule". 4. First configure the hours (le�) 5.
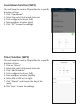
Configure the Smart Socket Se�ngs (WP3) Different features can be adjusted from the menu bu�on on the upper right hand bu�on “ ” on the APP. 1. Device Name can be changed as desired. 2. Device Loca�on can set the loca�on of the smart socket in your home. 3. Check Device Network allows to check the network connec�on status. 4. Add Members to be able to control the device in the Share Device se�ng. 5. Create Group to control other smart device at the same �me. 6.
Home Screen Updated (WP1) Now that your device has been added, it will show on the home screen along with all other paired Xodo Smart Products. Now you are all set. Smart Plug Home Screen (WP1) The home screen will show the live plug status. 1. Press the “OFF”/”ON” bu�on to turn off/on the smart plug. 2. Press the “Countdown” bu�on to set countdown on or off.
Countdown func�on (WP1) This will keep the sock in ON posi�on for a specific dura�on of �me. 1. Click "Countdown". 2. Select the switch that needs to be set. 3. First configure the hours (le�) 4. Next configure minutes (right) 5. Click "OK" to save the se�ngs. Timer func�on (WP1) This will keep the sock in ON posi�on for a specific dura�on of �me. 1. Click on "Alarm". 2. Select the switch that needs to be set. 3. Click "Add Schedule". 4. First configure the hours (le�) 5. Next configure minutes (middle) 6.
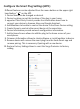
Configure the Smart Plug Se�ngs (WP1) Different features can be adjusted from the menu bu�on on the upper right hand bu�on “ ” on the APP. 1. Device Name can be changed as desired. 2. Device Loca�on can set the loca�on of the plug in your home. 3. upported Third-Party Control provide the informa�on about how to connect your device to Amazon Alexa and Google Assistant. 4. Add Members to be able to control the device in the Share Device se�ng. 5. Create Group to control other smart device at the same �me. 6.
My Home Page Device Controls 1. Some devices can set group control. Click " " in the upper right corner 2. Click "Create Group". 3. The page displays all devices with the same model number and available to be added as a group. Select the device and click “Confirm”.
4.Enter group name and click “Save” to finish. 5.When a group has been created successfully, the page will be automa�cally redirected to the group control panel, where grouped devices can be managed. Smart Features 1 Click “Automa�on” on the "Smart" page. 2 Click “Add Automa�on“ or "+" to go to the smart configura�on page. 3 Click “Add condi�ons” or "+" to select trigger condi�on.
4 Click “Add ac�ons” or "+" to select the ac�on to occur. 5 Click “Valid Time Period” to set a valid �me period for automa�on. 6 Click “Next” to go to the smart configura�on page. 7, Enter the automa�on name click “Confirm” to finish. 8.Click the switch in the lower le� corner to select to execute or turn off the automa�on.
Smart Features - Scene To configure a scene with "Trigger automa�on", you must set up an automated scene in advance. 1 Click “Scene” on the "Smart" page. 2 Click “Add Scenario“ or "+" to go to the smart se�ngs page. 3 Click “Add ac�on“ or "+" to add set automa�on or equipment. 4 Click “Save”. 5 Enter the automa�on name click “Confirm” to finish.
Link Xodo Smart account to Google Home Screen 1. Open Google Play Store or Apple Store and download Google Home 2. Open the Google Home app. Click on Get Started. 3. Login with a Google Account or create a new account. 4. Use Loca�on access to find devices on the same wifi network. 5. You will need to permission so Google Home can access device. 6. The app will search for devices to connect.
7. If no devices can be found that are already setup, select NO. 8. A youtube video is available to help instruct how to use smart devices. 9. The app will show se�ngs to add devices, setup rou�nes, and adjust se�ngs. 10. If the devices are already installed and setup through the Xodo app, you can select the "Works with Google" setup op�on to con�nue. 11. Configure the home se�ngs by adding address and name to a "Home" group.
Control your smart devices through Google Home Now you can control your smart devices through Google Home. Take bedroom light as the example, the supported voice commands are as below: 1. Ok Google, turn on/off bedroom light. 2. Ok Google, set bedroom light to 50 percent. 3. Ok Google, brighten bedroom light. 4. Ok Google, dim bedroom light. 5. Ok Google, set bedroom light to red. Link Xodo Smart account to Alexa 1. Download the free Alexa app from the Amazon Appstore, Google Play, or the Apple App Store.
7. Open the smart life app to add 8. Click Se�ngs 9. Manage Smart Home Devices to verify Smart Life has been added. 10. You will be redirected to the account link page. Type in your Xodo Smart account and password, don't forget to select the country/region where your account belongs to. Then tap "Link Now" to link your Xodo Smart account. The country/region, the account, and the password must match.