WiFi Smart Plug Quick Start Guideline Read before installing or using this product. Keep this guide for future reference. Visit Contixo.
Welcome Thank you for purchasing Xodo Smart home products! We are committed to bringing you excellence with smart technology products that make life more comfortable, convenient, and provide a more dynamic healthy lifestyle.
French has not done yet First empty the page
What’s included in the box You will find the following contents included to help you get started: WiFi Smart Plug Quick Start Guidelines NOTICE Make sure to always follow these safety instructions: 1. Please check for damaged caused by shipping. Contact supplier as needed. 2. Follow instructions and only use products in safe operating condition. Keep out of reach of children. This product is not a toy. 3. Do not disassemble or alter the smart plug. Doing so will void the warranty.
Specifications Product Name: Xodo WiFi Smart Plug Model: WP1 Rated Voltage: 100V-240V AC 50Hz-60Hz Rated Current: 10A Max Power: 1100W Output Port: 1 AC (US) Working Temp: -10~50°C Support System: Android or IOS WiFi: 802.11 b/g/n 2.
Smart Socket Introduction 1. Manual control button 2. Power indicator 3. Output AC outlet WiFi Smart Socket Components Button — Press to turn on/off the Plug Output AC plug — Charging via charger Input AC plug — Plug in a normal socket Indicator Light Blinking blue: Configuration status Blue light ON: Smart plug is working Blue light OFF: Smart plug stop working 4.
Download and Install the Xodo Smart APP Download and install the APP. It can be also be found by searching "XODO Smart" by Contixo Inc. in the App Store (for IOS) or Google Play Store (for Android). Xodo Smart Open the APP The welcome screen will appear and then you will be asked to login or register a profile. Register an account by entering your email address and setting up a profile or logging in with an existing account.
Adding Devices You will be able to manually add a device. Select Plug to continue. Detecting Device When detecting devices manually, power on the device and confirm the indicator light is blinking rapidly (Hold the reset button for 5 seconds). Once you confirm the smart device is ready, press the “Confirm indicator rapidly blink” button. Continue on to the next step. Pressing the “Help” button will offer some troubleshooting guidelines to follow.
Connect to a WiFi network The next step to connect the smart device is to connect to a WiFi network. If the proper network is not listed on this page, select the “Change Network” link to see a list of available networks. Enter the password next to the lock icon. Press “Confirm” to continue. Connecting After you hear the beep and continue on, the “Connecting” screen will appear. It will usually register within by approximately 30% range.
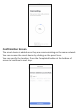
Confirmation Screen The smart device is added once they are communicating on the same network. You can rename the smart device by clicking on the pencil icon. You can specify the location. Press the Completed button at the bottom of screen to continue to next step.
Home Screen Updated Now that your device has been added, it will show on the home screen along with all other paired Xodo Smart Products. Now you are all set. Smart Socket Home Screen The home screen will show the live plug status. 1. Press the “OFF”/”ON” button to turn off/on the smart plug. 2. Press the “Countdown” button to set countdown on or off. 3. Press the “Schedule” button to set a schedule.
Configure the Smart Socket Settings Different features can be adjusted from the menu button on the upper right hand button “ ” on the APP. 1. Device Name can be changed as desired. 2. Device Location can set the location of the plug in your home. 3. upported Third-Party Control provide the information about how to connect your device to Amazon Alexa and Google Assistant. 4. Add Members to be able to control the device in the Share Device setting. 5. Create Group to control other smart device at the same time.
Setup Google Home APP Make sure to refer to Google instructions and always follow safety precautions. Here is a quick overview to get setup with Google Home: Run the Google Home APP and sign in a Google account. Then connect the Google Home APP with your Google Home device according to the Instructions on Google Home. Choose the WiFi network you want to connect to your Google Home. Then connect it toy your Google Home according to the instructions.
Quick Guide for Using Google Home Certain third party devices provide extra functionality to your smart products. You will need the following: 1. A Google Home device, Android phone, or tablet with Google Assistant. 2. Google Home APP (Android Only) and a Google account. 3. The device display language must be set to English US. 4. Xodo Smart App and a profile account. 5. Smart device.
Control the Smart Plug through Alexa A. You can control the smart plug with a simple voice command like: "Alexa, turn on office plug" or "Alexa, turn off office plug". B. The name of the device should be the same as you setup in XODO Smart App.
Customer Service and Tech Support Your satisfaction is important to us. We are here to help! Contact us at support@contixo.com Include your order number and product description. See our website for more products www.contixo.com We enjoy your feedback! Xodo is a subdivision of the Contixo Inc. group., and the respective logos are registered trademarks of Contixo Inc. and may not be used, reproduced, or altered without written Permission.