XOMAX Installation Manual XM-2VRSU734BT Installation Manual ENGLISH
Topic: EN ENGLISH Installation and Quick Start Guide XM-2VRSU734BT Thank you for purchasing one of our XOMAX products! We appreciate your confidence. Enjoy your brand new multimedia unit! i Please read the following manual carefully before you install and use the unit. Please save this manual in case you will need to clarify further possible questions regarding installation and usage of our product. We recommend you to let the technician install the unit in your vehicle.
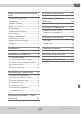
Topic: EN Safety instructions and precautions 4 ISO cable connections 15 Handling by stop only....................... 4 Connection schedule – ISO plug 16 ISO plug configuration 17 Installation..................................... 4 Regular loudness............................. 4 Repair of the unit............................ 4 Power supply.................................. 4 Socket A (power supply)..................17 Replacement of fuses....................... 4 Socket B (loud speakers).......
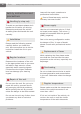
EN Topic: Safety instructions and precautions Safety instructions and precautions ! Handling by stop only To avoid any accidents please don't handle the unit while you driving. Please stop and park the vehicle at safety place and handle the unit casually. ! Installation Please read the following manual carefully before you install the unit. We recommend you to let the technician install the unit in your vehicle.
Topic: ! Safety instructions and precautions EN Cleaning of the unit Please keep the unit clean and remove the dust from it regularly. Please use for that a soft and dry cleaning rag. Major soilings can be removed carefully with the wet cleaning rag. Do not use any chemical or alcohol-containing detergents to avoid the damage of the unit's varnish. ! Usage of the touchscreen Do not press the touchscreen too hard – it may lead to image distortions, unit malfunctions and touchscreen damages.
Topic: EN Installation Installation ! We recommend you to let a professional technician install the unit in your vehicle. ! WARNING! Please read these advices carefully before installation procedure. The damages caused by an inappropriate installation are not covered by warranty. To avoid the risk of losing the warranty please let a specialist accomplish the installation of the unit. »» To avoid a short circuit please disconnect the vehicle battery before the installation.
Topic: Installation EN »» The speakers should feature the impedance of 4-8 Ohm and a sufficient wattage. »» Please ensure that the speakers you are connecting with the unit are intact. Damaged speakers can impair the unit. »» To avoid a short circuit please isolate all cable junctions and endings of the unused cables with the electrical tape. »» All the cables should be layed and fixated tidy and properly. The cables should not contact any movable or hot objects.
Topic: EN Installation instructions Installation instructions i Please note, that this installation manual was generalized attending to provide you with the common indispensable information. Therefore it might cause from product to product some irrelevant discrepancies, especially regarding some depictions (e.g. installation accessories) You can find the detailed manual for your XOMAX product on our homepage: www.xomax.de/download 1 1 2 1 Installation steps 1.
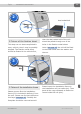
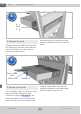
Topic: Installation instructions EN 2 dual-ended bolt then the dual-ended bolt of the unit should be pulled through one of the holes in the fixation metal sheet. 2 Fixture of the fixation sheet This step can not be accomplished in every vehicle, thus it may be possibly skipped. The fixation metal sheet should be fixated in the vehicle first, Later (see page 10) the unit will be fixed to the metal sheet with the washer and the nut.
EN Topic: Installation instructions 4 click 4 Connect the unit Please connect the ISO cable first with the ISO plug of the unit, then with the one of the vehicle. Do not forget to connect the radio aerial. Now slide the unit carefully into the already fixated frame till it clicks into place. 5 fixation metal sheet fixation bolt fixation nut 5 Fixture of the unit This procedure refers to the step 2 and may be possibly skipped as well.
Topic: Deinstallation instructions EN Deinstallation instructions 1 to release the unit from the installation frame. 1 Prepair the instruments To deinstall the unit you will need a spanner (a wrench) to unloose the fixation nut and 2 extraction keys (optional) 2 unloose the fixation nut This step may be possibly skipped, if due to the lack of space the unit initially was not fixated to the fixation metal sheet.
EN Topic: Deinstallation instructions 3 extraction keys 3 Use the extraction keys Please insert the extraction keys into the dedicated recesses between the installation frame and the unit's housing. In each case the key should be inserted centered, the inserting point should be equally distanced both from the top and from the bottom. 4 unlocking holding side-cogs 4 Unloose the unit can be carefully pulled out.
Topic: Deinstallation instructions EN 6 Afterwards please disconnect all the cables incl. the ISO multicore. 6 Remove the unit Now pull the unit carefully out of the installation frame or out of the car radio slot in case the frame was already firmly fixed to the unit by delivery. 7 5 Remove the installation accessories Finally remove all the installation accessories such as fixation metal sheet and installation frame.
EN Topic: Connection schedule – Cinch multicore Connection schedule – Cinch multicore XOMAX 14 XM-2VRSU734BT
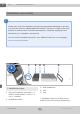
Topic: ISO cable connections EN ISO cable connections ISO plug ! We recommend you to let a professional technician install the unit in your vehicle. This plug connects the ISO cable with the vehicle. The ISO cable as such serves as an extension cable for an eased connection of the unit to the vehicle provided that the vehicle has a standardized ISO plug with the appropriate pin assignment. Terminal plug This plug connects the ISO cable with the unit.
EN Topic: Connection schedule – ISO plug Connection schedule – ISO plug XOMAX 16 XM-2VRSU734BT
Topic: ISO plug configuration EN ISO plug configuration A 2 4 6 8 1 3 5 7 2 4 6 8 Socket A (power supply) 1 3 5 7 B Socket B (loud speakers) On the A side you can find the socket for power supply. On the B side you can find the speakers terminals.
EN Topic: ISO cable connections ISO cable connections 1 2 illustration similar ISO cable 1. Terminal plug This plug connects the ISO cable with the unit. 2. ISO plug This plug connects the ISO cable with the vehicle. The ISO cable as such serves as an extension cable for an eased connection of the unit to the vehicle provided that the vehicle has a standardized ISO plug with the appropriate pin assignment. Please note »» The multicore cable may vary depending on the current model.
Topic: Common solutions EN Common solutions The following advices are generally valid and refer to diverse Xomax models with the similar characteristics. Please note that some articles may refer not to your model exactly and contain the describtion of features and functions that your model does not support. The describtion of the problem The cause and the solution The remote control is without function. Solution 1: Please ensure that the battery film is removed.
EN Topic: Common solutions Poor radio reception: The radio tuner finds no broadcaster or the reception is poor. For problem-solving regarding the radio reception it is important to know the type of the antenna of your vehicle. Here are the possible solutions for each type of the antenna: Type 1 – passive antenna: We recommend you to substitude the existing antenna by the larger and therefore more efficient one. Shark fin or rod antennas (under 5 cm) are definitely insufficient.
Topic: Recycling of an old unit/Recycling of the battery Recycling of an old unit EN Recycling of the battery User information regarding recycling of electric and electronic devices (private households) According to the battery decree we make you aware of your obligation to dispose of empty batteries at municipal collection points. Batteries that contain pollutants (e.g. Hg = mercury, Pb = lead, Cd = cadmium) are labelled with the symbol pictured above.