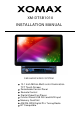
XM-DTSB1010 INSTALLATION MANUAL CAR AUDIO/VIDEO SYSTEM 10.
To ensure safety while driving and to comply with laws, drivers should not watch video or operate the video device while driving.
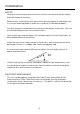
Content Precaution...................................... 2 Automatic Memory Storing & Safety I n f o r m a t i o n ........................ 3 Program Scanning....................... 20 Disc N o t e ....................................... 4 Installation .................................... 5 RDS function.................................. 20 Electric Connection ...................... 8 Basic Operation .............................. 23 Remote C o n t r o l ............................
Precaution THANK YOU FOR PURCHASING A SOUNDSTORM MULTIMEDIA PLAYER. Before operating the unit, read this manual thoroughly and keep it handy for future reference. To avoid injury or accident, read the following precautions before installing and operating the unit. ON INSTALLATION DO NOT install any receiver in locations where; - it may obstruct the steering wheel and gearshift lever operations, as this may result in a traffic accident.
Safety Information CAUTION: THIS DIGITAL VIDEO PLAYER IS A CLASS I LASER PRODUCT. HOW EVER THIS DIGITAL VIDEO PLAYER USES A VISIBLE/INVISIBLE LASER BEAM WHICH COULD CAUSE. HAZARDOUS RADIATION EXPOSURE IF DIRECTED. BE SURE TO OPERATE THE DIGITAL VIDEO PLAYER CORRECTLY AS INSTRUCTED. USE OF CONTROLS OR ADJUSTMENTS OR PERFORMANCE OF PROCEDURES OTHER THAN THOSE SPECIFIED HEREIN MAY RESULT IN HAZARDOUS RADIATION EXPOSURE.DO NOT OPEN COVERS AND DO NOT REPAIR YOURSELF. REFER SERVICING TO QUALIFIED PERSONNEL.
Disc Note Disc formats supported by this player Digital Digital Video Video unusable) depending on your handle it and conditions in the usage environment. Note these scratches are not an indication of any problem with the player.
Installation NOTES: Choose the mounting location where the unit will not interfere with the normal driving function of the driver. Before finally installing the unit, connect the wiring temporarily and make sure it is all connected up properly and the unit and the system work properly. Use only the parts included with the unit to ensure proper installation. The use of unauthorized parts can cause malfunctions.
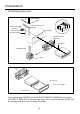
Installation Installating the unit DASH BOARD METAL MOUNTING STRAP HEX NUT SPRING WASHER PLAIN WASHER CONSOLE TAPPING SCREW SLIDE BRACKET HOUSING HEX BOLT SCREWDRIVER TABS KEY PLATE PLASTIC TRIM OUT KEY PLATE If you want to take CHASSIS out of the SLIDE BRACKET HOUSING, first remove the PLASTIC TRIM OUT of the both sides away, then insert the two KEY PLATE into left and right side of chassis as above illustration.
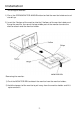
Installation Installing the monitor. 1) Press the OPEN/MONITOR-ANGLE button to slide the monitor holder out and stand it up. 2) Insert the 2 bulges of the monitor into the 2 hollows of the monitor holder and flip up the monitor, then push the top middle part of the monitor to make the monitor attach onto the monitor holder. Removing the monitor.
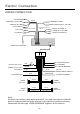
Electric Connection WIRING CONNECTION RCH IN RED AV IN SUBW OOFER GREY VIDEO OUT(2) YELLOW REAR CAMERA INPUT YELLOW VIDEO IN YELLOW LCH IN W HITE FRONT RCA OUTPUT CABLE REAR OUTPUT CABLE RCH RED FRONT RCA RED R VIDEO OUT YELLOW LCH W HITE FRONT RCA W HITE L RADIO ANTENNA JACK ISO CONNECTOR IGNITION SWITCH(B+) MEMORY BACK-UP(B+) GROUND(B-) RED FUSE KEY GROUND(BLACK) KEY 1(BROW N) YELLOW KEY 2(W HITE/ORANGE) BLACK PINK BLUE LIGHT GREEN AUTO ANTENNA FRONT LCH SPK. REAR LCH SPK.
Remote Control Ref # Button Function Press this button to Open/Close the operate monitor .Long press 1 /OPEN it to adjust the angle of monitor Upward/Downward. 2 /MOD 3&7 / Press this button to turn the unit ON , press and hold to turn the unit OFF. Press it briefly to select a desired work source . In Disc Playback mode, press for fast forward or back forward playback. In Radio mode, press to scan step by step. 4 AS/ AS function see as page radio Scan operation.
Remote Control Ref # Button 11 Function AUDIO/5 Same operation as audio in page 26. In radio mode, press to select the store station 5. 12 MENU/4 13&21 VOL+/- Press this button briefly to display the root level directory of a digital video disc. In radio mode, press to select the store station 4. Use these controls to adjust the volume level. 14 SEL Press the SEL(in radio mode,press and hold the SEL) to switch between BASS,TREBLE,BALANCE, SWF VOL, SWF FREQ.
Remote Control Preparing the Remote Control Inserting the Battery 1.First push to inside as the direction indicated by the arrow (See 1 ) and then Remove the battery holder as the direction indicated by the arrow (See 2 ). 2.Replace the battery Set a new battery property with (+)side up as illustrated (See 3 ). 3.Insert the battery holder. Push in the holder to the original position (See 4 ).
Basic Operation Ma in Me nu Ope r a tion In many modes, touch the icon or touch the range to enter the main menu, the message like following as below. GENERAL CLOCK AUDIO VIDEO (4) Se tu p i n te rfa ce 1 LANGUAGE ILLUMINATION COLOR CALIBRATION (1) (2) (3) Se tu p i n te rface 2 (5) ADJUSTABLE ITEMS: 1. POWER icon In any modes, touch the POWER icon to switch the unit off . The monitor will draw in automatically . G EN ER A L AN I MAT IO N 2.
Basic Operation Disc setup as follow: RATING Select to turn Parental Control on or off. The factory default password is 1234. (The password must be used to make changes to the Parental Control menu below .) DISC FORMAT AUTO T V TYPE 16:9 RATING ADULT FORMAT This player is capable of playing discs recorded in either PAL or NTSC formats. Make the selection based on whether you are connecting the unit to a PAL TV or an NTSC TV. You can also set the unit to AUTO (auto select).
Basic Operation AUDIO SETUP Touch the audio to turn to audio quality adjustment. VIDEO SETUP A U D IO BA S S TR E B L E SU BW O O F E R COLOR 20 BRIGHTNESS 20 CONTRAST 20 TINT 20 ... EQ US E R Vi d e o se tu p i n te rfa ce a u d i o se tu p i n te rfa ce 1 COLOR: 0 to 40 Adjust the color for the picture-lighter or darker. A UD IO LOUDNESS FAD ER / B ALAN C E OF F .. . BRIGHTNESS: 0 to 40 Adjust if the picture is too bright or too dark.
Basic Operation R e s e t Fa c tor y Se ttings RESET button is placed on the housing and must be activated with either a ballpoint pen or thin metal object. The RESET button is to be activated for the following reasons: A. Initial installation of the unit when all wiring is completed. B. All the function buttons do not operate. C. Error symbol on the display. RE SE T R ES E T NOTE: If RESET is selected, all memory data will deleted, please re-adjust .
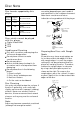
Control Panel UNIT KEYS 1 4 3 5 8 2 9 6 12 7 16 13 10 18 17 11 C ontr ol Pa ne l 14 15 1. OPEN BUTTON To slide the monitor out and stand it up or into the monitor slot, press this button; 2. VOL KNOB & SEL BUTTON In normal mode, the VOL knob is used to increase or decrease the volume. Press the SEL(in radio mode,press and hold the SEL) to switch between BASS,TREBLE,BALANCE, SWF VOL, SWF FREQ. After switching on the desired mode above, rotate VOL knob or press VOL+/ VOL- buttons to set it.
Control Panel 4/9. 7/ and 8/ BUTTONS In radio mode, Long pressing |<< or >>| button can automatically search down or up for an available station beginning from the current frequency; Briefly pressing |<< or >>| button can manually search down or up for a your desired station beginning from the current frequency.
Control Panel 8. REL BUTTON Press it to detach the control panel. 10. IR sensor 11. USB PORT 12. AUX IN JACK 13. LCD Display Screen 14. SD CARD SLOT 15. RESET BUTTON Press this button to return to factory settings. 16. TA/AF BUTTON TA Function [traffic Announcement] Button(for Rds Only) In RADIO mode When you swing briefly the MU/PTY knob in the direction of the TA/AF button , the TA function is activated, the TA symbol appears in the display . (swing it again to turn off .
Touch Screen Operation R A D IO OPER ATION Briefly touch “ ” to decrease frequency by one step of channel spacing. Lis te ning to Ra dio Touch the RADIO ICON in home menu to enter the RADIO mode. In radio mode, tap icon to adjust the brightness for the display . Automatic Search During Radio mode, touch and hold / ” (for more than 2 seconds ) either “ ICONS to start search for a radio station automatically.
Touch Screen Operation A utom a tic Me m or y Stor ing & Pr ogr a m Sc a nning Automatic Preset Setup In Radio Mode, touch and keep (for more than 2 ’ S) the screen of “ ” range to active automatic station storage. The radio searches within the current frequency band, e.g. FM3, for the stronger signal level until the search cycle has finished . The six strongest stations are then allocated to the corresponding storage locations . Then the station of the first storage location is set .
Touch Screen Operation PI MUTE : the sound of another station is suppressed . TA Tr a ffic A nnounc e m e nt Touch the AF section on touch screen or swing and keep the SEL knob in the TA/AF direction for about 2 seconds , the AF function is activated. The AF symbol appears in the display . (Pri o ri ty Fo r Tra ffi c In fo rma ti o n ) In Radio mode, touch the cursor button to switch the TA function ON and OFF . When the TA function is activated, the TA symbol appears in the display .
Touch Screen Operation Me dia Ope r a tion To skip the next track In audio play mode, the message will display as below : (When Parking Brake is applied .) To skip the previous track Repeat Function Random Function Previous menu Tap to turn to BT PHONE mode. (after pairing and connecting a mobile phone with BT function). In audio play mode, tap icon to adjust the brightness for the display .
Touch Screen Operation BASIC OPER ATION SEL EC TIN G PL AY MOD ES Pause (still picture) During the Disc playback, select the “RPT, RDM ” to select your favour play mode. Touch the “ ” section on touch screen during playback will stop play temporary, touch it again to return the normal playback . 1).
Touch Screen Operation ON -SC R EEN D ISPL AY FU N C TION OSD During playback, touch the screen or press the DISP on the remote control, it will display the following as below : Note: touch the screen or press the DISP on the remote control again to cancel the OSD information. 1.
Touch Screen Operation D i g i ta l Vi d e o Sp e ci a l Fu n cti o n 1. Multi-subtitle Language Function (for Digital Video Only) 3. Multi-Angle Function (for Digital Video Only) During Digital Video playback. Touch the icon on touch screen. During Digital Video playback, touch the icon on the touch screen . Each time the button is pressed , the number of the angel changes in sequential order . Each time the button is touch, number of the subtitle language changes in sequential order.
Touch Screen Operation BT Op e ra ti o n 1.
Touch Screen Operation Tap a icon such as to show as follow: : Tap to download the contacts from your phone. CO NTAC TS : Tap for phone number search. & : For page turning. b. Use the number icons to input your desired phone number; * When inputting a wrong digit, use c. After finishing inputting, touch to dial out. icon or < button to delete it. icon or press button on control panel 2) Redial last dialed phone number icon to dial out the last dialed phone number.
Touch Screen Operation 3. BT MUSIC 1) Touch BT MUSIC in home menu or pressing MODE button can pop up BT MUSIC interface as follows: Mute function Play/Pause the playing To select the Equalizer mode To skip the next track To decrease the volume level To skip the previous track To increase the volume level Tap to turn to BT PHONE mode. (After pairing and connecting a phone with BT function). Loudness Function Subwoofer Function In BT music mode, tap icon to adjust the brightness for the display .
Touch Screen Operation A U X Ope r a tion On the front panel of this unit, there is an AUX IN jack, follow the diagram below to connect analogue replay devices(only for the Audio connect, if you want to connect the Video, please plug the
Touch Screen Operation AV Ope r a tion Please plug the
Touch Screen Operation U SB OPER ATION C a r d OPER ATION Following the diagram below, connect your USB device to the front panel USB port . If it is properly connected, the device will be mounted and start playing automatically. The unit can support playback MP3/W MA/ JPEG/MP4 format which are stored on SD memory cards . Please read the following instructions before you start using a memory card . Inserting the card as follow: Press in till heard a “CLICK” 5 5 USB 1 SD 1 001 SONG MOV03247.
Touch Screen Operation STEER IN G WH EEL CON TR OL Touch the SWC icon as follow to turn to steering wheel control . Then tap Assign and tap the button 1 and then select the icon as the picture show, the icon show in button 1 position. After selection tap confirm and back to home menu that means select finish. The function of the icons as follow: Touch to begin function save. After selection touch to confirm operation. During setting, touch the to turn to home menu.
Parental Control * Pa r e nta l C ontr ol Q: After inserting a Digital Vi deo disc into the disc slot, if a dialogue box pops up and asks you to input a password, what should you do ? A: The playing disc is locked by a rating level of parental control.
Region Code * Re gion Code If you insert a disc into the disc slot and REGION ERROR is displayed, the car multi-media system can not play the disc. The reason is that the region codes of the car multi-media system and the used disc do not match each other. Appendix: Region code of D igital Video Motion Picture Association of America (MPAA) divided the world into 6 regions, and gave every region a region code for locking and unlocking D igital Video playback.
Specification General Power Supply Requirement..................................................DC 12V Current consumption.........................................................10A MAX. Audio Signal Output ........................................................... 2ch & 4ch line out Frequency Response................................................... 20 Hz - 20 KHz S/N Ratio ........................................................................... 90 dB (JIS) Wow and Flutter ..........................
Troubleshooting Before going through the check list, check wiring connection. If any of the problems persist after check list has been made, consult your nearest service dealer. SYMPTOM No power CAUSE SOLUTION The car ignition switch is not on The fuse is blown If the power supply is properly connected to the car accessory terminal,switch the ignition key to "ACC" Replace the fuse Presence of disc inside the Remove the disc in the player, then put a new one player.