INSTALLATION/OWNER’S MANUAL DVD Navigation system with 7” Touch Screen Display XM-DTSBN927
XM-DTSBN927
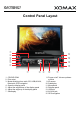
XM-DTSBN927 Control Panel Layout 1 2 C 3 4 5 6 D E F 7 8 9 1. CD/DVD ROM 2. Disc reject 3. Mode switching from radio, SD, USB,AUX IN, Bluetooth, GPS navigation 4. Open the display panel 5. Adjust the angle down of the display panel 6. Adjust the angle up of the display panel 7. Subdisplay A B 8. Power on/off, Volume up/down or Mute 9. IR sensor 10. Subdisplay 11. Microphone 12. Release panel 13. USB slot 14. AUX IN jack 15.
Remote Control Ref # Button Function Press this button to Open/Close the operate monitor .Long press 1 /OPEN it to adjust the angle of monitor Upward/Downward. 2 /MOD Press this button to turn the unit ON , press and hold to turn the unit OFF. Press it briefly to select a desired work source . / In Disc Playback mode, press for fast forward or back forward playback. In Radio mode, press to scan step by step. 3&7 4 AS/ AS function see as page radio Scan operation.
Remote Control Ref # Button Function 11 AUDIO/5 Same operation as audio in page 26. 12 MENU/4 In radio mode, press to select the store station 5. 13&21 VOL+/- Press this button briefly to display the root level directory of a digital video disc. In radio mode, press to select the store station 4. Use these controls to adjust the volume level. 14 SEL Press the SEL(in radio mode,press and hold the SEL) to switch between BASS,TREBLE,BALANCE, SWF VOL, SWF FREQ.
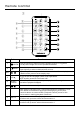
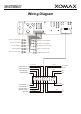
XM-DTSBN927 Wiring Diagram GPS D-T V A -T V R A DIO A NT F R ONT L O UT P UT (WHIT E ) R E A R L O UT P UT (WHIT E ) F R ONT R O UT P UT (R E D) R E A R R O UT P UT (R E D) AUX L INP UT(WHITE ) AUX V IDE O I NP UT(Y E L L OW) AUX R I NP UT(R E D) VIDE O O UTP UT(Y E L L OW) S UB WOOFE R O UTPUT(G R E E N) C AME R A INP UT(Y E L L OW) B L UE B L UE /WHIT E S PE AK E R FRONT R S PE AK E R F R O N T R + S PE AK E R REAR R S PE AK E R REAR R + S PE AK E R REAR L + S PE AK E R REAR L S PE AK E
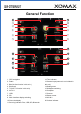
XM-DTSBN927 General Function 12 11 ⑨ ② ⑩ ③ ① ④ ⑥ ⑦ ⑤ ⑧ 20 14 15 13 16 18 19 17 1. GPS navigation 2. Radio 3. Disc(No disc function in this unit ) 4. Bluetooth 5. TV(NO TV function in this unit) 6. AV-IN 1 7. USB 8. SD 9. Main Interface display switching 10.Close the display 11.Sourcing indicator: Disc, USB, SD, Bluetooth 12.Time indicator 13.Camera input(camera is not included in this unit) 14.Setting menu 15.Wallpaper switching 16.Compass 17.Counter 18.Gamer center 19.AV-IN 2 20.
XM-DTSBN927 POWER ON/OFF Long press the power key to turn on/off the unit. MUTE Press this key to make the audio silence, press again to resume the sound. Searching function Short press this key, it will automatically scan the preset radio station. Long press this key, it will search all the frequency, and save the radio station. Sliding the 3 pages, you can enter the preset stations by short press or stored the present frequency in the bar by long press.
XM-DTSBN927 TUNING UP and DOWN Short press this icon one time to adjust the current frequency up/down automatically. It will stop searching after the strongest station has been tuned. Long press, station will be searched for manually lower or higher by 0.05MHZ each time. RDS Function Select the RDS function in the radio interface: AF, TA, PTY. You can turn on/off by click these function keys.
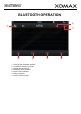
XM-DTSBN927 BLUETOOTH OPERATION ⑥ ⑤ ⑦ ① 1. 2. 3. 4. 5. 6. 7.
XM-DTSBN927 PREPARE FOR BLUETOOTH OPERATION (1) When use Bluetooth, please make sure the mobile phone supports Bluetooth function. (2) For the different kind of mobile phone, Bluetooth emissive power has some difference. To get the best conversation quality, it is commended that the distance between the mobile phone and the unit is within 3m. And please don’t put any metal object or any obstacle between the path of the mobile phone and the unit. PAIRING 1) On the mobile phone, select the Bluetooth set up.
XM-DTSBN927 SETTING MENU 1.
XM-DTSBN927 2. GPS Path setting Select the EXE file in the GPS card. 3.
XM-DTSBN927 4. Sound Setting Turn on/off the Touching sound Turn on/off Back car volume Turn on/off user defaults volume Turn on/off GPS MIX: display the music/radio/sound in the GPS interface at the same time while GPS is running Report point remove mute: turn on/off GPS sound mute Bluetooth sound setting 5.
XM-DTSBN927 5. General Setting 1. 2. 3. 4. 5. Turn on/off the power by pressed any key Turn on/off the warning when the car is running. Turn on/off the GPS monitor, while the GPS is running, other source can play at the same time. Calibration of the touch panel Language setting 6. STEERING WHEEL CONTROL Enter the setting menu, click the STEER icon to enter steering wheel setting, following the steps which notice on the screen.
XM-DTSBN927 Replace the Battery of IR Handset Replace the Battery When the operational range of the remote control becomes short or non-functional, replace battery with a new CR2025 battery. Check the battery polarity before replacement. Pull out the battery holder while pressing the stopper 1. Place battery whth (+) mark facing up into the battery holder. Insert the battery holder into the remote controller.
XM-DTSBN927 Install the unit (DIN front mount) DIN FRONT-MOUNT (method A) Installing the Unit 1. Dashboard 2. Holder After inserting the holder into the dasrwhboard, select the appropriate tab according to the thickness of the dashboard material and bend them inwards to secure the holder in place. 3. Screw 1. Dashboard 2. Nut (5mm) 3. Plan washer 4. Screw (5*25mm) 5. Screw 6. Starp be sure to use the starp to secure the back of the unit in place.The starp can be bent by hand to the desired angle. 7.
XM-DTSBN927 DIN REAR MOUNT(method B) Installation using the screw holes on the sides of the Unit. Fastening the unit to the factory radio mounting bracket. 1. Select a position where the screw holes of the bracket and the screw holes of the main unit become aligned (are fitted) and tighten the screw at 2 places on each side.Use either truss screws (5*5 mm) or flush surface screw (4*5 mm). 2. Screw(“T”Position). 3. Dashboard or Console.
XM-DTSBN927 Disposal / recycling information Disposal of an old unit Disposal of the battery User information regarding disposal of According to the battery decree we make you aware of your obligation to dispose of empty batteries at municipal collection points. electric and electronic devices (private households) Batteries that contain pollutants (e.g. Hg = mercury, Pb = lead, Cd = cadmium) are labelled with the symbol pictured above.