Digitaler Fotorahmen BEDIENUNGSANLEITUNG (DE) (DPF 10B1)
Inhaltsverzeichnis Deutsch Sicherheitshinweise Elektronische Sicherheit ................................................................................................ 4 Verwendung, Verpackungsinhalt.................................................................................... 5 Bedienung Fernbedienung .............................................................................................................. 6 Geräteübersicht ......................................................................
SICHERHEITSHINWEISE Elektronische Sicherheit Deutsch Das Blitzsymbol im Dreieck weist den Benutzer auf gefährliche Spannungen an einigen freiliegenden Bauteilen im Inneren des Gerätes hin. Das Ausrufezeichen im Dreieck weist den Benutzer auf wichtige Bedienungs- und Wartungsanweisungen (Service) in diesem Handbuch hin, die unbedingt befolgt werden sollten. Das Gerät wurde getestet und entspricht lt. FCC Norm den Standards eines Klasse B Gerätes.
SICHERHEITSHINWEISE • • • • • • Verwendungszweck • Die Wiedergabe von unterstützten Video-, Bild- und Musikdateien Verpackungsinhalt Folgende Bestandteile gehören zum Lieferumfang des Xoro Digitalen Fotorahmens: • • • • Xoro Digitaler Fotorahmen Netzteil Bedienungsanleitung Fernbedienung Falls eines dieser Teile fehlen sollte, wenden Sie sich bitte schnellstmöglich an Ihren Händler. Bewahren Sie die Originalverpackung für den Fall auf, dass das Gerät an den Händler zurückgeschickt werden muss.
BEDIENUNG Deutsch Fernbedienung 6 Digitaler Fotorahmen
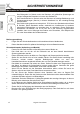
BEDIENUNG Geräteübersicht (DPF 10B1) Deutsch 1. SDHC-Kartenleser 2. USB-2.0-Anschluss 3. Mini USB Anschluss 4. Stromversorgung 5. Bedienfeld ( Ein/Aus / Menü usw.) 6. Lautsprecher Hinweis: An Steckplatz 2. befindet sich der angeschlossene Speicher.
Deutsch Stromversorgung Benutzen Sie nur das mitgelieferte Netzteil zum Betreiben Ihres Xoro Fotorahmens. Beachten Sie die Angaben auf dem Typenschild des Netzteils. Hinweise: • Das Ladegerät liefert eine stabilisierte Gleichspannung. Der Betrieb mit einer nichtstabilisierten Spannung kann das Gerät beschädigen. Nur mit dem mitgelieferten Netzteil ist ein sicherer Betrieb und die Einhaltung aller Vorschriften und Normen gewährleistet. USB Anschlüsse & Speicherkarten Das Gerät verfügt über zwei USB 2.
BEDIENUNG Erste Schritte Stellen Sie das Gerät an einem dafür geeigneten Ort auf. Verwenden Sie dafür den eingebauten Ständer. Verbinden Sie anschließend das mitgelieferte Netzteil mit dem Gerät. verwenden Sie die Fernbedienung, zum Ein/Ausschalten. Direkt nach dem Einschalten erscheint das Hauptmenü des Digitalen Fotorahmens.
BEDIENUNG Fotos anschauen Deutsch Der Digitale Fotorahmen kann ausschließlich Bilder im JPEG Dateiformat darstellen. Nach Auswahl des Massenspeichers, mit den von Ihnen gewünschten Medien, werden mehrere Optionen dargestellt. Wählen Sie die Option „Bilder“ und Drücken Sie die „ENTER“ Taste. Es wird Ihnen nun eine Übersicht der auf dem Datenträger gefundenen Fotos gezeigt. Sie können mit den Navigationstasten [◀][▶][▲][▼] innerhalb der Auswahl navigieren und mit der „ENTER“ Taste Fotos anzeigen lassen.
BEDIENUNG Videos anschauen Mit dem Digitalen Fotorahmen können Sie Filme im MPEG-4/AVI Dateiformat anschauen. Der Fotorahmen ist nicht “HD Ready”. Eventuell müssen Sie Ihre Videos in ein kompatibles Format umwandeln, damit sie dargestellt werden können. • • • Wählen Sie die „Video“ Option im Hauptmenü und Drücken Sie die „ENTER“ Taste. Es wird eine Liste der verfügbaren Videos des angeschlossenen Massenspeichers aufgelistet.
BEDIENUNG Zeiteinstellung Deutsch Um die Zeit einzustellen drücken Sie die „SETUP“ Taste der Fernbedienung. Navigieren Sie anschließend mit den [◀][▶] Tasten zu der Option „Zeit“. Um die Zeiteinstellung zu ändern betätigen Sie die „ENTER“ Taste. Wählen Sie mit den [▲][▼] Tasten die Jahr/Tag/Monat/Stunde/MinuteAuswahl und mit den [▲][▼] Tasten die Ziffern. Speichern erfolgt mit Drücken der „ENTER“ Taste.
BEDIENUNG Spracheinstellung Systemsprache auswählen Dia Zeit Auswahl der Anzeigedauer je Foto (3 Sekunden - 1 Stunde) Modus Diavorführung Konfiguriert Bildübergänge (Manuell oder Zufällig) Deutsch Musik Wiederholungsmodus Wiederholung der Hintergrundmusik (Einen Titel/Alle Titel/Aus) Video Wiederholungsmodus Bildformatwahl Zeit Wiederholung bei der Video Wiedergabe (Ein Video/Alle Videos/Aus) Bilder auf Bildschirmgröße strecken oder original Bildgröße darstellen Zeit & Datumseinstellung (Seite 12)
Problembehandlung Deutsch Lesen Sie bitte die folgenden Informationen, um die mögliche Ursache zu einem Problem herauszufinden, bevor Sie sich an den Kundendienst wenden. Problem Lösung B e s t im m t e . A V I -u n d MPEG-4-Video-Dateien werden nicht richtig abgespielt. Warum? Grundsätzlich gibt es keine Standardisierung des Dateiformates AVI/ MPEG-4 und Kamera Hersteller versuchen durch Kompression immer bessere Videoaufnahmen zu machen. Um das Video dennoch abspielen zu können muss es daher ggf.
GEWÄHRLEISTUNGSBEDINGUNGEN Außerdem ausgeschlossen sind Schäden durch Reparaturarbeiten unautorisierter Agenturen und Schäden die durch das Aufspielen eines Firmware Upgrades entstanden sind, es sei denn, es war erforderlich, das Upgrade zu installieren, um zugesicherte Eigenschaften überhaupt erst zu ermöglichen.
RECYCLING INFORMATIONEN Deutsch Wiederverwertung von Elektrogeräte Das Produkt wurde mit hochwertigen Materialien und Komponenten entwickelt und hergestellt, die recylingfähig sind und wieder verwendet werden können. Diese durchkreuzte Mülltonne auf dem Produkt oder auf der Verpackung bedeutet, dass das Produkt der Europäischen Richtlinie 2002/96/EC entspricht. Informieren Sie sich über die vor Ort geltenden Bestimmungen zur separaten Entsorgung elektronischer Geräte.
Digital Photoframe User Manual (EN) (DPF 10B1)
Contents English Safety Information Electronic security.......................................................................................................... 4 Usage, package content ................................................................................................ 5 Operation Remote Control ............................................................................................................. 6 Device ................................................................................
Safety Information Electronic Security English The lightning flash with an arrowhead symbol within an equilateral triangle is intended to alert the user of the presence of un-insulated "dangerous voltage" within the product's enclosure that may be of sufficient magnitude to constitute a risk of electric shock to persons.
Safety Information • • • • • • • • • Usage • Playback of supported video, picture and music files Package contents The following components are supplied with the Xoro Digital Photo Frame: • • • • Xoro Digital Photo Frame Power supply User manual Remote Control If any of these items are missing, please contact your dealer as soon as possible. Keep the original packaging in the event that the unit needs to be returned to the dealer.
Handling English Remote Control Turn on / off, StandBy 6 Digital Photoframe
Handling Device (DPF 10B1) English 1. SDHC-Cardreader 2. USB 2.0 port 3. Mini USB port 4. Power Supply 5. Navigation keys 6. Speakers Note: At port no. 2 you will find the connected 8 GB storage.
Power supply English Use the supplied power adapter to use your Xoro Photo Frame. Please read the information on the nameplate of the power supply. Notes: • The charger delivers a stabilized DC voltage. Operation with non-stabilized voltage can damage the instrument. Only use the supplied power supply, safe operation and compliance with all regulations and standards is ensured. USB ports & Memory Cards The device has USB 2.0 ports.
First Steps 1. 2. Insert the power lead into the Digital Photo Frame’s socket marked DC Turn on the Digital Photo Frame by either pressing and holding the POWER button on the back of the unit for 3 seconds or pressing the ON/OFF button on the Remote control. English Main Menu After turning on the unit, this screen will appear: For every device appears an extra icon in the Menu. For Example: Use the [◀][▶] buttons to navigate, then press ENTER to select an option.
First Steps View Photos English This Digital Photo Frame allows you to view JPEG Photo files only. After selecting the memory device you want to view your photos from, you will see several options displayed in the diagram below. Select ‘Picture’ to view your photos by pressing ENTER. You will now have access to your photos in thumbnail view. You can navigate through your photos using the [◀][▶] [▲][▼] buttons. Press ENTER to start playing your photos.
First Steps View Videos This Digital Photo Frame allows you to view MPEG-4/AVI Video files only. It is not “HD Ready”. If you encounter problems with video playback, please refer to our website FAQ section where there are links to Video Conversion programs. • Select the Movie icon from the Menu, then press ENTER. During the video, you can press the INFO button and an info bar will appear on the screen.
First Steps Picture Settings English Select the ‘setup’ button from the remote control, to adjust the settings on your Digital Photo Frame. Now use the [◀][▶] arrows to navigate through the different settings until you reach the picture settings. Navigate through the different options using the [▲][▼] arrows and confirm by pressing the ENTER button. Press ENTER again to save changes. Calendar Settings • To set the Time, press the ‘Setup’ button on the Remote Control.
First Steps System Settings Select the ‘setup’ button from the remote control, to adjust the settings on your Digital Photo Frame. Now use the [◀][▶] arrows to navigate through the different settings until you reach the system settings. From here, you will see the various options. The device can be configured so that it is only active when held in close proximity movement. After a period of your choice, it switches off automatically.
Troubleshooting English Please read the following information to find out the possible cause of a problem before contacting service Problem Solution Certain .AVI and MPEG-4 Video files are not playing properly. Why? The subject of MPEG-4 and .AVI is a tricky thing. Basically there is no absolute standard format and every major camera manufacturer keep updating their own versions of video file to improve compression. However, it is possible to convert your files to standard formats.
Warranty Information The warranty for wearing parts (e.g. rechargeable batteries) is limited to 6 months. In case the device is equipped with internal data storage (e.g. hard disc drive, Flash drive), the customer is responsible to backup his data before sending the device. MAS Elektronik AG is not liable for any data loss on returned devices. MAS Electronic AG reserves the right to reset returned devices to factory defaults. Please note your personal settings for this reason.
English Recycling Information Recycling of electronic devices This product is designed and manufactured with high quality materials and components which can be recycled and reused. This symbol means that electrical and electronic equipment, at their end-of-life, should be disposed of separately from your household waste. Please, dispose of this equipment at your local community waste collection/recycling centre.
XORO by MAS Elektronik AG Weidegrund 3 21614 Buxtehude Deutschland Tel: 04161 800 24 24 www.xoro.