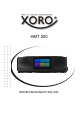
HMT 200 BEDIENUNGSANLEITUNG (DE)
INHALTSVERZEICHNIS Deutsch SICHERHEITSHINWEISE Elektronische Sicherheit ................................................................................................ 4 Verpackungsinhalt, USB Anschlüsse & Speicherkarten ................................................. 5 ERSTE SCHRITTE Anschlüsse & Tasten ..................................................................................................... 6 Starten Stand-by & Herunterfahren, Softwaretasten, Aufladen.....................................
SICHERHEITSHINWEISE Elektronische Sicherheit Deutsch Das Blitzsymbol im Dreieck weist den Benutzer auf gefährliche Spannungen an einigen freiliegenden Bauteilen im Inneren des Gerätes hin. Das Ausrufezeichen im Dreieck weist den Benutzer auf wichtige Bedienungs- und Wartungsanweisungen (Service) in diesem Handbuch hin, die unbedingt befolgt werden sollten. Das Gerät wurde getestet und entspricht lt. FCC Norm den Standards eines Klasse B Gerätes.
SICHERHEITSHINWEISE Elektronische Sicherheit • • • Verpackungsinhalt Folgende Bestandteile gehören zum Lieferumfang des XORO HMT 200: • • • XORO HMT 200 Netzteil Bedienungsanleitung Falls eines dieser Teile fehlen sollte, wenden Sie sich bitte schnellstmöglich an Ihren Händler. Bewahren Sie die Originalverpackung für den Fall auf, dass das Gerät an den Händler zurückgeschickt werden muss. USB Anschlüsse & Speicherkarten Das Gerät verfügt über einen MicroUSB 2.0 Anschluss .
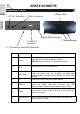
ERSTE SCHRITTE Anschlüsse & Tasten 6. Power Taste 2. AUX - Anschluss Deutsch 1. DC IN - Anschluss 3. Micro USB Anschluss 7. Steuerelemente 5. USB 2.0 Anschluss 4. TF Anschluss (Micro-SD Kartenslot) Bezeichnung Funktionsbeschreibung Zur Stromversorgung des Gerätes mit dem Netzteil und zum laden der internen wiederaufladbaren Batterie. Hinweis: Benutzen Sie nur das mitgelieferte Netzteil. 1 DC IN 2 AUX 3 Micro USB Für die Datenübertragung von einem PC aus (z.B.
ERSTE SCHRITTE Starten, Stand-by & Herunterfahren Bei ausgeschaltetem Gerät drücken und halten Sie den Ein-/Ausschaltknopf (6) für einige Sekunden. Das System wird gestartet sobald das XORO Logo bzw. Android Betriebssystem Logo auf dem Display erscheint. Im Betrieb drücken und halten Sie den Ein-/Ausschaltknopf für einige Sekunden bis das Fenster zum Herunterfahren angezeigt wird. Bestätigen Sie den Vorgang durch Drücken der OK Taste auf dem Bildschirm.
ERSTE SCHRITTE Deutsch Definition: Android Das Gerät ist mit dem Android Betriebssystem ausgestattet. Der Name Android leitet sich von dem griechischen Wort „androide“ ab, was so viel bedeutet wie „menschenähnlich“ und dient zunehmend als Betriebssystem für mobile Geräte wie Smartphones, Netbooks oder Tablets.
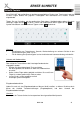
ERSTE SCHRITTE Virtuelle Tastatur Der XORO HMT 200 verfügt über ein berührungsempfindliches Display (sog. Touchscreen) und wird mit den Fingern bedient. Bei jeglichen Texteingaben wird automatisch eine virtuelle Tastatur eingeblendet. Hinweise: • Einstellungen zum Tastaturlayout, Sprache, Rechtschreibung etc. nehmen Sie bitte in den Systemeinstellungen (Seite 11) vor. • Für die Nutzung der Spracheingabe ist eine funktionierende Internetverbindung erforderlich.
SYSTEMEINSTELLUNGEN Einstellungen Deutsch Im folgenden Kapitel des Handbuches werden die verschiedenen Systemeinstellungen erklärt. Sie erreichen das Einstellungsmenü durch klicken des „Einstellungen“ Buttons auf dem Startbildschirm. Einstellungen / Drahtlos & Netzwerke / WLAN Zum Einrichten der drahtlosen Internetverbindung gehen Sie bitte wie folgt vor: • Tippen Sie im Menüpunkt „WLAN“ auf den Schieberegler bis dieser auf „AN“ umschaltet.
SYSTEMEINSTELLUNGEN Einstellungen • "Interner Speicher" In diesem Bereich sind die Apps standardmäßig installiert. Es ist nicht möglich, Benutzerdateien (z.B. MP3, JPEG) in diesem Bereich abzulegen. • "SD-Karte" oder "USB-Speicher" In diesem Bereich können Sie Benutzerdateien ablegen. (Externes Speichermedium erforderlich) Hinweis: Ein Teil des Arbeitsspeichers des Gerätes wird von der Hardware (Grafikprozessor, WLAN) verwendet und steht nicht für das Betriebssystem oder für Apps zur Verfügung.
SYSTEMEINSTELLUNGEN Einstellungen Deutsch Einstellungen / System / Datum & Uhrzeit Autom. Datum/Uhrzeit Aktivieren Sie diese Einstellung, wenn das Gerät die aktuelle Uhrzeit aus dem Internet beziehen soll (empfohlen). Wenn die Einstellung "Autom. Datum/ Uhrzeit" abgeschaltet ist, können Sie an dieser Stelle Datum und Uhrzeit manuell einstellen. Zeitzone auswählen Mit dieser Funktion können sie die Zeitzone wählen an der sich ihr Gerät orientiert.
ANWENDUNGEN Lokal Im folgenden Kapitel der Bedienungsanleitung werden die verschiedenen Funktionen unter „Lokal“ erklärt. Sie erreichen das „Lokal“ Menü durch klicken des „Lokal“ Buttons auf dem Startbildschirm. Deutsch In diesem Menü haben sie die Auswahlmöglichkeiten • • • • Musik UPnP Datei Manager Apps Im Nachfolgenden wird näher auf die einzelnen Funktionen der jeweiligen Auswahlmöglichkeiten eingegangen.
ANWENDUNGEN Lokal Deutsch UPnP Wählen Sie den Menüpunkt UPnP aus um auf den UPnP Dienst (Universal Plug and Play) zuzugreifen. UPnP Der UPnP Dienst ermöglicht eine System und Hersteller übergreifende Verbindung zu anderen Geräten für den Datenaustausch, in diesem Fall für Musik. Somit können Sie zum Beispiel Musik direkt von einem Computer streamen, sofern ihr Computer einen UPnP Dienst installiert hat und sich in dem gleichen Netzwerk wie ihr HMT 200 befindet.
ANWENDUNGEN Lokal Apps Wählen Sie den Menüpunkt „Apps“ aus, um auf die alternative Ansicht der Menüpunkte zu gelangen. Deutsch Apps Hierüber haben Sie zugriff auf die auf dem Gerät installierten Apps, sowie der Menüpunkte aus „Lokal“ und dem Hauptbildschirm. Hinweis: Sie müssen sich bei einigen Apps für die Nutzung registrieren, dies kann mit zusätzlichen Kosten verbunden sein.
ANWENDUNGEN Verbindung Deutsch Im folgenden Kapitel der Bedienungsanleitung werden die verschiedenen Funktionen unter „Verbindung“ erklärt. Sie erreichen das „Verbindung“ Menü durch klicken des „Verbindung“ Buttons auf dem Startbildschirm. In diesem Menü haben sie die Auswahlmöglichkeiten • • • • Bluetooth FireAirReceiver Line-In/Out WLAN Im Nachfolgenden wird näher auf die einzelnen Funktionen der jeweiligen Auswahlmöglichkeiten eingegangen.
ANWENDUNGEN Verbindung FireAirReceiver Über diese Schaltfläche aktivieren oder deaktivieren Sie die FireAirReceiver Funktion. Line-In An Wenn Sie Line-In aktivieren, empfängt ihr HMT 200 den Ton von externen Audioquellen per Kabel (zum Bsp. über ein Klinke zu Klinke Kabel, von einem Smartphone oder Tablet). Line-In Aus Wenn Sie Line-In deaktivieren, gibt ihr HMT 200 den Ton von den internen Audioquellen aus. (Zum Bsp.
ANWENDUNGEN Verbindung Deutsch WiFi Wählen sie WiFi aus, um eine WLAN Verbindung zwischen ihrem HMT 200 und einem WLAN Router herzustellen. WiFi Sobald die Schaltfläche sich in „WiFi-ON“ ändert, können Sie mit ihrem WLAN Router eine Verbindung herstellen. Durch erneutes Tippen auf die Schaltfläche deaktiviert sich die WLAN Funktion wieder und ihr HMT 200 öffnet einen WLAN Hotspot.
ANWENDUNGEN Equalizer Im folgenden Kapitel der Bedienungsanleitung werden die verschiedenen Funktionen unter „Equalizer“ erklärt. Sie erreichen das „Equalizer“ Menü durch klicken des „Equalizer“ Buttons auf dem Deutsch In diesem Menü haben Sie die Auswahlmöglichkeiten • • • • Equalizer Autoerkennung ON/OFF Vorinstallierte Filter Eigenen Filter erstellen (Benötigt die Vollversion) Einstellungen Im Nachfolgenden wird näher auf die einzelnen Funktionen der jeweiligen Auswahlmöglichkeiten eingegangen.
ANWENDUNGEN Equalizer Deutsch Eigenen Filter erstellen Um einen eigenen Filter zu erstellen, müssen Sie auf die mit dem Symbol markierte Schaltfläche drücken. Bitte beachten sie, dass Sie zum speichern eines eigenen Filters die kostenpflichtige Vollversion benötigen. Eigenen Filter erstellen Mit den Schiebereglern können Sie die einzelnen Tonfrequenzen reduzieren oder verstärken. Speichern können Sie den Filter über die in der oberen rechten Ecke mit dem roten + markierte Schaltfläche.
ANWENDUNGEN Internet Im folgenden Kapitel der Bedienungsanleitung werden die verschiedenen Funktionen unter „Internet“ erklärt. Sie erreichen das „Internet“ Menü durch klicken des „Internet“ Buttons auf dem Startbildschirm. In diesem Menü haben sie die Auswahlmöglichkeiten • • • • Deezer Spotify Internet Radio TuneIN Im Nachfolgenden wird näher auf die einzelnen Funktionen der jeweiligen Auswahlmöglichkeiten eingegangen. Deezer Mit Deezer können Sie Musik von der Musikplattform Deezer streamen.
ANWENDUNGEN Internet Deutsch Spotify Mit Spotify können Sie Musik von der Musikplattform Spotify streamen. Spotify Bei der ersten Verwendung von Spotify werden Sie gebeten sich anzumelden oder zu registrieren. Danach können Sie das genießen. Musikangebot von Spotify Weitere Informationen finden sie unter: www.spotify.com Internet Radio Mit mediaU können Sie das Digitale Radioangebot genießen.
ANWENDUNGEN Internet Weitere Informationen finden sie unter: www.mediayou.net Deutsch TuneIN Mit TuneIN können Sie auf das Internetradio Angebot zugreifen. TuneIN Bei der ersten Verwendung von TuneIN werden Sie gebeten die kostenlose Probezeit des Premium Angebots auszuprobieren. Danach können Sie das Musikangebot von TuneIN genießen. Weitere Informationen finden sie unter: tunein.
ANWENDUNGEN Wetter Deutsch Im folgenden Kapitel der Bedienungsanleitung werden die verschiedenen Funktionen unter „Wetter“ erklärt. Sie erreichen das „Wetter“ Menü durch klicken des „Wetter“ Buttons auf dem Startbildschirm. Bei der ersten Verwendung von der Wetter Funktion werden Sie auf Neuerungen hingewiesen. Danach werden Sie gebeten einen Ort hinzuzufügen. Drücken Sie das + Symbol um einen Ort hinzuzufügen. Geben Sie nun den Namen ihres gewünschten Ortes an.
ANWENDUNGEN Wetter Wählen Sie nun den gewünschten Ort aus. Deutsch Bestätigen Sie nun mit dem blauen Haken. Sie bekommen jetzt aktuelle Wetterdaten zu ihrem gewählten Ort.
PROBLEMBEHANDLUNG Deutsch Lesen Sie bitte die folgenden Informationen, um die mögliche Ursache zu einem Problem herauszufinden, bevor Sie sich an den Kundendienst wenden. Problem Lösung Gerät lässt sich nicht einschalten • Überprüfen Sie, ob das Netzteil korrekt an der Steckdose angeschlossen ist. • Überprüfen Sie, ob das Kabel des Netzteiles korrekt am Gerät angeschlossen ist. • Ziehen Sie den Stecker heraus, warten Sie 1 Minute, und schließen Sie dann den Stecker wieder an.
GEWÄHRLEISTUNGSBEDINGUNGEN Außerdem ausgeschlossen sind Schäden durch Reparaturarbeiten unautorisierter Agenturen und Schäden die durch das Aufspielen eines Firmware Upgrades entstanden sind, es sei denn, es war erforderlich, das Upgrade zu installieren, um zugesicherte Eigenschaften überhaupt erst zu ermöglichen.
RECYCLING INFORMATIONEN Deutsch Wiederverwertung von Elektrogeräte Das Produkt wurde mit hochwertigen Materialien und Komponenten entwickelt und hergestellt, die recyclingfähig sind und wieder verwendet werden können. Diese durchkreuzte Mülltonne auf dem Produkt oder auf der Verpackung bedeutet, dass das Produkt der Europäischen Richtlinie 2002/96/EC entspricht. Informieren Sie sich über die vor Ort geltende Bestimmungen zur separaten Entsorgung elektronischer Geräte.
LIZENZEN & HAFTUNGSAUSSCHLUSS Wir weisen an dieser Stelle darauf hin, dass die Firmware des Gerätes u.a. Open Source Software enthält, welche unter der GNU General Public License (GPL) und Lesser General Public License (LGPL) lizensiert wird. Um eine GPL / LGPL konforme Verwendung der Programme sicherzustellen, verweisen wir auf die Lizenzbedingungen der GPL / LGPL. Lizenztext Der Lizenztext zur GNU General Public Licence ist im Downloadbereich des Produktes auf unserer Internetseite, sowie auf http://www.
HMT 200 User Manual (EN)
TABLE OF CONTENTS English SAFETY INFORMATIONS User Manual, Safety Instructions ................................................................................... 4 Package Contents, USB Ports & Memory Cards ............................................................ 5 FIRST STEPS Ports & Keys .................................................................................................................. 6 Start Stand-by & Shutdown, Software keys, Charging..............................................
SAFETY INFORMATION Electrical Safety English The lightning flash with an arrowhead symbol within an equilateral triangle is intended to alert the user of the presence of un-insulated "dangerous voltage" within the product's enclosure that may be of sufficient magnitude to constitute a risk of electric shock to persons.
SAFETY INFORMATION Electrical Safety • • • Package Contents The following components are included: - XORO HMT 200 - Power Cable - User Manual If any of these items is missing, please contact your dealer as soon as possible. Keep the original packaging in the event the unit needs to be returned to the dealer. USB Ports & Memory Cards The device has a MicroUSB 2.0 port. USB-devices such as (USB-sticks, HDD, SSD) or USB-input devices (mouse, keyboard etc.) can be plugged in .
FIRST STEPS Ports & Keys 6. Power Button 2. AUX - Port English 1. DC IN - Port 3. Micro USB - Port 7. Control Elements 5. USB 2.0 - Port 4. TF - Port (Micro-SD slot) Name Description For the power supply and charging of the internal battery, via charging cable. 1 DC IN Note: Do only use the original charging cable. 6 For connecting external audio sources.
FIRST STEPS Start, Stand-By & Shutdown Start Press and hold the power button (6) for several seconds. The system is started as soon as the XORO logo or Android operating system logo appears on the display. Press and hold the power button for a few seccond until the shutdown window is displayed. Confirm the operation by pressing the OK button on the screen. Stand by Press the power button briefly to turn the unit into the stand by mode and the operating mode to enable.
FIRST STEPS Definition Android English The XORO HMT 200 is equipped with the Android operating system. The name of the operating system Android is derived from the Greek word " androide", which means as much as human-like and is increasingly being used as an operating system for mobile devices such as smartphones, netbooks and tablets.
FIRST STEPS Virtual Keyboard The XORO HMT 200 has a touchscreen and is controlled by touching it with the fingers. Whenever you need to type something, a virtual keyboard will appear. Notes: • Settings for the keyboard e.g. language of the keyboard. are described on page 11. Ä,Ö,Ü and special characters Some keys contain special characters. • Touch the key and hold the finger pressed down until a menu with characters appears • Keep touching and move the finger to the desired special character.
SETTINGS Settings English The following chapter will explain the different system settings. For accessing the settings menu, click the settings button on the home screen. Settings / Wireless & Networks / Wi-Fi For connecting to an Wi-Fi network please follow these steps: • Activate the button into „Wi-Fi“ Settings. Now the device will scan for all Wi-Fi networks in area. Select your Wi-Fi network by clicking on its name. Type your password and confirm with „Connect“.
SETTINGS Settings Settings / Device / Storage Here you can see how much memory space is in use and how much is still available. You can also unmount memory cards here. ("Unmount"). The internal storage is primarily used as storage for applications. It is not possible to store files such as MP3 or JPEG here. • "SD-Card" or "USB-Memory" Here you can store user files such as MP3 or JPEG. (Requires an external storage device) Note: Please keep in mind, that a part of the RAM-memory is used by the hardware.
SETTINGS Settings English Settings / System / Date & Time Autom. Date/Time Enable this settings, if you want your device to use the networks date & time specifications (recommended). If this option is disabled can set your date & time manually. Set date With this function you can set the date manually. Use 24-Hour Format If this function is disabled, the time will be displayed in the 12hour format. Instead of 14:00, the time will be displayed as 2:00PM. Choose Date Format Sets the dates format.
APPLICATIONS Local The following chapter of this user manual informs you about the functions under „Local“. You can access the „Local“ menu by touching the „Local“ button on the start screen. English This menu contains • • • • Music UPnP File Manager Apps Now the functions will be explained in detail. Music Choose music for listening to your locally or externally saved music. (For example: USB Stick or Micro-SD Card). Music Here you can listen your music.
APPLICATIONS Local English UPnP Choose UPnP for accessing the UPnP service (Universal Plug and Play). UPnP The UPnP service provides a system independent connection to any device for the data transfer. You can stream music from your computer to your speakers as long as the computer has a UPnP software installed as well and is connected with the same Wi-Fi network as your HMT 200. File Manager Choose the file manager for accessing it. File Manager Here you can manage your files.
APPLICATIONS Local Apps This menu will show you an alternative overview of the Applications and menu items. English Apps Here you can access all applications installed on the device, as well as all menu items from „Local“ and the home screen. Note: Some apps require a registration, this could involve additional costs. Recommendation: In case the device supports the download and installation of apps from the Google Play Store we recomend to limit the number of apps.
APPLICATIONS Connection English The following chapter of this user manual informs you about the functions under „Connection“. You can access the „Connection“ menu by touching the „Connection“ button on the start screen. This menu contains • • • • Bluetooth FireAirReceiver Line-In/Out Wi-Fi Now the functions will be explained in detail. Bluetooth Enable Bluetooth for linking the HMT 200 with another device (for example: smartphone) via Bluetooth for streamíng music via Bluetooth.
APPLICATIONS Connection FireAirReceiver With FireAirReceiver you can connect your HMT 200 with a smartphone or tablet, in order to work you need to install the app „Airwire“ on your smartphone or tablet first. English FireAirReceiver With this button you can enable/disable the AirWireReceiver function. Line-In-On Enable Line-In for receiving a audio signal via an audio cable from an external audio source such as a smartphone or tablet.
APPLICATIONS Connection English Wi-Fi Enable Wi-Fi to connect your HMT 200 with an Wi-Fi router. Wi-Fi As soon as you see „Wi-Fi-ON“ you will be able to connect to a Wi-Fi router. If you touch „Wi-Fi“ again, the Wi-Fi function will bedeactivated and a Wi-Fi Hotspot will be opened instead. If the Wi-Fi button turns into „Wi-Fi-Hotspot“ is the Wi-Fi Hotspot opened and your HMT 200 will act like a Wi-Fi router.
APPLICATIONS Equalizer The following chapter of this user manual informs you about the functions under „Equalizer“. You can access the „Equalizer“ menu by touching the „Equalizer“ button. English This menu contains • • • • Preset Auto-Detect ON/OFF Preset Filters Create own Filter (Requires the full version) Settings Preset Auto-Detect ON/OFF Enables and disables the auto detection function. Preset Filters You can choose preset filters such as Jazz, Pop, Rock or Heavy Metal and many others.
APPLICATIONS Equalizer English Create own Filter For creating an own filter, please click at the button. Note that you need the full version for saving your own filters. Create own Filter Use the sliders to increase or decrease the frequency‘s intensity. For saving, press the red marked + button in the top right corner. Note: You need the full version for saving your own filter. This may involve additional costs. Settings Touch the settings button for accessing the settings menu.
APPLICATIONS Internet The options for this menu are • • • • Deezer Spotify Internet Radio TuneIN Now the functions will be explained in detail. Deezer With Deezer you can stream music from Deezer. Deezer If you use Deezer the first time you will be asked to login or register. Now you can enjoy the Deezer music service. More information: www.deezer.com HMT 200 21 English The following chapter of this user manual informs you about the functions under „Internet“.
APPLICATIONS Internet English Spotify With Spotify you can stream music from Spotify. Spotify If you use Spotify the first time you will be asked to login or register. Now you can enjoy the service of Spotify. More information: www.spotify.com Internet Radio With Internet Radio you can enjoy the digital radio service. Internet Radio If you use the Internet Radio service the first time, you are asked to wait, as downloading the radio list may take a while.
APPLICATIONS Internet TuneIN With TuneIN you can access the internetradio service. English TuneIN If you use TuneIN the first time, you are asked to try out the free „Premium“ test version. Now you can enjoy the TuneIN service. More information: tunein.
APPLICATIONS Weather English The following chapter of this User manual informs you about the functions under „Weather“. You can access the „Weather“ menu by touching the „Weather“ button on teh start screen. If you use the weather application the first time, you will be informed about the latest update. Then you are asked to add a town. Touch the + symbol for adding an town. Now you can type the name of your town.
APPLICATIONS Weather Select the correct town from the menu. English Confirm by clicking at the blue checkmark. Done. Now the new town has been added.
TROUBLESHOOTING English Please read the following information to find out the possible cause of a problem before contacting our costumer service. Problem Device does not turn on Solution • Check whether the power adapter is properly connected to the power outlet. • Check if the cable of the power supply is properly connected to the device. • Pull out the plug, wait for 1 minute and then plug the connector back on.
WARRANTY MAS Electronic AG is not liable for any accessories not belonging to original package content such as DVDs, hard disc drives, Flash storage devices, batteries, etc. This limited warranty covers the warranty requirements set by authorities in your country. This limited warranty does not cover finishes, accessories or batteries, nor does it cover damage resulting from accident, misuse, abuse, dirt, water, battery leakage, tampering, servicing performed or attempted by unauthorized service agencies.
RECYCLING INFORMATION English Recycling Information Recycling of electronic devices This product is designed and manufactured with high quality materials and components which can be recycled and reused. This symbol means that electrical and electronic equipment, at their end-of-life, should be disposed of separately from your household waste.Please, dispose of this equipment at your local community waste collection/ recycling centre.
LICENSES & DISCLAIMER We would like to point out that the firmware of the XORO HMT 200 contains open source software, which is licensed under the GNU General Public License (GPL) and Lesser General Public License (LGPL). To ensure a GPL / LGPL compliant use of the programs, please refer to the license terms of the GPL / LGPL. License text The license text of the GNU General Public License is available in the download area of the product on our website, as well as on http://www.gnu.
XORO by MAS Elektronik AG Weidegrund 3 21614 Buxtehude Deutschland Tel: 04161 800 24 24 www.xoro.