MTA 50 MTA 55 MTA 65 Serie MTA 80 Serie Installationsanleitung
Inhaltsverzeichnis (DE) Seite 01. Allgemein ............................................................................................................. 1 02. Wichtige Sicherheitshinweise ................................................... 1 03. Lieferumfang ............................................................................. 2 04. Installationsanweisung.............................................................. 2 4.1. Vorbereitung ...............................................................
Allgemein Die MTA‐Serie wurde entwickelt, um auch Straßenfahrzeugen wie z. B. Wohnwagen, Minibusse, Transporter und LKWs den vollen Komfort eines Vollautomatischen Satelliten Systems bieten zu können.
Lieferumfang Motoreinheit und Spiegel Steuergerät Mini‐Kontrolleinheit Dachdurchführung mit verbundenen Kabeln 2,5 Meter Steuerkabel 2,5 Meter Antennenanschlusskabel 1,0 Meter Antennenanschlusskabel Spiegelauflage Installationsanleitung Installationsanweisung Grundsätzlich empfehlen wir den Einbau durch Ihren Fachhändler oder eine Fachwerkstatt vornehmen zu lassen! Vorbereitung Stellen Sie sicher, dass es keine physischen Hindernisse auf dem Fahrzeug, die Bewegung der Satellite
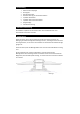
Dachdurchführung 1. Verbinden Sie das Kabel, das von der Antenne (No.1) kommt mit dem Kabel das vom LNB (No.2) kommt mithilfe eines F‐Steckers. 2. Verbinden Sie nun das Steuerkabel (No.3) das von der Antenne kommt mit dem Kabel (No.4) das vom Steuergerät kommt. 3. Verbinden Sie jetzt das Antennenkabel (Antennen Eingang) und das Steuerkabel mit dem Steuergerät. 4.
Installation auf dem Dach 1. Säubern Sie die Montagefläche mit einem geeigneten Reiniger und um Schmutz und Unreinheiten zu entfernen. 2. Achten Sie darauf, dass der Spiegel und die LNB‐Einheit zur Rückseite des Fahrzeuges zeigen um Windeffekte während der Fahrt zu minimieren. 3. Je nach Bedarf kann die Montageplatte auf dem Dach des Caravans verschraubt oder verklebt werden. 1.
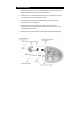
Anschlussdiagramm MTA 55
Verwendung Bedienung und erster Start des Systems Versichern Sie Sich das alle Antennenkabel zwischen dem Steuergerät und dem Loop‐ out zum Fernseher oder Receiver ordentlich angeschlossen sind. Betätigen Sie die Power‐Taste “ ” am Steuergerät, die rote LED‐Leuchte geht nun an und das System beginnt zu arbeiten. Auf der Mini‐Kontrolleinheit sehen Sie nun, auf welchen Satelliten sich das System ausrichtet. Die Satelliten‐Anlage beginnt automatisch mit Suche nach dem Satelliten.
Gewährleistungsbedingungen Sofern die Produkte im Zeitpunkt des Gefahrübergangs nicht die vereinbarte Beschaffenheit haben, ist die MAS Elektronik AG nach ihrer Wahl zur Mangelbeseitigung oder Ersatzlieferung berechtigt. Im Falle der Mangelbeseitigung/Ersatzlieferung erwirbt die MAS Elektronik AG mit dem Ausbau/Austausch Eigentum an den ausgebauten / ausgetauschten Komponenten / Geräten.
Technische Spezifikationen MTA 50 MTA 55 MTA 65 Serie MTA 80 Serie Motorsteuerung 2‐Achsen DC Motor 2‐Achsen DC Motor 2‐Achsen DC Motor 2‐Achsen DC Motor Satellitensuche automatisch automatisch automatisch automatisch Verbindungen 2 Kabel 2 Kabel 2 Kabel 2 Kabel 0° ~ 380° limited 0° ~ 380° limited 0° ~ 380° limited 0° ~ 380° limited 7°/second 10°/second 20°/second 20°/second 0° ~ 80° 0° ~ 75° 0° ~ 75° 0° ~ 75° 5°/second 10°/second 10°/second 10°/second 79 x 59 x 20 cm 60