Installation and operating instructions LV100 Standard LV100PC Pull Cord LV100T Timer LV100H Humidistat LV100HP Humidistat and Pull Cord LV100PIR Integral Body Movement Sensor Safety extra low voltage toilet/bathroom 100mm fan range Retain for future reference GB F D NL I S GR N SE A ®
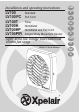
D A LV100PIR E m 5m 12 B F C G m 5m 11 2
H J LV100, LV100PC, LV100H, LV100HP & LV100PIR LV100, LV100PC, LV100H, LV100HP & LV100PIR LV100T LV100T I L K LV100H & LV100HP LV100PIR M 3
GB Xpelair Toilet/Bathroom Fans LV100, LV100PC, LV100T, LV100H, LV100HP & LV100PIR installation & operating instructions Please leave this leaflet with the fan for the benefit of the user Installing the fan What the installer will need These appliances are intended for connection to fixed wiring. A double pole isolating switch with a minimum contact gap of 3mm (Wall or Ceiling mounted). Check that the electrical rating shown on the transformer matches the mains supply.
If ceiling mounting the fan Use the appropriate ancillaries for termination. These items are available from Xpelair. 1. WT10 - Termination ducting kit. 2. CFWG100 - Soffit board termination grille (white or grey). 3. FD100/3 and FD100/6 - flexible ducting. Where to locate it Fan 2. Check there are no buried pipes or cables e.g. electricity, gas, water behind the switch location (in the wall or above the ceiling). If in doubt, seek professional advice. 3. Isolate the mains supply. 4.
GB Xpelair Toilet/Bathroom Fans LV100, LV100PC, LV100T, LV100H, LV100HP & LV100PIR installation & operating instructions Please leave this leaflet with the fan for the benefit of the user If installing in a ventilation shaft Mount the back draught shutter 1. Check there are no buried pipes or cables in the ventilation shaft. If in doubt, seek professional advice. 1. Peel the backing from the foam strip supplied and attach it around the outside of the lip on the back draught shutter. 2.
3. Drill and plug the two holes and fix the transformer with two pointed end self-tapping screws supplied. 2. Locate the cables in the cable grips (mains cable shown in H , and make the connections shown in J ). If fitting to a recessed wall box 3. Ensure all connections are tight. 1. Route the cables into the wall box and fix the wall box to the wall. 4. Switch off the mains electrical supply and remove fuses. 2. Connect the protective earth conductor if required. 5.
Notes LV100, LV100PC, LV100T, LV100H, LV100HP, LV100PIR 54
55
Do's and dont's • Do read all the instruction leaflet before commencing installation. • Do install each fan with a double pole isolating switch. • Do make sure the mains supply is switched off before attempting to make electrical connections or carry out any maintenance or cleaning • Don't install this fan in any window/panel which is less than 4mm thick. Guarantee Customers outside UK - see international below. • UK: The fan is guaranteed against defects for 3 years from the date of purchase.