ET80/ET85 Rugged 2-in-1 Tablet Quick Start Guide for Microsoft® Windows® 10 MN-004255-03EN Rev A
ZEBRA and the stylized Zebra head are trademarks of Zebra Technologies Corporation, registered in many jurisdictions worldwide. All other trademarks are the property of their respective owners. © 2021 Zebra Technologies Corporation and/or its affiliates. All rights reserved. Information in this document is subject to change without notice. The software described in this document is furnished under a license agreement or nondisclosure agreement.
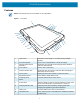
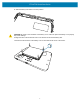
ET80/ET85 Quick Start Guide Features NOTE: Some features may not be available on all configurations. Figure 1 Front View 1 2 3 45 2 6 22 17 18 21 19 20 19 8 18 17 14 16 13 12 11 10 7 9 15 1 Light sensor Determines ambient light for controlling display backlight intensity. 2 Front microphones Use for voice communications or audio recordings. 3 Windows Hello Infrared Illuminator Illuminates your face with infrared (IR) light during Windows Hello face authentication.
ET80/ET85 Quick Start Guide 13 USB-A port Provides USB host and client communications. 14 USB-C port Provides USB host and client communications, and device charging via cables and accessories. 15 Scanner window Provides data capture using the imager. 16 Dock interface connector Provides communication to the device from the dock. 17 Speakers Provides audio output. 18 Keyboard latch slot Attaches the keyboard to the tablet.
ET80/ET85 Quick Start Guide 10 Communication expansion port For Ethernet and serial communication through the expansion adapter. 11 NFC antenna position Use to read NFC cards. 12 Battery cover Provides access to the replaceable battery. 13 Solid State Drive Cover Provides access to the solid state drive. Setting Up the Device To start using the device for the first time: 1. Install a nano SIM card (optional for ET85 only). 2. Charge the device. 3. Power on the device.
ET80/ET85 Quick Start Guide 4. Using index fingers, life the battery up. 5. Insert the nano SIM card with the contacts facing up. 6. Push the SIM card in and ensure that it locks into place. 7. If required, install the SIM lock plate and secure with the M1.4 x 2 mm screw using a Phillips #0 screwdriver. The maximum torque for the screw is 1 kg/m (7 lb/ft). 8. Replace the battery, ensuring it is seated properly.
ET80/ET85 Quick Start Guide 9. Slide the battery lock switch to the lock position. CAUTION: Be aware of the orientation of the battery cover. Failure to replace the battery cover properly may cause damage. 10. Align the tabs on the underside of the cover with the slot around the battery well. 11. Ensure that the chamfer on the battery cover is at the bottom left corner of the device.
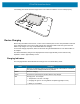
ET80/ET85 Quick Start Guide 12. Carefully press down around the edges of the cover. Make sure that the cover is seated properly. Device Charging Before using the tablet for the first time, connect it to an external power source. Keep the tablet connected to the external power source until it is fully charged. The Charging Indicator LED turns green when the tablet is fully charged. You may use the tablet while it is charging.
ET80/ET85 Quick Start Guide Charging Temperatures Charge batteries in ambient temperatures from 0°C to 45°C (32°F to 113°F). The tablet or dock always performs battery charging in a safe and intelligent manner. To accomplish this, for small periods of time, the charger alternately enables and disables battery charging to keep the battery at acceptable temperatures. Charging Accessories Use one of the following accessories to charge the tablet.
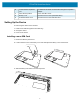
ET80/ET85 Quick Start Guide 2. If installed, ensure the keyboard and handle are closed. 3. Insert the bottom of the tablet into the bottom of the dock (1), aligning the charging contacts on the tablet with the connector pins on the dock. 4. Rotate the top of the tablet towards the top of the dock (2).
ET80/ET85 Quick Start Guide 5. Use your thumb to push the tablet into the dock, then push the lever down to secure the tablet. 6. After the tablet is secured in the dock, you can lower the keyboard (optional). Removing the Tablet 1. If installed, ensure the keyboard is closed. 2. To remove the tablet from the dock, lift the lever on top of the dock (1) to release the tablet, rotate the top of the tablet down (2), then lift the tablet out of the dock (3).
ET80/ET85 Quick Start Guide Charging Using the USB-C to AC Adapter Use the USB-C to AC adapter to charge the tablet. 1. Plug the AC line cord into the USB-C to AC adapter (1). 2. Plug the AC line cord into the AC wall outlet (2).
ET80/ET85 Quick Start Guide Power Only Dock The Power Only Dock provides: • Power for operating the device. • Charging for the device’s battery and optional Power Pack installed in an Expansion Back. • Barrel lock and two keys to secure the tablet to the dock. • Support for VESA 100 x 100, 100 x 50, and 75 x 75. Figure 3 Power Only Dock Setup .
ET80/ET85 Quick Start Guide Vehicle Dock The Vehicle Dock provides: • Power for operating the device. • Charging for the device’s battery and optional Power Pack installed in an Expansion Back. • Ports for connecting USB devices and Ethernet communication. • Barrel lock and two keys to secure the tablet to the dock. • Support for VESA 100 x 100, 100 x 50, and 75 x 75.
ET80/ET85 Quick Start Guide Office Dock The Office Dock provides: • Power for operating the device. • Charging for the device’s battery and optional Power Pack installed in an Expansion Back. • Ports for connecting USB devices, HDMI video output, and Ethernet communication. • Barrel lock and two keys to secure the tablet to the dock. • Desktop mount.
ET80/ET85 Quick Start Guide Powering On the Tablet • Press and hold the Power button for at least one second, then release. Scanning with Internal Imager To read a barcode, a scan-enabled app is required. 1. Ensure that an app is open on the tablet and a text field is in focus (text cursor in text field). 2. Point the scanner exit window at a barcode. 1 3. Press and hold the Scan button (1). The aiming pattern turns on to assist in aiming. 4.
ET80/ET85 Quick Start Guide Using the Camera 1. Ensure the front camera privacy cover (1) or rear camera privacy cover (2) is open. 1 2 2. Open the camera application. The Camera Indicator LED illuminates. 3. Point the camera at an object. 4. Touch the on-screen shutter button to take a photo or record a video.
ET80/ET85 Quick Start Guide Reading NFC Cards The tablet supports reading NFC cards. The NFC antenna is located on the back of the tablet under the NFC logo. With an NFC enabled application open, bring the NFC card toward the antenna. Depending upon the application, an audio or visual indication indicates successful reading of the card.
ET80/ET85 Quick Start Guide Keyboard The ET80/ET85 attachable rugged keyboard is a QWERTY keyboard that provides a multi-color backlight and six programmable keys. Figure 8 ET80/ET85 Keyboard Features 1 2 3 2 1 4 5 6 9 8 7 1 Keyboard latch Attaches the keyboard to the tablet. 2 Keyboard alignment pin Assists in aligning the keyboard with the tablet. 3 Tablet interface connector Provides power and communication from the tablet.
ET80/ET85 Quick Start Guide Attaching the Keyboard 1. Place the keyboard on a flat and level surface. 2. Align the keyboard alignment markings on the tablet and keyboard. 3. Gently press the tablet down onto the keyboard until you hear a click. When the keyboard is correctly installed, the keyboard locking switch automatically clicks into the lock position and the orange indicator is hidden under the switch.
ET80/ET85 Quick Start Guide Removing the Keyboard 1. Place the tablet on a flat and level surface. 2. Ensure the keyboard and tablet are in the open position. 3. Move the keyboard locking switch to the Unlock position. When in the unlock position, the orange indicator is visible to the left of the switch. 4. Lift the tablet from the keyboard.
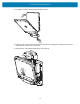
ET80/ET85 Quick Start Guide Expansion Backs The Expansion Backs provide a Power Pack slot for the device and either a hand strap or Smart Card CAC reader. Installing the Expansion Backs 1. Power off the tablet before installing or removing the Expansion Back. 2. Lift the notched corner of the battery cover and carefully lift the battery cover off the device. Store the cover in a safe place. 3. Align the expansion back with the device.
ET80/ET85 Quick Start Guide 4. Using a T6 Torx screwdriver, secure expansion back to device using four screws. Torque to 14 n-cm.
zebra.