Ricoh GXe3300N Sublimation Manual dome Sales: 01332 855 085 gem tec™ Tehcnical Support: 01332 858 333 www.xprestechnical.co.
Index Contents Ricoh GXe3300N Installation P.1 Driver Setup P.6 CorelDRAW Setup (CorelDRAW 10 - X4 & X5) P.10 Working with templates P.18 CorelDRAW tools P.20 CorelDRAW tasks P.22 Troubleshooting / Tips P.
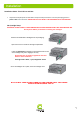
Installation Installation Guide - Ricoh Driver and Inks 1. Unpack and setup the printer as described in the printer setup instructions. Have the printer plugged into a power outlet but not turned on. IMPORTANT: DO NOT INSTALL THE STANDARD RICOH CARTRIDGES. Ink Cartridge Setup CAUTION: DO NOT INSTALL THE STANDARD RICOH INKS BEFORE INSTALLING SUBLIMATION INK. Do not power ON the printer before installing the cartridges. Remove the Sublimation cartridges from the packaging .
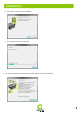
Installation 2. Insert the Ricoh CD into the CD/DVD Rom driver . 3. Select a language for the interface & click OK. 4. Click Quick Install for USB, and then click next. 5.
Installation 8. 6. Click ‘Next’ to confirm the driver installation 7. The installation process will now begin. You will be prompted to turn the printer On to allow detection of the Ricoh GXe3300 .
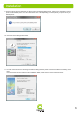
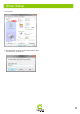
Installation 9. Once the printer has been detected you will be shown the following dialogue box, asking if you would like to set the printer as the default printer. You can select either Yes or No depending on which printer you prefer to be you default printer. 10. Click next in the dialogue box below. 11. You will now be shown the following information stating that the printer has been installed successfully, Click Next.
Installation 12. The system will now install the user manual, and then show the following window to confirm the install is complete.
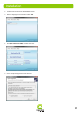
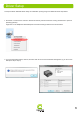
Driver Setup To setup the Ricoh GXe3300 Driver ready for Sublimation printing using Corel Draw follow the steps below: 1. Click Start > Control Panel > Printers / Devices & Printers (’Printers and Faxes’ if using windows XP or previous operating systems). Right click on the GelSprinter GXe3300 option and select Printing Preferences as shown below. 2. If you see the window below, click OK, and then click OK on the second window that appears. (If you do not see this option skip to step 3).
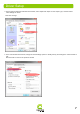
Driver Setup 3. In the Printing Preferences Window shown below, select ‘Inkjet Plain Paper’ for the ‘Paper Type’, and then select ‘User Settings’ as shown. Now click ‘Change’ 4. In the new window shown below, change the ‘User Settings’ option to ‘Quality Priority’ and change the ‘Colour Profile’ to ‘Off’. Now click ‘OK’ to return to the previous window.
Driver Setup 5. Click ‘Save’ 6. Type ‘Subli Print’ under the Custom Setting Name option as shown below, and click OK.
Driver Setup 7. Click ‘OK’ in the Printing Preferences window to confirm all changed settings as shown below.
CorelDRAW 10 - X4 Setup To setup Corel Draw 10 - X4 follow the steps below. 1. Before opening Corel Draw you need to install the Xpres Sublimation Colour Profile, this can be downloaded from www.xprestechnical.co.uk or can be found on the Subli Print CD supplied. Save the Colour Profile on to your Desktop (drag and drop if taking from the supplied CD). Now Right Click the Colour Profile (Subli_Print_GXe3300_V1.
CorelDRAW 10 - X4 Setup 3. Now click Tools > Colour Management, you will see the Colour Management Dialogue Box appear as shown below. Firstly, make sure that the arrows are highlighted as above. To select or deselect an arrow, click directly on the arrow itself. Also select RGB under the ‘Color mode used for effects:’ option.
CorelDRAW 10 - X4 Setup 4. Click on the Import/Export icon to open the window below. Import/Export Icon Select ‘Always Convert Using’ and ‘Always Embed Using’. In both drop down lists select ‘Internal RGB - Fraser (1998)’ as shown. 5. Now click on the ‘Advanced Printer Settings’ to open the window below. Advanced Printer Settings Icon Make sure that ‘Do Not Override’ under Colour Profile is selected next to all printers. 6. Now click on the [+] option to save your settings.
CorelDRAW 10 - X4 Setup 7. When you have your image ready to print, go to File > Print and select the relevant printer (GelSprint GXe3300). Now select the Prepress tab, make sure that the ‘Mirror’ option is ticked as shown below. (Sublimation requires the images to be printed in Mirror). 8. Now select the Misc Tab, make sure the ‘Apply ICC Profile’ option is ticked as shown below. Now click ‘Apply’ to confirm the changes. The system is now ready for printing.
CorelDRAW X5 Setup To setup Corel Draw X5 follow the steps below: 1. Before opening Corel Draw you need to install the Xpres Sublimation Colour Profile, this can be downloaded from www.xprestechnical.co.uk or can be found on the Subli Print CD supplied. Save the Colour Profile on to your Desktop (drag and drop if taking from the supplied CD). Now Right Click the Colour Profile (Subli_Print_GXe3300_V1.02) and select ‘Install Profile’ - There will be no confirmation that the file has been installed.
CorelDRAW X5 Setup 3. Now click on Tools > Colour Management > Default Settings. You will now see the colour management dialogue box appear as shown below: 1 2 3 9 7 8 4 5 Here we will configure Corel's default color space and ICC profiles. The green arrows and numbers correspond to each phase of the setup process which are detailed below. 1. Select 'Adobe RGB (1998)' from 'RGB:' under 'Default color settings:'. 2. Select 'RGB' from 'Primary color mode:' under 'Default color settings:'. 3.
CorelDRAW X5 Setup When your image is ready to print open the print window: File > Print 2 GelSprinter GXe3300 1 1 Select the appropriate printer from the drop down list (Gelsprinter GXe3300N). 2 Select the 'Color' tab. 1 2 3 4 5 6 1 Select 'Print Composite'. 2 Select 'Use document color setting'. 3 Select 'CorelDRAW' from 'Color conversions performed by:'. 4 Select 'RGB' from 'Output colors as:'. 5 Select the ‘Subli_Print_GXe3300_V1.02' profile from 'Correct colors using color profile:'.
CorelDRAW X5 Setup 7. Now select the ‘Prepress’ tab, make sure that the ‘Mirror’ option is ticked as shown below. (Sublimation requires the images to be printed in Mirror). You are now ready to print. Click 'Print’ and Corel will now print your image using the sublimation ICC profile combined with the configured Ricoh Printer Driver. (If you also click the ‘Apply’ button this will store your settings ready for future use).
Working with templates In this section you will learn how to open a sublimation template, import an image and use the power clip tool to fit the image to the template. For this exercise we will use the 9cm² square coaster. If you have had an installation by an Xpres engineer, you will find the templates in a folder on your desktop called 'Xpres'. Otherwise you can either download these from the Technical Support section of our website www.xprestechnical.co.uk.
Working with templates If your image does not fit the power clip correctly first time, right click on the image and choose 'Edit Contents' from the drop down menu (diagram 1). You can also click on Effects > Power Clip > Edit Contents. Drag the image (you will see the image and the template on the screen) until you have it in the right place. You can even re-size the object in the 'Edit' state.
CorelDRAW tools CorelDRAW is an extremely powerful program of which you will probably only need to use half of the tools and features of the program. In this section we will introduce you to the tools in CorelDRAW and what they do and also take you through the most common tasks you will need to complete in CorelDRAW. Below is an image of the toolbox in CorelDRAW with explanations of the tools based on Corel 11.
CorelDRAW tools The Pick Tool This is the main tool that you will use in CorelDRAW, it is used for manipulating anything onscreen in the main window and also for selecting and using any of the other tools, holding the left mouse button and dragging a box will select anything within the area that you drag over, clicking an object onscreen with a single left mouse button click will select individual objects.
CorelDRAW tasks Grouping & Ungrouping CorelDRAW allows objects to be grouped with other objects, this means that when one object is moved or resized, other objects grouped with it will also have the same action applied to them. To group objects, use the pick tool to select the objects and either go to your arrange menu, then select ‘Group’ or click on the short cut button in the menu bar labelled ‘Group’. To Ungroup use the same actions but select ‘Ungroup’ from the menus.
Troubleshooting / Tips Useful CorelDRAW tips To ensure CorelDRAW performs at it's best, click on Tools > Options, click on 'snap to objects' and un-tick the 'snap to objects on (ALT+Z)'. Now click on the + next to 'Text' and click on 'Quick correct'. Un-tick all five boxes. Depending on your system memory you can increase the memory usage available to CorelDRAW (default 25%). If CorelDRAW is sluggish and running out of memory try increasing this (10% increments recommended).