
User's Manual


Document MV0319P.N
© Xsens Technologies B.V.
MVN User Manual
129
20 Contact point editing examples
The following section illustrates how to use the contact editing toolbar.
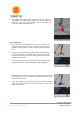
20.1.1 Example 1
In the originally recorded MVN file, a contact on the mid foot has been
wrongly detected. The result is an unlikely position of the foot segment
with respect to the lower leg and a discontinuity in the position of the total
character. Removing this contact will improve the data.
Click on the foot segment. Step forwards and backwards in time to
identify the wrongly detected or missing contacts.
Select the identified time frames by clicking the left mouse button.
The selected frames will be highlighted. By manually defining a
contact point, all other contact points of that frame will be removed
including contact points of segments other than selected.
To add contact points without removing existing points, hold the shift
button when the releasing the mouse button. This option should not
be used excessively, but maybe useful to optimize discrepancies
when two segments make contact at the same time frame.
If a wrong frame or contact point is selected, you can undo this by a
click on the right mouse button and select ‘Remove user-defined’.
To remove all contact points such that no segment has contact, click
and drag the right mouse button on the desired frames and select
‘Force no detection’. The contact bar will then show a black band.