
User's Manual


Document MV0319P.N
© Xsens Technologies B.V.
MVN User Manual
131
21 Working with different applications
21.1.1 Autodesk 3ds Max
In 3ds Max, a Biped system provides direct input of BVH files, including key-
frame reduction and footstep extraction. Choose the 3ds Max output format
when exporting to BVH. The exporter will apply a neutral pose hierarchy
instead of the T-pose hierarchy. The neutral pose for the Biped places the
figure upright along the +Z axis, facing forward along the -Y axis, left hand on
the +X axis. Hands are oriented with palms against the outside thighs, with
thumbs to the front side; fingers and thumb of each hand outstretched (open)
facing down along the -Z axis. Legs are together and straight at the knees.
When all joint rotation values are set to zero for the first frame of the BVH file,
the results displayed at frame zero in Biped should match the default position
of the Biped exactly.
A Biped has built-in anthropomorphic constraints which require that elbows and
knees are one degree-of-freedom hinge joints. The axis of rotation of the hinge
should ideally always be perpendicular to the arm's shoulder-elbow-wrist
triangle and the leg's hip-knee-ankle triangle. If the hinge joint constraint is
violated, biped’s converter must decide whether to satisfy the orientation data
or satisfy the elbow/knee positioning based solely on the point locations.
In the Conversion Parameters Dialogue Box, if the ‘Angle’ radio button is selected (recommended), the
limb's triangle attempts to match the hinge to the Euler matrix axes. This may deviate from the position
posture. If the ‘Point’ radio button is selected, the limb's triangle matches the positions of the actual
points. This may deviate from the specified Euler angles. However, in both cases, the limb always moves
to hit the IK position of the wrist or ankle, so if Euler angles are given that are not aligned with the natural
hinge joint, the axis is projected to the nearest axis that satisfies the wrist/ankle IK constraint (that is,
one axis must be normal to the line joining the arm's shoulder-wrist or the leg's hip-ankle).
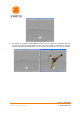
21.1.2 Autodesk MotionBuilder
Autodesk MotionBuilder is a powerful animation package which features many tools for forward and
inverse kinematic manipulation and retargeting. Use the following steps to drive your model in
MotionBuilder.
1. Import the BVH motion file into the MotionBuilder.
2. On the first frame of the motion set the BVH skeleton reference into the T-Pose.
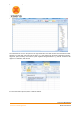
3. Characterize the BVH skeleton with the MVN character template.
The MVN character template ‘MVN BVH Character.fbx’ can be found in the folder:
%AppData%\Xsens\External\MotionBuilder\Templates\MVN.
4. Import the character model you want to animate.
5. In the control rig of the imported model choose as input ‘Character Input’ (MVN BVH).
6. Play the animation and plot to character.
Poser 6
Choose the Poser BVH exporter format when exporting to BVH. The exporter will rename certain labels
and combine the chest channels since Poser can only handle 1 abdomen and 1 chest channel. Load
the model you want to animate into Poser. Import BVH data and choose the options arms aligned with
X-axis, and Scale Automatically.