
User's Manual


Document MV0319P.N
© Xsens Technologies B.V.
MVN User Manual
143
23.3.1 Settings in MVN Studio
Once the spanner has been clicked, a new menu appears:
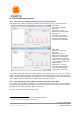
Figure 70: Sync settings window in MVN Studio
To add a synchronization type, click “Add”, all settings become available, to be set manually or using
the drop down menus.
Note that the Awinda/Sync Station can accept both rising and falling edges. The Pulse Polarity should
be chosen depending on the requirements of the third party device. Also, check with third party systems
what the threshold of the Pulse Width must be before entering a pulse width. Some example settings
are provided in Section 23.7.
When all desired parameters have been set, click “OK”. This closes the sync settings window. Now in
the Session Configuration interface, the number of settings is displayed, indicating to the user that sync
is set and if the system is enabled, sync will be enforced. Below shows the result when start and stop
recording on line Sync In 1 have been set.
This is an important point to note: The Configured Sync Settings are saved in the configured system.
Therefore when a given configuration is enabled the sync settings of this enabled configuration are used.
23.4 Important Notices for Sync In
When the Awinda Station is configured to start recording upon receipt of a trigger, it initializes recording
at the start of the following frame. The Awinda Station cannot trigger a start recording command between