SB4.
Table Of Contents Product Registration 1 Important Safety Instructions 2 Important Electrical Instructions 3 Important Operation Instructions 3 Features 3 SB4.5r Assembly Instructions 7 Operation of Your Console 11 General Maintenance 20 Manufacturer’s Limited Warranty 21 ATTENTION THIS FITNESS BIKE IS INTENDED FOR RESIDENTIAL USE ONLY AND IS WARRANTED FOR THIS APPLICATION. ANY OTHER APPLICATION VOIDS THIS WARRANTY IN ITS ENTIRETY.
Congratulations On Your New Fitness Bike and Welcome to the XTERRA Fitness Family! Thank you for your purchase of this quality fitness bike from XTERRA Fitness. Your new fitness bike has been manufactured by one of the leading fitness manufacturers in the world. XTERRA Fitness will do all we can to make your ownership experience as pleasant as possible for many years to come. If you have questions, or if parts are missing or damaged, or you require customer service, call (870)336-4286.
Important Safety Instructions When using an electrical appliance, basic precautions should always be followed, including the following: Read all instructions before using this appliance. DANGER - To reduce the risk of electric shock: 1. Always unplug this appliance from the electrical outlet immediately after using and before cleaning. WARNING - To reduce the risk of burns, fire electric shock, or injury to persons: 1. An appliance should never be left unattended when plugged in.
Important Electrical Instructions WARNING! • NEVER remove any cover without first disconnecting AC power supply. • If A.C. voltage varies by ten percent (10%) or more, the performance of your fitness bike may be affected. Such conditions are not covered under your warranty. If you suspect the voltage is low, contact your local power company or a licensed electrician for proper testing. • NEVER expose this fitness bike to rain or moisture.
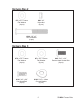
SB4.5r Assembly Pack Checklist Hardware Step 1 #70. 5/16” x 18mm Flat Washer (6 pcs) #90. 5/16” x 1-1/4” Hex Head Bolt (4 pcs) #73. 5/16” Split Washer (6 pcs) #95. 5/16” x 3/4” Button Head Socket Bolt (6 pcs) #96. 3/8” x 3-1/2” Carriage Bolt (2 pcs) #98. 3/8” Cap Nut (2 pcs) SB4.5r Fitness Bike #81. M5 x 12mm Phillips Head Screw (4 pcs) #97. 3/8” x 23mm Curved Washer (2 pcs) #99.
Hardware Step 2 #80. 3/8” Nyloc Nut (4 pcs) #71. 3/8” x 19mm Flat Washer (4 pcs) #100. 3/8” x 3” Hex Head Bolt (4 pcs) Hardware Step 3 #70. 5/16” x 18mm Flat Washer (4 pcs) #71. 3/8” x 19mm Flat Washer (6 pcs) #101. 3/8” x 3/4” Hex Head Bolt (6 pcs) #102. 5/16” x 19mm Curved Washer (2 pcs) 5 #95. 5/16” x 3/4” Button Head Socket Bolt (6 pcs) SB4.
Hardware Step 4 #70. 5/16” x 18mm Flat Washer (2 pcs) #73. 5/16” Split Washer (2 pcs) #95. 5/16” x 3/4” Button Head Socket Bolt (2 pcs) #81. M5 x 12mm Phillips Head Screw (4 pcs) Assembly Tools #103. 12/14mm Wrench #104. 14/15mm Wrench #106. M5 L Allen Wrench #105. Phillips Head Screwdriver SB4.
SB4.5r Assembly Instructions 1 Seat Assembly & Rear Stabilizer Hardware Step 1 #70. 5/16” x 18mm Flat Washer (6 pcs) #73. 5/16” Split Washer (6 pcs) #81. M5 x 12mm Phillips Head Screw (4 pcs) #90. 5/16” x 1-1/4” Hex Head Bolt (4 pcs) #95. 5/16” x 3/4” Button Head Socket Bolt (6 pcs) #96. 3/8” x 3-1/2” Carriage Bolt (2 pcs) #97. 3/8” x 23mm Curved Washer (2 pcs) #98. 3/8” Cap Nut (2 pcs) #99. M6 x 15mm Phillips Head Screw (4 pcs) 1.
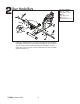
2 Rear Handle Bars Hardware Step 2 #71. 3/8” x 19mm Flat Washer (4 pcs) #80. 3/8” Nyloc Nut (4 pcs) #100. 3/8” x 3” Hex Head Bolt (4 pcs) 1. Install the Handlebars (6 & 7) to the Seat Carriage with four Hex Head Bolts (100), Flat Washers (71) and Nyloc Nuts (80). Be careful that the wires do not get pinched while assembling the handlebars. Connect Cable (111) to the Front Port on the left side below the seat, and Cable (112) to the Rear Port. SB4.
3 Console Mast & Seat Back Hardware Step 3 #70. 5/16” x 18mm Flat Washer (4 pcs) #71. 3/8” x 19mm Flat Washer (6 pcs) #95. 5/16” x 3/4” Button Head Socket Bolt (6 pcs) #101. 3/8” x 3/4” Hex Head Bolt (6 pcs) #102. 5/16” x 19mm Curved Washer (2 pcs) 1. Secure the Seat Back Assembly (5) to the Seat Carriage with six Hex Head Bolts (101) and Flat Washers (71). Make sure these bolts are very tight. 2. Run the two wires (107 & 109) through the bottom of the Console Mast and out the hole at the top.
4 Console, Handle Bars & Pedals 1. Cut the plastic tie that holds the plastic cover on the handlebars. Remove the plastic cover and set it aside. Install the Front Handlebars (3) and secure with two Button Head Socket Bolts (95), Split Washers (73) and Flat Washers (70). Snap the plastic cover back on. 2. Connect the two wires (107 & 109) to the mating connectors on the back of the Console (94) and secure the Console with four Phillips Head Screws (81).
Operation of Your Console SB4.5r Console Power Up The SB4.5r fitness bike is supplied with an external power supply. When power is connected to the fitness bike, the console will automatically power up. If there is no input to the console for 30 minutes, the console will go to stand-by mode to save energy. To turn the console on press any key. When initially powered on the console will perform an internal self-test. During this time all the lights will turn on.
Console Operation Quick Start Mode This is the quickest way to start a workout. After the console powers up you just press the Start key to begin. In Quick Start the Time will count up from zero and the workload may be adjusted manually by pressing the Up or Down keys. The dot matrix display will show a work profile with a ¼ mile track around it and a lap counter to the left. Pressing the Enter key will switch the display from track to a hill type profile.
Programming The Console Each of the programs can be customized with your personal information and changed to suit your needs. Some of the information asked for during programming is necessary to ensure the readouts are correct. You will be asked for your age and weight. Entering your age is necessary during the Heart Rate Program to ensure the correct settings are entered in the program.
Manual Program The Manual program works as the name implies, manually. This means that you control the workload yourself and not the computer. 1. Press the Manual program button then press the Enter key. 2. The message window will ask you to enter your Weight. You may adjust the weight setting using the Level Up/Down keys, then press Enter to continue. 3. The message window will ask you to enter your Age.
Preset Programs The SB4.5r has seven different programs that have been designed to provide a variety of workouts.These seven programs have factory preset profiles for achieving different goals. P-1 Sunrise The Sunrise program simulates going up and down a gentle hill early in the morning. The resistance in the pedals will steadily increase and then decrease during the program. RESISTANCE P-2 Journey The Journey program is designed to maximize the burning of fat, a lifelong journey for some of us.
P-4 Xtreme The Xtreme program is designed to increase muscular strength in your lower body with extreme resistance. This program will steadily increase in resistance to a high level and then keeps you there. This is designed to strengthen and tone your legs and glutes. RESISTANCE P-5 Canyons The Canyons program takes you through high levels of intensity followed by periods of low intensity.
User Programs The User Programs allow you to build and save your own workout. You can build your own custom program by following the instructions below. 1. Select the User Program (User 1 or User 2) also then press Enter. The message will ask “Run Program?” if there is already a program stored. Press Enter or Start to begin stored program or Level Up/Down key to select “No”. If No is selected, you have the option to cancel the stored program.
Heart Rate The old motto, “no pain, no gain”, is a myth that has been overpowered by the benefits of exercising comfortably. A great deal of this success has been promoted by the use of heart rate monitors. With the proper use of a heart rate monitor, many people find that their usual choice of exercise intensity was either too high or too low and exercise is much more enjoyable by maintaining their heart rate in the desired benefit range.
Rate of Perceived Exertion Heart rate is important but listening to your body also has a lot of advantages. There are more variables involved in how hard you should workout than just heart rate. Your stress level, physical health, emotional health, temperature, humidity, the time of day, the last time you ate and what you ate, all contribute to the intensity at which you should workout. If you listen to your body, it will tell you all of these things.
General Maintenance 1. Wipe down all areas in the sweat path with a damp cloth after each workout. 2. If a thump, clicking or wobbly feeling develops, the main cause is usually the pedals and/or crank arms being loose. Engineering Mode The console has built in maintenance/diagnostic software. The software will allow you to changes to the console settings such as changing units from English to Metric and turn off the beeping of the speaker when a key is pressed.
Manufacturer’s Limited Warranty Effective August 1, 2012 - FITNESS BIKE LIMITED WARRANTY XTERRA Fitness Inc. warrants all its home use fitness bike parts for a period of time listed below, from the date of retail sale, as determined by a sales receipt or in the absence of a sales receipt, eighteen (18) months from the original factory shipping date.
3000 Nestle Road Jonesboro, AR 72401 www.xterrafitness.com - Phone:870-336-4286 ©2012 All RIghts Reserved. - Fax:870-935-7611 SB4.