
Installation Instructions

2
ASSEMBLY AND OPERATING INSTRUCTIONS
CAUTION:
Read and follow all instructions before operating fan.
Do not use fan if any part is damaged or missing.
WARNING:
To reduce the risk of fire or electrical shock, do not use this fan with any solid state speed control device.
This appliance has a 3-prong plug. To reduce the risk of electrical shock, this plug is intended to fit in an outlet only
one way. If this does not fit the outlet, contact a qualified electrician. Do not attempt to bypass this procedure.
RULES FOR SAFE OPERATION:
z Do not insert fingers or any other objects through the grill guard when fan is in operation.
z Disconnect the fan when moving from one location to another.
z Disconnect the fan when removing guards for cleaning.
z Make sure fan is on a stable, flat surface when in operation.
z Do not use fan in windows. Rain and moisture may create the electrical hazard.
z Do not alter the Fan’s assembly.
z Be sure FRONT and REAR GUARD are completely in locking position before operation.
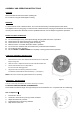
TUBE BASE ASSEMBLY INSTRUCTIONS
1. Remove the two screws, lock washers and flat washers from V shape tube,
keep for using later.
2. Slide one end of V shape tube to the end of fan tube with smaller hole.
3. Second, slide another end of V shape tube to
the end of fan tube with bigger hole.
4. Align these holes, and Securing with the two Screws,
lock washers and flat washers removed at Step. 1. ( See figure 1)
NOTE: The screws must be fully tightened before the fan operating.
OPERATING INSTRUCTIONS
This fan comes fully assembled. No further assembly is needed.
TO ADJUST AIRFLOW UPWARD OR DOWNWARD:
Tilt fan head to the desired angle. The high velocity fan can be used alone or in conjunction with air conditioning.
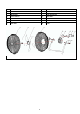
How To Adjust Tilt
1. Insert knob to tilt nut.
2. Use knob to loose tilt nut by turning counter-clockwise.
3. Adjust fan head to tile you want.
4. Tightened the tilt nut by turning clockwise.
5. Keep knob for future use.
Tilt Nut
Kno
Figure. 1