
User manual


www.XtremeAirUsa.com PAGE 6
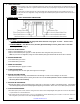
STEP 7B: SECURE THE HOOD TO WALL
Use stud finder to find the stud and use 1/8” drill bit to drill though the back of the hood.
Secure the hood by using 1 7/8” provided screws though the back of the hood to the studs.
.
STEP 7A: SECURE THE HOOD TO BOTTOM CABINET
D09 model: please skip this step if you don’t have cabinet above the hood.
10. Secure the hood by using 1 7/8” provided screws through the back
of hood to the studs (use stub finder to find the stud. Figure 7
CAUTION: Make certain the range hood is secure before releasing!
11. Connect the exhaust on the hood to the ductwork above. Use
aluminum tape to make all joints secure and all tight
Step 10: Install baffle filters
Install baffle filters; refer to picture at left for the following three steps:
1.Angle baffle filter toward back of hood.
2.Lift a baffle filter up above horizontal level.
3.Slide forward into slot behind the front of hood.
4.Slide the installed baffle filter to either left or right until it stops.
5.Repeat step 1 to 4 to install the next ones, make sure you slide to opposite direction from
the previous installed filter.
To remove the baffle, please reverse the process.
NOTE: The middle filter has to be installed last where it should be taken out first when you
want to remove other filters.
STEP 9: INSTALL OIL TUNNEL OR OIL CONTAINER (NOT AVAILABLE FOR ALL MODELS)
Drop oil tunnel into recess support near rear of hood. Refer to the left picture
Oil Tunnel
Side View
Baffle Installation Side View
STEP 8: CONNECT DUCTWORK
Connect the exhaust on the hood to the ductwork. Wrap with aluminum tape to make all joints
secure and tight.
From inside of the hood, use “hex bit extension”
place 1 ¼” provided screw into each key hole (A) OR
predrilled-holes (B) and secure to cabinet bottom.
There are 8 holes (4 keyholes & 4 predrilled-holes)
available. You can use either key or predrilled-hole
as long as a minimum of 1 screw at each corner of
hood body.