Page 1 INSTALLATION GUIDE & USER’S MANUAL For Under Cabinet Mount Range Hoods Customer Support Info: Tel: 714.554.9000 Email: Support@XtremeAirUsa.com Website: www.XtremeAirUsa.com www.XtremeAirUsa.
Page 2 TABLE OF CONTENTS 1 IMPORTANT SAFETY INSTRUCTIONS ........................................................................................................................ 2 2 MOUNTING HEIGHT ................................................................................................................................................ . 3 3 VENTING REQUIREMENTS ........................................................................................................................................
Page 3 2. MOUNTING HEIGHT FOR THE MOST EFFICIENT & QUIET OPERTION: A distance of 26” to 30” is recommended between stove top and the bottom of range hood. If the hood is mounted too low this could result in heat and/or fire hazard. If the hood is mounted too high the controls will be hard to reach, and the hood will lose its performance and efficiency. 3. VENTING REQUIREMENTS: It is recommended that the range hood be vented vertically through the roof with a minimum of 6” or larger vent work.
Page 4 5. ELECTRICAL REQUIREMENTS: IMPORTANT: Observe all governing building codes and city ordinances. A 120 volt, 60 Hz. AC, 15-amp outlet is needed (fused electrical circuit is required) It is the customer’s responsibility to contact a qualified electrical installer, and assure that the electrical installation is adequate and in conformance with National Electrical Code, ANSI/ NFPA 70 — latest edition, or CSA Standards C22. 1-94, Canadian Electrical Code, Part 1 and C22. 2 No.
Page 5 8. INSTALLATION NOTE: DO NOT TRY TO REMOVE BLOWER OR ITS HOUSING. YOU WILL BE UNABLE TO PUT IT BACK IN. MORE IMPORTANTLY, THE WARRANTY WILL BE VOIDED. STEP 1: PROTECT THE COOK TOP Put a thick, protective covering over counter top, cook top or range to protect from damage or dirt. STEP 2: CREAT WORK STATION (OPTIONAL ONLY) Have 2 pieces of wood about 2” x 4” x 20” on both sides of stove & a plywood plank on top of them to protect cook top or stove from damage or dirt.
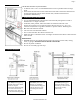
Page 6 STEP 7A: SECURE THE HOOD TO BOTTOM CABINET D09 model: please skip this step if you don’t have cabinet above the hood. From inside of the hood, using the hex bit extension, place one 1 ¼” screw (provided) into each key hole or pre-drilled holes (fig. A) secure to cabinet bottom. Make sure there is at least 1 screw at each corner of hood body INSIDE HOOD VIEW TOP VIEW STEP 7B: SECURE THE HOOD TO WALL Use stud finder to find the stud and use 1/8” drill bit to drill though the back of the hood.
Page 7 9. RANGE HOOD OPERATION For TOUCH SENSITIVE CONTROLS, please DO NOT PRESS. for a matter of one second is all that is needed. TOUCH THE ENTIRE BUTTION: See illustration on right For best result, start the range hood before cooking and allow it to operate several minutes after the cooking is completed to clear all smoke and odors from the kitchen A light touch and hold on the required button CORRECT INCORRECT T VS .
Page 8 5. Touch power-off delay button again to clear the screen. Touch light button to validate. To check time, touch light button. E. REMOTE CONTROL SENSOR: 1. Remote control sensor receives infrared (IR) signal from the remote control. The maximum distance for IR data transmission is 10Feet and requires direct line of sight. The transmission distance may vary depending on temperature and remote control battey condition. 2.
Page 9 3. TYPE 3: MECHANICAL BUTTON CONTROL A. Activating Blower Function: Press your desired speed (1, 2, 3) B. Turn off power: While the blower (motor) is running, press button (0) to turn off the motors. C.To turn the light ON/OFF While the light is off, press button (4) once to turn on the light. Press button (4) again to turn the light off 4. FOR DL09 Model: TYPE 4: ELECTRONIC BUTTON CONTROL A. Activating Blower Function: Press (0) once (flashing) Press your desired speed (1, 2, 3, 4) B.
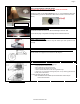
Page 10 10. HOW TO CHANCE OR REPLACE LIGHT BULB TYPE 1: GU10 BASE TYPE LIGHT BULB: A. Make sure the range hoods i s u n p l u g g e d , o r t u r n OFF breaker. B. Slightly press inward on the GU10 bulb using both thumbs C. Keep your grip & pressure constant on the bulb with the thumbs as you turn the bulb counter-clockwise. Stop pushing it inward once you feels it won’t turn further (it should take about 90 degrees) D. Pull the bulb straight out of the socket E.
Page 11 12. USE & CARE INFORMATION: Operations: Read and understand all instructions and warnings in this manual before operating the appliance. Save these instructions for future reference. Always leave safety grills and filters in place. Without these components, operating blowers could catch on to hair, fingers and loose clothing. NEVER dispose cigarette ashes, ignitable substances, or any foreign objects into blowers. NEVER leave cooking unattended.
Page 12 . 16. LIMITED WARRANTY www.XtremeAirUsa.