INSTALLATION GUIDE & USER’S MANUAL PRO-X & ULTRA SERIES Under Cabinet Range Hood IMPORTANT: READ AND SAVE THESE INSTRUCTIONS FOR RESIDENTIAL & INDOOR USE ONLY www.XtremeAirUsa.
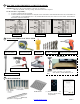
TABLE OF CONTENTS 1 IMPORTANT SAFETY INSTRUCTIONS ..2-3 2 HEIGHT & CLEARANCE REQUIREMENT .. 4 3 VENTING REQUIREMENT . . 4 4 VENTING METHODS 4 5 ELECTRICAL REQUIREMENT & CIRCUIT DIAGRAM . .5 6 TOOL & MATERIAL YOU WILL NEED.. ..5 7 PART SUPPLIED . .5 8 RANGE HOOD DIMENSIONS ... .
IMPORTANT SAFETY INSTRUCTIONS-continue WARNING - TO REDUCE THE RISK OF FIRE, ELECTRIC SHOCK, OR INJURY TO PERSONS, OBSERVE THE FOLLOWING: Use this unit only in the manner intended by the manufacturer. If you have questions, contact the manufacturer PRODUCT: Do not remove permanently affixed labels, warnings, or plates from the product. This may void the warranty.
02 HEIGHT & CLEARANCE 03 VENTING REQUIREMENT IMPORTANT: • NEVER exhaust air or terminate duct work into spaces between walls, crawl spaces, ceiling, attics or garages. All exhaust must be ducted to the outside. • Hood mounted too low could result in heat damage and fire hazard; while hoods mounted too high will be hard to reach and will loose its performance and efficiency. • Use metal duct work only. Rigid metal vent is recommended.
05 ELECTRICAL REQUIREMENTS & CIRCUIT DIAGRAM: IMPORTANT: Observe all governing building codes and city ordinances. ■ A 120 volt, 60 Hz., AC only, 15-amp, fused electrical circuit is required. It is the customer’s responsibility: • To contact a qualified electrical installer. • To assure that the electrical installation is adequate and in conformance with National Electrical Code, ANSI/ NFPA 70 — latest edition*, or CSA Standards C22. 1-94, Canadian Electrical Code, Part 1 and C22. 2 No.
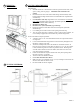
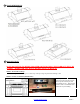
08 HOOD DIMENSIONS: 09 INSTALLATION NOTE: DO NOT TRY TO REMOVE BLOWER OR ITS HOUSING, THE WARRANTY WILL BE VOIDED. MOREOVER, YOU WON’T BE ABLE TO PUT IT BACK IN. STEP 1: Protect the cook top •Put a thick, protective covering over counter top, cook top or range to protect from damage or dirt. STEP 2: Create work station (OPTIONAL) Have 2 pieces 2” x 4” x 20” on both sides of stove & plywood on top of them to protect cook top or stove from damage or dirt.
Step 3: Prepare ductwork & single outlet Make sure you have a 15amp, 120V, 60Hz, single outlet on the left or right of the duct pipe (usually is on ¼ of cabinet width).
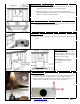
Step 7: Secure the hood-continue Secure the hood by using 1 7/8” provided screws though the back of the hood to the studs (use stud finder to find the stud and use 1/8” drill bit to drill though the back of the hood) CAUTION: Make certain the range hood is secure before releasing! Step 8: Connect ductwork •Connect the exhaust on the hood to the ductwork about. Use aluminum tape to make all joints secure and tight.
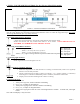
1. TYPE 1: TOUCH SCREEN CONTROL (For Pro-X Series PX10, PX12-models) Note: This range hood is equipped with remote control and smoke sensor that will self-calibrate within 5 seconds when the range hood is first electrically activated. Self-calibration will be set when the range hood beeps. LCD panel will turn off automatically after a period of inactivity. A.
F. Remote Control Sensor: Remote control sensor receives infrared (IR) signal from the remote control. The maximum distance for IR data transmission is 3 meter and requires direct line of sight. The transmission distance may vary depending on temperature and remote control battery condition. Light settings are independent from other settings (including power-off delay) and lights have to be manually turned on or off.
E. Adjusting the timer function: 1. While the blower (motor) is not running, touch and hold Decrease Value button over 3 seconds to enter timer mode. 2. Adjust to desired period of delay off timer by touching Increase Value or Decrease Value button (minimum 1 minute to maximum 15 minutes). This setting will be saved immediately. F. Activating the timer function: * While the blower (motor) is running, touch and hold Power button for over 3 seconds to activate delay off timer.
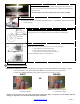
REPLACING THE LIGHT BULB 1. Make sure the range hood is unplugged or turn OFF breaker. 2. Use the small flat crew driver to lift any where around the outsider ring as show in below picture Arrow. 3. Install new light bulb 4. Put back the light set by press it in. 5. Turn ON breaker and range hood to test for operation. Note: you can pop out the light by pressing behind light fixture. 13 TROUBLE SHOOTING 1.
14 USE & CARE INFORMATION: Operations: • Read and understand all instructions and warnings in this manual before operating the appliance. Save these instructions for future reference. • Always leave safety grills and filters in place. Without these components, operating blowers could catch on to • hair, fingers and loose clothing. • NEVER dispose cigarette ashes, ignitable substances, or any foreign objects into blowers. • NEVER leave cooking unattended.
www.XtremeAirUsa.