
Use and Care Manual


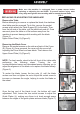

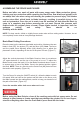


Table Of Contents

REPLACING OR ADJUSTING THE SAW BLADE
Make sure the machine is unplugged from a power source before
replacing or adjusting the saw blade. To prevent serious injury, wear
heavy-duty work gloves when working with or around the saw blade.
FIG 6
FIG 3
FIG 4
FIG 5
FIG 7
Remove the Table
Before attempting to remove or replace the blade, the stainless
steel table must be removed. To do this, remove the socket
screws which attach the Table Support (D) to the table. Then,
from the left side of the table, pull the table back and off. Once
removed, place the table on a flat surface away from the
machine to prevent damage while working with the blade.
(Figure 3)
Upper Guard Plate (G) (Figure 5).
Removing the Blade Cover
Remove the socket screws on the side and back of the Cover
(E) (Figure 4). Once removed, the cover will slip up and off,
exposing the Drive Wheel and saw blade.
Then remove the
Upper Guard Plate (G) (Figure 5).
NOTE: For best results, stand to the left front of the table while
performing the following steps. Turning the nut
counterclockwise lowers and decreases tension allowing you to
adjust the alignment of the blade or to replace the blade entirely.
(Figure 6)
To center the blade, loosen the two nuts (J) until the blade
centers and then re tighten the nuts. Adjust the socket screw to
increase or decrease the angle, helping to center the blade on
the wheel.
Once the top part of the blade is set, the bottom will need
adjustment. First, loosen the two socket screws to adjust the
Guide Plates (L), making sure there is at least enough space
between the edges of the guide plates and saw blade (Figure 7)