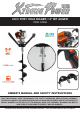
43CC POST HOLE DIGGER + 8” BIT AUGER ITEM: 81094 OWNER’S MANUAL AND SAFETY INSTRUCTIONS SAVE THIS MANUAL: KEEP THIS MANUAL FOR SAFETY WARNINGS, PRECAUTIONS, ASSEMBLY, OPERATING, INSPECTION, MAINTENANCE AND CLEANING PROCEDURES.
IMPORTANT SAFETY INFORMATION GENERAL SAFETY WARNINGS Read all safety warnings and instructions. Failure to follow the warnings and instructions may result in electric shock, fire and/or serious injury. Save all warnings and instructions for future reference. SAFETY The warnings, precautions, and instructions discussed in this instruction manual cannot cover all possible conditions and situations that may occur.
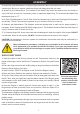
IMPORTANT SAFETY INFORMATION DO NOT use the Auger if the Bit is dull, bent, or damaged. Drill with the Engine running at full speed. Fully squeeze the Throttle to maintain a steady drilling speed. When shutting off the Engine, make sure the Auger has stopped before setting the tool down. Fire Hazard! DO NOT fill fuel tank while engine is running. DO NOT operate if gasoline has been spilled. Clean spilled gasoline before starting engine. DO NOT operate near pilot light or open flame.
IMPORTANT SAFETY INFORMATION CARBON MONOXIDE PRECAUTIONS This Auger Drill is designed for outdoor use only. DO NOT operate this drill in indoor, closed or poorly ventilated areas. When running, the engine of this product produces carbon monoxide, a colorless and odorless toxic gas that, when inhaled, can cause serious personal injury or death. FIRE AND EXPLOSION PRECAUTIONS Gasoline fuel and fumes are flammable and potentially explosive. Use proper fuel storage and handling procedures.
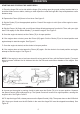
OPERATION PRE-START INSTRUCTIONS 1. Fill the fuel tank: To obtain the proper 25:1 fuel mix, combine 25 parts unleaded gasoline (89+ octane) with 1 part 2-cycle oil in the provide Fuel Mix Container (36a). Cover and shake to thoroughly mix before each fueling. NOTE: Mix only enough fuel for a few days work. The maximum storage time of mixed fuel is three months. 2. Once the proper fuel mix is obtained, removed the Fuel Cap (93). Fill the Fuel Tank (89) approximately ¾ full with the fuel mix.
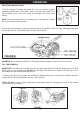
OPERATION STARTING AND STOPPING THE AUGER DRILL 1. Place the Auger Drill on its side with the Auger (33a) resting upon the ground surface location that is to be drilled. Make sure no debris, clothing or other objects ore near the Auger Bit. Keep all bystanders a safe distance away. 2. Depress the Primer (95) three to four times. See figure C. 3. Set the Choke (76) to the appropriate position: Closed if the engine is cold. Open of the engine is warm. See Figure C. 4.
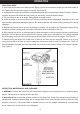
OPERATION DRILLING A HOLE 1. Stand with a solid stance on stable ground. Brace yourself and maintain a proper grip with both hands on the Frame (1b) whenever the engine is running. See Figure E. 2. Accelerate the engine to full throttle just before starting to drill by squeezing the Speed Control (10b) Also, keep the engine at full throttle the entire time you are drilling, unless a problem arises. 3. Do not attempt to drill at an angle. Always Keep the Auger vertical . 4.
ASSEMBLY 3. Auger Drill (33a) Maintenance: Using the Auger while that is bent or filled with excessive debris can cause serious injury. Be sure to replace a defective Auger and always keep the unit clean. 4. Spark Pug (51) Maintenance: The condition of the Spark Plug should be checked ever six months or every 100 hours of total use. If necessary, clean or replace the Spark Plug. The recommended Spark Plug replacement type is: L7T 5.
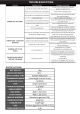
TROUBLESHOOTING SPECIFICATIONS 8
PARTS DIAGRAM 9
PARTS LIST 10
TROUBLESHOOTING PLEASE READ THE FOLLOWING CAREFULLY THE MANUFACTURER AND/OR DISTRIBUTOR HAS PROVIDED THE PARTS LIST AND ASSEMBLY DIAGRAM IN THIS MANUAL AS A REFERENCE TOOL ONLY. NEITHER THE MANUFACTURER OR DISTRIBUTOR MAKES ANY REPRESENTATION OR WARRANTY OF ANY KIND TO THE BUYER THAT HE OR SHE IS QUALIFIED TO MAKE ANY REPAIRS TO THE PRODUCT, OR THAT HE OR SHE IS QUALIFIED TO REPLACE ANY PARTS OF THE PRODUCT.