30 IN.
SAFETY INFORMATION WARNING 1. Read and save these instructions. Do not operate fan unless you have read these instructions. 2. Unplug the fan before moving it or performing maintenance. Do not touch the fan when your hands are wet. 3. Those who are not qualified electricians should not disassemble, repair or rebuild the fan. 4. Unplug the fan when it is not in use. 5. DO NOT unplug the fan by pulling the cable cord. Unplug by holding the plug and pulling. 6.
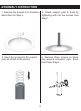
ASSEMBLY INSTRUCTION 1. Remove the screws from the base. Save them for Step 2. 2. Attach support post to base by tightening with the five screws from Step 1. 3. Insert the spring into the support post as shown in the picture. 4. Remove three screws on black ring around extension pipe. Save them from Step 5.
ASSEMBLY INSTRUCTION (CONTINUED) 5. Insert extension pipe into support post. Fix black ring onto support by tightening back three screws from Step 4. Adjust extensoin pipe to your desired height and secure it by tighttening back the height adjustment knob. CAUTION: To avoid injury and prevent from cutting, never put your head over the extension pipe during or before the extension pipe was secured onto the support post tightly. 6.
ASSEMBLY INSTRUCTION 9. Remove two screws from fan blade. 10. Assemble fan blade onto motor Save them for Step 10. shaft by tightening two screws. Make sure each screw is tightly secured. 12. Secure the assembly of front guard and rear guard by tightening a screw and nut on the bottom and position of them. 11. Assemble front guard to rear guard by fixing both guards together with clips on the rim of front guard.
OPERATION INSTRUCTION 1. Place the fan on a safe, flat surface where it can not fall or be pulled by the cord. 2. Adjust the desired speed (Stop - Low- Medium - High). by pulling the chain switch CARE AND CLEANING Unplug the appliance before cleaning. Do not use water for cleaning metal surfaces. Slightly moisten a cloth and wipe off the surfaces of the fan. In order to remove dust from the grill, use a vacuum cleaner or remove the front grill by removing the securing screws on the edge of the grill.
IO PRODUCT MADE IN CHINA 5