
User's Manual

4
4. In the absence of signals, the product will be in after 8 seconds to enter standby state.
5. Small in volume, light in weight, and convenient to carry
【Instrument has 5s automatic signal detection function, when you insert finger, timely will
automatically start;Automatic startup function instrument (applicable to Automatic startup
function instrument)】
Operation Instructions
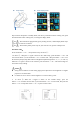
1. Install two AAA batteries into battery cassette before covering its cover.
2. Plug one finger into rubber hole of the Oximeter (it is best to plug the finger thoroughly) before
releasing the clamp with the nail upwards.
3. Press button on the front panel;
【Note: if equipped with automatic startup function refers to clamp oximeter, need not press
the button, the instrument has 5 s automatic signal detection function, directly inserted into
the finger, instrument is automatically switched on timely】
4. Don’t tremble your finger when the Oximeter is working. Your body is not recommended on
moving status.
5. Press the button on the front panel, if we want change display direction;
【Note: if equipped with gravity sensing function of instrument then don't press the button,
hand movements, the instrument with the gravity sensing has four corresponding
interface switch】
6. Read relevant datum from display screen.
7. The instrument has the function of sleep, no signal 8seconds will enter standby state of sleep;
8. Please replace new batteries when OLED indicates the batteries are in low power.
Note: When plugging your finger into the Oximeter, your nail surface must be upward.
Declaration: Please use the medical alcohol to clean the rubber before each test and clean the tested
finger with alcohol before and after the test. (The rubber inside of the Oximeter adopts medical
rubber, which has no toxin, no harm, and brings no side effect such as allergy to the our skin ).
Battery installation
1.According to the positive and negative identity right will be two AAA batteries into the battery
2. In the direction of the arrow at the bottom of the level of battery back cover.
Please note: pay attention to the battery positive and negative polarity, must be installed
correctly, otherwise it may cause damage to instrument.
Lanyard installation
1, Put the lanyard thin end through the hole.
2, Put the lanyard coarser end through its already wearing thin end part and tighten。
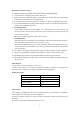
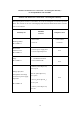
Brief Description of Front Panel