
User manual

X100 Series Main User Manual 103
INSTALL & CONNECT SETUP CONFIGURE RECORDING SOFTWARERECORDING SOFTWARE
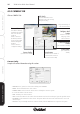
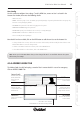
- DELETE button: Click to remove a camera including its settings from the system.
- EDIT button: Click this button to save any modifications made to the configuration in this section.
- CLEAR button: Click to clear all fields on the selected camera.
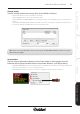
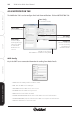
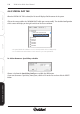
Search button
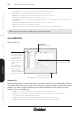
Click the SEARCH button to search for active IP cameras on the LAN. A popup window will open and
display all the cameras found in a list. Wait for the search to complete then use the mouse to tick the
cameras which need to be added to the system. Multiple IP cameras can be selected at once and then
later configured individually after they have been added to the Camera List.
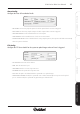
- SELECT ALL button: Auto select all the cameras in the list.
- CANCEL ALL button: Auto deselects all cameras in the list.
- OK button: Click to confirm the selection of IP cameras to add to the system.
- CANCEL button: Cancels all actions and closes the pop up window without saving any changes.
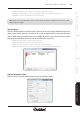
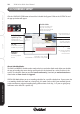
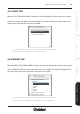
Camera Parameter button
Click the Camera Parameter button to open the pop up window as shown.
Note: Ensure you click the EDIT button after you have changed the Camera Config fields otherwise the system
will not save your settings.
X100 CAM1 192.168.0.56 00-0E-AE-A0-01-67 80
X100 CAM2 192.168.0.187 00-0E-AE-A0-01-4F 80
X100 CAM3 192.168.0.55 00-30-4F-A0-01-6B 80