
User manual


16 X100 Series Main User Manual
INSTALL & CONNECT SETUP CONFIGURERECORDING SOFTWARE
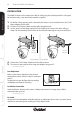
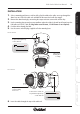
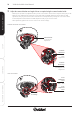
6. Adjust the camera direction and angle of view as required using the camera bracket inside.
- Make any lens (focus) adjustments using the manual Focus Ring after you have connected the camera and have
setup live viewing via your PC.
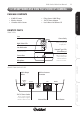
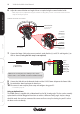
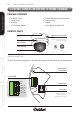
7. Connect the Power Cable to the correct terminals; attach Positive (+) to VCC12 and Negative (-) to
GND as shown (if using PoE this step is not required):
8. Connect the LAN cable to the Network Socket and the 12V DC Power Adaptor to the Power Cable.
9. Re-attached the dome housing to the dome base.
10. The camera is now ready for you to setup and configure using your PC.
- See SETUP on page 36.
Note: Incorrect wiring may cause damage to the camera.
Please ensure + and - terminal connections are fitted correctly.
+
-
VCC12
GND
DIGITAL_IN
ALARM_OUT
AUDIO_IN
AUDIO_OUT
AUDIO_GND
Power CablePower Adaptor
(to Mains Power)
INSTALL & CONNECT
CAMERA DIRECTION ADJUSTMENT
Focus Ring
Camera bracket
For Horizontal
Adjustment
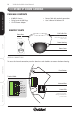
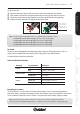
Using an Optional Lens
The X100D camera is supplied with a 4.0mm board lens for 50° viewing angle. The lens can be manually
replaced with an Xvision Megapixel Board Lens to achieve a different viewing angle. Any lens change
should be made after you have connected the camera and have set up live viewing via your PC so that
the focus can be set correctly.
Camera’s
Tilt bracket
Camera’s
Board hinge
For Vertical
Angle
Adjustment
For Horizontal
(Left/Right) Board
Adjustment