
User manual


X100 Series Main User Manual 21
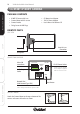
INSTALL & CONNECT SETUP CONFIGURE RECORDING SOFTWARE
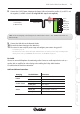
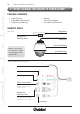
8. Connect the 12V DC Power Adaptor to the Power Cable and attach the positive (+) to VCC12 and
the negative (-) to GND as shown (if using POE this step is not required):
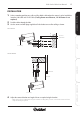
9. Connect the LAN cable to the Network Socket.
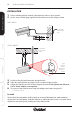
10. Re-attach the dome housing to the dome base.
11. The camera is now ready for you to setup and configure your camera using your PC.
- See SETUP on page 36.
- The Auto Iris lens on the camera will require calibration before use. After you have setup and configured the
camera, please ensure you CALIBRATE the Auto Iris lens. See AUTO IRIS on page 61.
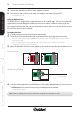
For Audio
Connect an external Microphone for monitoring audio. Connect an audio output device such as a
speaker with an amplifier for voice alerting or for enabling the 2 Way Audio function.
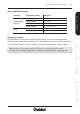
See table below for details on connection.
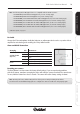
Audio and Alarm Connections
Grouping Terminal Name Connect to:
POWER
VCC12 Positive (+) Power Cable
GND Negative (-) Power Cable
ALARM SENSOR
DIGITAL_IN Alarm Sensor Input
ALARM_OUT Alarm Output
AUDIO
AUDIO_IN External Microphone / Audio Input
AUDIO_OUT External Speaker / Audio Out
AUDIO_GND Audio Ground
Note: Incorrect wiring may cause damage to the camera. Please ensure + and - terminal connections are
fitted correctly.
+
-
VCC12
GND
DIGITAL_IN
ALARM_OUT
AUDIO_IN
AUDIO_OUT
AUDIO_GND
Power CablePower Adaptor
(to Mains Power)
INSTALL & CONNECT