
User manual

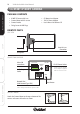

X100 Series Main User Manual 27
INSTALL & CONNECT SETUP CONFIGURE RECORDING SOFTWARE
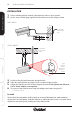
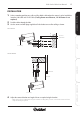
INSTALLATION
1. Select a mounting position on a wall or ceiling. Make a hole where the camera is to be installed to
insert the LAN cable and 12V DC Cable (if using Power over Ethernet, 12V DC Power is not
required).
2. Feed the cables through the hole.
3. Use the screws and wall plugs supplied to fix the bracket on a wall or ceiling as shown.
4. Adjust the camera direction and angle of view as required using the bracket.
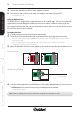
- Make any lens (focus) adjustments using the manual Focus Ring after you have connected the camera and have
setup live viewing via your PC.
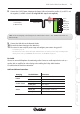
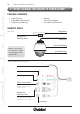
Focus Ring
To Power
To Network
Focus Ring
To Power
To Network
CEILING MOUNT
WALL MOUNT
INSTALL & CONNECT