VORTEX VOLT 8 QUICK-START USER GUIDE ANDROID 5.
PRECAUTIONS On the Road Using a device while driving is illegal in many countries. Please refrain from using your mobile while driving. Near Sensitive Electronics or Medical Equipment Don’t use your device near sensitive electronic equipment – particularly medical devices such as pacemakers – as it could cause them to malfunction. It can also interfere with the operation of fire detectors and other automatic-control equipment. While Flying Your device can cause interference with aircraft equipment.
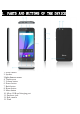
1. PARTS AND BUTTONS OF THE DEVICE 1 .Front camera 2. Speaker 3.light distance sensor 4. Touchscreen 5. Volume button 6. Power button 7. Back button 8. Home button 9. Menu button 10. Micro USB and charging port 11. Earphone jack 12. Rear camera 13.
14. Speaker 15. Microphone 2. TOUCH BUTTONS The button moves back one step to the previous menu/page. The button returns immediately to the main screen. The button displays a menu of recently opened applications. The button will launch the applications and settings menu. 3. GETTING STARTED Installing the micro-SIM Card and BatterySwitch off your phone before installing or replacing the battery or the micro-SIM card.
WARNING! To avoid damage to the phone, do not use any other kind of SIM card, or any non-standard micro-SIM card cut from a SIM card. You can get a standard micro-SIM card from your service provider. Insert the battery by aligning the metal contacts on the battery with themetal contacts in the battery compartment. Gently push down on the battery until it clicks into place. Align the back cover with the back of the phone and press the cover back into place.
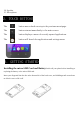
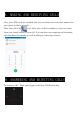
5.QUICK NOTIFICATION PANEL When you receive a notification you can quickly view it by following the below instructions. Slide your finger from the top of the screen down to the center to access Notification Panel to see your notifications. Drag the notification menu down to display the second fast access menu, the menu will look similar to the below image.
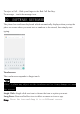
Through this menu, it is possible to modify the functions such as brightness, auto rotation, Wi-Fi, Bluetooth and more. 6. SETTINGS MENU The settings menu allows you to adjust Tablet cellphone System Configuration. To Change Settings: 1. Touch the “Settings” menu icon on the Application menu. The Settings menu will open. 2. Touch a category title to view further options on the right side of the screen.
• Accounts – Add or remove email and Google accounts such as Gmail, Google • Language and input Select language – add to the dictionary, edit on-screen keyboard settings, vocal search, etc. • Backup and reset – Backup and restore data, perform factory reset, etc. • Date and time – Set date, time zone, time, clock format etc. • Accessibility – Set up large text, auto-rotate screen, speak password etc. • About Phone – Displays information about your phone 7. INSERTING/REMOVING SIM CAEDS 1.
8. MAKING AND RECEIVING CALLS Once your SIM cards are installed turn on your phone and wait a few minutes for your phone to find a network. Then select the Call icon. Here you can dial a number or select a contact from your stored contacts list to call. You can also view outgoing and incoming calls that have been made, as well as adding or removing contacts. 9. ANSWERING AND REJECTING CALLS To answer a call – Slide your finger to the blue Call Answer key.
To reject a Call – Slide your finger to the Red Call End key. To message – touch the message icon. 10. SOFTWARE KEYBOARD The phone has a software keyboard which automatically displays when you tap the place on screen where you want text or numbers to be entered, then simply start typing. Touchscreen The touchscreen responds to finger touch. Note: • Don’t place any object on the touchscreen for it may damage or crush the screen. Single Click: Single click one icon to choose the icon or option you want.
. HOW TO CONNECT TO A COMPUTER Note: • Turn on your phone before connecting the phone to a PC by USB cable. 1. Use a USB cable to connect the phone with a computer. The phone will automatically detect a USB connection. 2. A notification will pop up on the screen displaying USB connected, select the desired USB operation. 3. The USB connection has been successful. 12. CONNECTION TO INTERNET Wireless: 1. Select “Settings”. 2. Select “Wi-Fi” and slide OFF to ON status. 3.
13. MOBILE DATA AND INTERNET Please Note: Cell Data may be turned “OFF” as a factory setting, to allow data to flow through your network provider please turn Cell Data “ON” either from your quick drop down menu or in > Settings > Cell Data, you will not be able to access the Internet when Cell Data is “OFF” and not connected to Wi-Fi. NB: Mobile Data charges apply when this setting is “ON” – Data will be passed through your network provider. Web Browsing Connect to the Internet and launch the browser.
14.BLUETOOTH Select “Settings”, select Bluetooth from “OFF” to “ON”. Search for the device you would like to pair with and select “PAIR”. You will see a message “Connected Successfully”. 15. CAMERA Touch the icon to enter camera mode and the interface is shown as follows: 1. Touch the icon to take a photo. 2. Touch the icon to start camera recording. 3.
share or set it as a wallpaper. Click the return button to exit camera interface. 4. Touch the icon to switch from front to back camera. 16.TROUBLE SHOOTING How to Close Applications When an application is not responding you can manually shut the app down in “Running Services” menu. This will ensure the system responds as desired. Please shut down all idle applications to release memory and get the system speed back to normal.
down. 2. Press the reset button located under the power button with a sharp object and the device will be forced to restart. Restore Default Setting If you want to reset the phone to factory settings and erase all materials, please press Settings Backup and reset Factory data reset. WARNING: actory Data Reset setting will delete ALL your data and system confi guration as well as any downloaded apps. Please use this function carefully.
SPECIFICATIONS CPU/PCB SOLUTION: Quad-core MTK 6580 DISPLAY: 5''FWVGA(480*854)TN Capacitive SIM CARD SUPPORT: SINGLE SIM RAM: 512M ROM: 8G 2G/GPRS/WAP/EDGE: 850/900/1800/1900MHz 3G: 1900/850 WI-FI: YES/802.11b/g/n FRONT CAMERA: 0.3MP REAR CAMERA: 2MP FM RADIO: YES BLUETOOTH: Version 4.0 GPS: YES TF CARD SUPPORT: Up to 32GB - Not Included CHARGER: DC 5V-1A USB: 5PIN Micro USB AUDIO JACK: 3.5mm 4ends;support iphone headset BATTERY CAPACITY(mAH): 2000 mAh OS: ANDROID 5.
FCC RF EXPOSURE INFORMATION: WARNING!! Read this information before using your phone In August 1986 the Federal Communications Commission (FCC) of the United States with its action in Report and Outer FCC 96-326 adopted an updated safety standard for human exposure to radio frequency (RF) electromagnetic energy emitted by FCC regulated transmitters. Those guidelines are consistent with the safety standard previously set by both U.S. and international standards bodies.
NORMAL POSITION: Hold the phone as you would any other telephone with the antenna pointed up and over your shoulder. RF Exposure Information: This product is compliance to FCC RF Exposure requirements and refers to FCC website https://apps.fcc.gov/oetcf/eas/reports/GenericSearch.cfm search for FCC ID: 2ADLJ-VOLT8 to gain further information include SAR Values. This device complies with part 15 of the FCC rules.