User's Guide Heavy Duty Datalogger Module Model 380340
Warranty EXTECH INSTRUMENTS CORPORATION warrants this instrument to be free of defects in parts and workmanship for one year from date of shipment (a six month limited warranty applies on sensors and cables). If it should become necessary to return the instrument for service during or beyond the warranty period, contact the Customer Service Department at (781) 890-7440 ext. 210 for authorization or visit our website at www.extech.
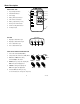
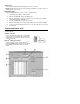
Meter Description 1 FRONT PANEL VIEW 1. Input / Output terminals 2. PAUSE LED indicator 3. LCD Display 4. Battery LED status indicator 5. Slide switches and buttons 6. Battery compartment (on rear) 7. Memory FULL LED indicator 8. DATA recording LED indicator 9. AC adaptor input 7 2 3 8 4 5 9 6 FRONT PANEL VIEW TOP VIEW 1. Optically isolated INPUT jack 2. Optically isolated OUTPUT jack 3. Non-isolated INPUT jack 4.
Datalogger Operation Note: The Heavy Duty Meters have an Auto-Shutoff feature that automatically turns off the meter (after 10 to 30 minutes depending on the model). This feature should be disabled during a datalogging session. Press the ‘RECORD’ button on the meter to disable the AutoShutoff feature. Automated Datalogging Preparation This function permits the Datalogger to automatically collect readings at the sample rate set by the user. 1.
FULL Indicator The FULL indicator lights when 7999 data points have been recorded. NOTE: Data will remain in memory until the Datalogger is RESET (see previous section) or until the batteries are removed. Manual Datalogging Manual datalogging allows the user to record one reading at a time. 1. Turn the Datalogger OFF (‘0’ switch position). 2. Slide the Auto/Man/Out switch to the MAN position. 3. Power the Datalogger (‘I’ position).
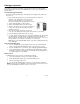
Software Screen Description 1. 2. 3. 4. 5. 6. 7. COM Port Selection (Click on appropriate port, COM1 or COM2) Data Transfer Status Transferred Data View Data File Name (type desired filename) Number of Data points Instructional steps describing the data transfer process (additional steps are listed in the next section).